The following is a list of “good to know” legislative acts.
Acronym
Name
Notes
CFAA
Computer Fraud and Abuse Act
First major cyber crime legislation
Federal Sentencing Guidelines (1991)
Responsibility on senior management
ECPA
Electronic Communications Privacy Act of 1986
Made it a crime to invade the electronic privacy of an individual
CALEA
Comm Assistance for Law Enforcement Act of 1994
Amended ECPA. Made wiretaps possible for law enforcement with a court order.
Economic Espionage Act of 1996
Made theft no longer tied to something physical
FISMA
Federal Information Security Management Act
Cyber security requirements for government agencies
DMCA
Digital Millennium Copyright Act
Copyright protection is 70 years + 1st major revision added CD/DVD protections
USA PATRIOT
USA PATRIOT Act of 2001
Gave law enforcement and intelligence agencies broader wiretapping authorizations
Identity Theft and Assumption Deterrence Act (1998)
Made identity theft a crime. Up to 15 years in prison and $250,000 fine.
HIPPA
Health Insurance Portability and Accountability Act (1996)
Regulations for security measures for hospitals, physicians, and insurance companies
HITEC
Health Information Technology for Economic and Clinical Health Act of 2009
Amended HIPPA. Updated privacy/security requirements for Business Associates (BAs), requires a written contract known as a business associate agreement (BAA). BAs are directly subject to HIPPA and enforcement actions like a covered entity. HITECH also introduced new data breach notifications.
GLBA
Gramm-Leach-Bliley Act
Limits services that banks, lenders, and insurance agencies can provide and information they can share with each other
COPPA
Child Online Privacy Protection Act
Seeks to protects children (<13 years old) online
FERPA
Family Educational Rights and Privacy Act
Gives students certain privacy rights. Deals with adults >18, and Children in school <18
ITAR
International Traffic in Arms Regulation
Regulates the export of military and defense related technologies
EAR
Export Administration Regulations
For commercial use, but may have military applications.
Table of Laws and Acts
Trademark, Patents, Copyright etc.
Name
Protection Length
Trademarks
10 Years
Patents
20 Years
Copyright
70 Years after the death of the author
Trade Secrets
Until they are leaked.
Table of Trademarks, Patents, Copyright, and Trade Secrets
-w is watch path -k is a filter key we can use later to search through logs
Now we can search with ausearch
ausearch -k password
Using Preconfigured Rules
There are already some preconfigured rules in /usr/share/audit/sample-rules/
We can copy those to /etc/auditd/rules.d/ and use them.
cd /usr/share/audit/sample-rules/
cp 10-base-config.rules 30-stig.rules 31-privileged.rules 99-finalize.rules /etc/audit/rules.d/
augenrules --load
Note on the 31-privileged.rules file. You’ll need to run the commands in the file which will create a new file. Then we can copy that to “/etc/auditd/rules.d/”
We’ll create a tunnel between two Mikrotik RouterOS routers. Once we have the tunnel connected, we can then route traffic between them.
Note: You can add Preshared keys, but we don’t cover that in this post, just to keep things simple. Check out the following post if you want to add Preshared keys.
Here is how we will want our routers set up. The WireGuard PtP IP is the IP addresses used on both ends of the tunnel. The WAN IP is the IP of each Router. Local IP on Host B is setup to distribute DHCP.
Host A
WAN IP: 172.16.0.1 WireGuard PtP IP: 10.1.1.1/30
Host B
WAN IP: 10.0.0.2 WireGuard PtP IP: 10.1.1.2/30 Local IP: 192.168.0.1/24
We need Host A to be able to access Private IP’s (192.168.0.0/24) behind Host B.
We’ll pretend that the 172.16.0.1 address is a public IP, and Host B, is behind some sort of NAT network.
To create the Point-to-point, or PtP, we will create a WireGuard VPN tunnel, and then add routes from Host A to Host B.
For each Mikrotik we need to create a WireGuard interface, and then a peer. One of the peers needs a keep alive if we are behind a NAT.
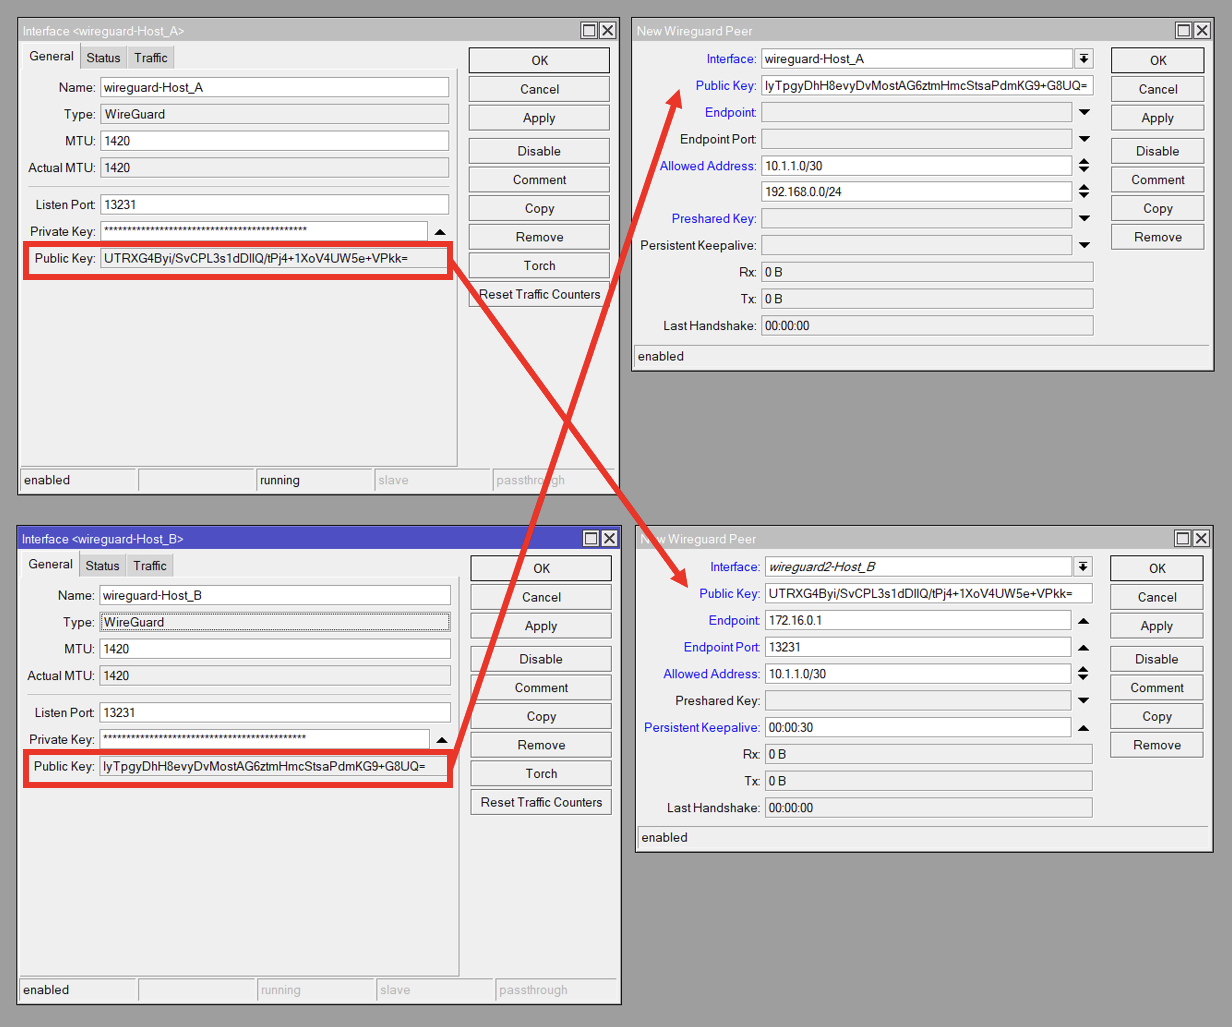
Wireguard Setup Overview
Here is an overview screenshot of what our WireGuard settings will look like. Host A is on top, and Host B on the bottom. On the left are the WireGuard interfaces, and the right contains the Peers.
We copy the Public Key from the remote WireGuard interface, to the Public Key on the local Peer. I.e. The Host_B Peer contains Host_A’s Interface Public Key and vice verse
Host A
If you want to, you can use the WinBox GUI to setup and configure the router.
In the Allowed Addresses, put 10.1.1.0/30 and 192.168.0.0/24*.
Finally, put in the Public Key from Host B. Note that we can’t do this until we create the WireGuard Interface on Host B, so you’ll need to come back for this step.
*The Allowed Address sets which addresses work on the other side of the tunnel. If we don’t specify 192.168.0.0/24, then we won’t be able to route to those addresses. If we don’t add 10.1.1.0/30, then our tunnel won’t work at all. Since we only need to route to the 192.168.0.0/24 network from the Host A side, we don’t need this IP range on Host B.
That should be it. Verify that there is a connection. From Host A, ping 192.168.0.1 or any other remote device.
Troubleshooting
Unfortunately, there appear to be some wonky bugs with WireGuard on RouterOS. It does appear to be getting better, but here are a couple things to check if the tunnel is not connecting.
Verify that the Firewall is not blocking WireGuard. You can allow the WireGuard port in the Firewall.
Try disabling and re-enabling the Interfaces and/or Peers
Verify that all the routes for the PtP are in /ip/routes. If not, try manually adding the route (10.1.1.0/30) on the WireGuard interface on both routers.
Add a keep alive if a router is behind a firewall/NAT.
Reboot and or Upgrade the RouterOS version and firmware.
Note: running /user/add will prompt you for the rest of the options.
Delete the default admin user with
/user remove admin
We want to delete the default admin user for two reasons. 1. There is no default password for this user. 2. It is a default username which means it will be targeted for brute force attacks.
Consider using the /users/groups for more granular control.
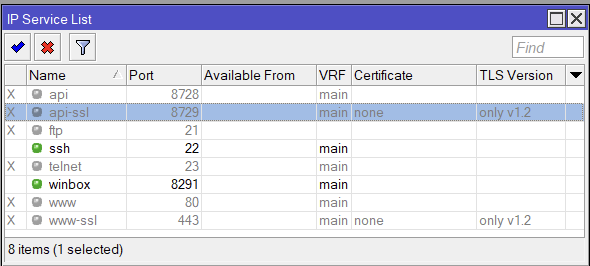
Disable unused services
In the following, we disabled all services except SSH and Winbox. We also limit access to those services only from private “RFC 1918” IP addresses. Customize as needed.
/ip service
set telnet disabled=yes
set ftp disabled=yes
set www disabled=yes
set www-ssl tls-version=only-1.2
set ssh address="set winbox address="192.168.0.0/16,172.16.0.0/12,10.0.0.0/8"
set api disabled=yes
set winbox address="set winbox address="192.168.0.0/16,172.16.0.0/12,10.0.0.0/8"
set api-ssl disabled=yes tls-version=only-1.2
for www-ssl and api-ssl, tls-version is not a required argument, but you may consider using it if you need the API or Webfig.
Recently ran across some AirGateway configs that had an extra user account on them. Typically on most Ubiquiti AirMax and AirGateway equipment, there are two user accounts that show up in the config.
users.1.* which is the admin user.
users.2.* which is the read only user. Disabled by default
A cool trick we can do is add users in the config i.e. (users.3, users.4 etc.)
So what do you do when you see a third user showing up that you didn’t put there?!
The username was the MAC address of the device and the password field is a DES(Unix) hash of what appears to be an 8 character randomly generated upper and lower case password.
Older AirOS versions only let a user select a password up to 8 characters long. You could create a longer one and log in via SSH, but you wouldn’t be able to log into the web interface.
Identifying Access
So how did these get on here in the first place?
I am guessing that the users were created at some point while trying to adopt them to UNMS/UISP before there was firmware that supported it. The user name is the actual MAC address of the device and the passwords do seem to be randomly generated. There do not appear to be any major differences between the support files from a normal AirGateway and a suspicious AirGateway.
Also appears to only affects AirGateways which were the only devices that had issues in the past connecting to UNMS/UISP. The rest of the AirMax equipment uses very similar firmware so if there was a security issue, it should have affected all the devices.
The hashing type “DES(Unix)” does not appear to be used anymore, being replaced with MD5 Crypt. So this does appear to have happened awhile ago.
the -1?l?u let’s us specify a custom character list made up of -l and -u. Lower and Upper case letters. –session airgateway will record a checkpoint ever so often. So if our run gets interrupted, we can restore the session with
./hashcat.bin --session airgateway --restore
Remediation
Fortunately, remediation is fairly simple.
SSH into the affected device and open up the config file
vi /tmp/system.cfg
Find the lines that start with “users.3.”, delete them, and save the file
Run the following command to save the changes.
/usr/etc/rc.d/rc.softrestart save
If you are not comfortable with the command line, then you can, through the web gui, download a backup, edit the backup file in a text editor, then upload/restore the backup.
Other notes
Something else you may run across is a mcuser that shows up in /etc/passwd. This is typically a user used for AirControl, so if you have used AirControl in the past that is most likely why it is there. Check out the following article to remove the user.
This is because a Wireguard preshared key needs to be 256bit (32 byte) base64 encoded key. We have a couple different ways we can generate the correct format.
1. Use Openssl to generate a random 32 byte password
openssl rand 32 | base64
2. Create a 31 character password and base64 encode it