Simple method to Encrypt/Decrypt Zip files on Windows

Unfortunately, encrypting a file on Windows with a simple password is not super simple. While Windows does now support other compression formats (RAR, 7-Zip) it does not support encryption for them.

Currently, Windows natively supports the ZipCrypto algorithm. No AES. Note that the ZipCrypto algorithm is not considered secure, and shouldn’t be used for highly confidential data.

The following method, you will need 7-Zip to create the archive, but you won’t need it for decryption as Windows has built in support for ZipCrypto decryption.

To create the archive, you will need 7-Zip installed. Right click on your file/folder -> 7-Zip -> Add to Archive.

You should be presented with a similar window.

Change Archive format to zip
Enter the password
Ensure that the Encryption method is ZipCrypto
Hit OK to create the Archive.

You can now transfer the password protected archive to a new machine. You’ll be prompted for the password when you extract the archive.

How to Add a User from Windows Command Prompt

Adding a user from a Windows command prompt is easy. We can use the net user command. Specify the username and password, append a /ADD and we are off to the races.

net user username password /ADD

Example Command.

net user incredigeek mysecurepassword /ADD

https://www.windows-commandline.com/add-user-from-command-line/

Wireshark – Please turn off promiscuous mode for this device

Recently received the following error while trying to do a packet capture on windows.

There are two solutions to this problem

  1. Disable promiscuous mode for the adapter
  2. Update Npcap

Disable Promiscuous mode

“Please turn off promiscuous mode for this device”

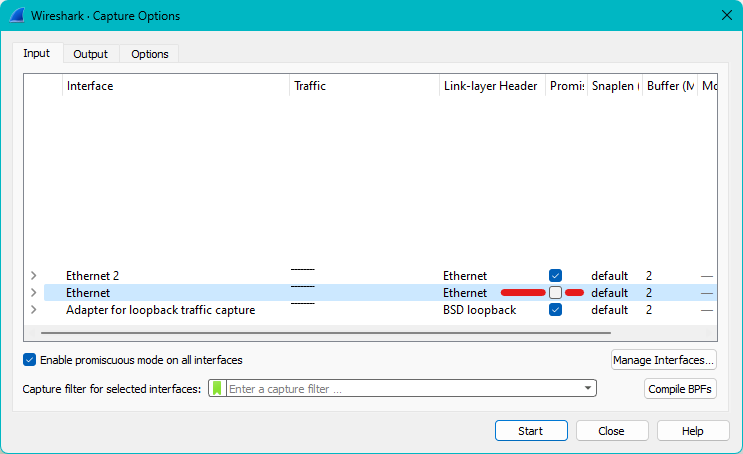
You can turn on promiscuous mode by going to Capture -> Options

Uncheck promiscuous

And click Start

Update Npcap

If you need promiscuous mode on, then look at installing a newer version of Npcap

https://npcap.com/dist/

Restart Wireshark, and Start a capture.

https://ask.wireshark.org/question/30138/please-turn-off-promiscuous-mode-for-this-device/

Making RDP Faster (60FPS)

https://learn.microsoft.com/en-us/troubleshoot/windows-server/remote/frame-rate-limited-to-30-fps

On RDP Server, Open up Registry Editor as administrator

Go to

HKEY_LOCAL_MACHINE\SYSTEM\CurrentControlSet\Control\Terminal Server\WinStations

Add a new DWORD

Set the name to DWMFRAMEINTERVAL

Set the Value to 15, and base Decimal.

Apply and reboot.

You may also want to look at enabling the following options in Group Policy Editor

Computer Configuration > Policies > Administrative Template > Windows Components > Remote Desktop Session Host > Connections > Select RDP transport Protocols > Use both TCP and UDP

Computer Configuration > Policies > Administrative Template > Windows Components > Remote Desktop Session Host > Connections > Remote Session Environment > Use hardware graphics adapters for all Rmote Desktop Services sessions

https://github.com/maxprehl/TurboRemoteFX
https://www.reddit.com/r/sysadmin/comments/fv7d12/pushing_remote_fx_to_its_limits/

Setting up Databricks Dolly on Windows with GPU

The total process can take awhile to setup Dolly. You’ll need a good internet connection and around 50GB of hard drive space.

Install Nvidia CUDA Toolkit

You’ll need to install the CUDA Toolkit to take advantage of the GPU. The GPU is much faster than just using the CPU.

https://developer.nvidia.com/cuda-downloads

Install Git

Install git from the following site.

https://git-scm.com/downloads

Download Dolly

Download Dolly with git.

git lfs install 
git clone https://huggingface.co/databricks/dolly-v2-12b

Install Python

We’ll also need Python installed if it is not already.
https://www.python.org/downloads/release/

Next we’ll need the following installed

py.exe -m pip install numpy
py.exe -m pip install accelerate>=0.12.0 transformers[torch]==4.25.1
py.exe -m pip install numpy --pre torch --force-reinstall --index-url https://download.pytorch.org/whl/nightly/cu117 --user

The last one is needed to get Dolly to utilize a GPU.

Run Dolly

Run a python console. If you run it as administrator, it should be faster.

py.exe

Run the following commands to set up Dolly.

import torch
from transformers import pipeline

generate_text = pipeline(model="databricks/dolly-v2-3b", torch_dtype=torch.bfloat16, trust_remote_code=True, device_map="auto")

# Or to use the full model run

generate_text = pipeline(model="databricks/dolly-v2-12b", torch_dtype=torch.bfloat16, trust_remote_code=True, device_map="auto")

Note: if you have issues, you may want/need to specify an offload folder with offload_folder=”.\offloadfolder”. An SSD is preferable.
Also if you have lots of RAM, you can take out the “torch_dtype=torch.bfloat16”

Alternatively, if we don’t want to trust_remote_code, we can do run the following

from instruct_pipeline import InstructionTextGenerationPipeline
from transformers import AutoModelForCausalLM, AutoTokenizer

tokenizer = AutoTokenizer.from_pretrained("databricks/dolly-v2-3b", padding_side="left")
model = AutoModelForCausalLM.from_pretrained("databricks/dolly-v2-3b", device_map="auto")

generate_text = InstructionTextGenerationPipeline(model=model, tokenizer=tokenizer)

Now can ask Dolly a question.

generate_text("Your question?")

Example:

>>> generate_text("Tell me about Databricks dolly-v2-3b?")
'Dolly is the fully managed open-source engine that allows you to rapidly build, test, and deploy machine learning models, all on your own infrastructure.'

Further information is available at the following two links.

https://github.com/databrickslabs/dolly
https://huggingface.co/databricks/dolly-v2-3b

How to Disable Windows Suggestions when copying text

Windows 11 introduced “Suggested Actions”. When you copy a date, time, or phone number, you will get this little pop up asking if you want to “Create event” or “Call number”.

While this can be helpful, it can also be slightly annoying and get in the way. Fortunately, there is a simple way to turn it off. Hit the little down arrow, then click “Go to clipboard settings”

Once in the System settings, turn “Suggested actions” off.

Enable TLS 1.1 and 1.2 on Windows 7

Windows 7 does not support TLS 1.1 or 1.2 by default. This can be an issue if you are still trying to use Outlook 2010 on Windows 7.

Fortunately there is a way that we can enable TLS 1.1 and 1.2.

First we need to verify that we have the correct Windows update in place. Download the appropriate download and double click it to run.

For 64 bit systems download the update from here

http://download.windowsupdate.com/c/msdownload/update/software/updt/2016/04/windows6.1-kb3140245-x64_5b067ffb69a94a6e5f9da89ce88c658e52a0dec0.msu

or for 32 bit systems

http://download.windowsupdate.com/c/msdownload/update/software/updt/2016/04/windows6.1-kb3140245-x86_cdafb409afbe28db07e2254f40047774a0654f18.msu

After the update is finished, create a new text file (AKA PowerShell Script) with the following contents.

$arch=(Get-WmiObject -Class Win32_operatingsystem).Osarchitecture
$reg32bWinHttp = "HKLM:\SOFTWARE\Microsoft\Windows\CurrentVersion\Internet Settings\WinHttp"
$reg64bWinHttp = "HKLM:\SOFTWARE\Wow6432Node\Microsoft\Windows\CurrentVersion\Internet Settings\WinHttp"
$regWinHttpDefault = "DefaultSecureProtocols"
$regWinHttpValue = "0x00000a00"
$regTLS11 = "HKLM:\SYSTEM\CurrentControlSet\Control\SecurityProviders\SCHANNEL\Protocols\TLS 1.1\Client"
$regTLS12 = "HKLM:SYSTEM\CurrentControlSet\Control\SecurityProviders\SCHANNEL\Protocols\TLS 1.2\Client"
$regTLSDefault = "DisabledByDefault"
$regTLSValue = "0x00000000"

Clear-Host
Write-Output "Creating Registry Keys...`n"
Write-Output "Creating registry key $reg32bWinHttp\$regWinHttpDefault with value $regWinHttpValue"

IF(!(Test-Path $reg32bWinHttp)) {
    New-Item -Path $reg32bWinHttp -Force | Out-Null
    New-ItemProperty -Path $reg32bWinHttp -Name $regWinHttpDefault -Value $regWinHttpValue -PropertyType DWORD -Force | Out-Null
}
ELSE {
    New-ItemProperty -Path $reg32bWinHttp -Name $regWinHttpDefault -Value $regWinHttpValue -PropertyType DWORD -Force | Out-Null
}

IF($arch -eq "64-bit") {
    Write-Output "Creating registry key $reg64bWinHttp\$regWinHttpDefault with value $regWinHttpValue"
    IF(!(Test-Path $reg64bWinHttp)) {
        New-Item -Path $reg64bWinHttp -Force | Out-Null
        New-ItemProperty -Path $reg64bWinHttp -Name $regWinHttpDefault -Value $regWinHttpValue -PropertyType DWORD -Force | Out-Null
    }
    ELSE {
        New-ItemProperty -Path $reg64bWinHttp -Name $regWinHttpDefault -Value $regWinHttpValue -PropertyType DWORD -Force | Out-Null
    }
}

Write-Output "Creating registry key $regTLS11\$regTLSDefault with value $regTLSValue"

IF(!(Test-Path $regTLS11)) {
    New-Item -Path $regTLS11 -Force | Out-Null
    New-ItemProperty -Path $regTLS11 -Name $regTLSDefault -Value $regTLSValue -PropertyType DWORD -Force | Out-Null
    }
ELSE {
    New-ItemProperty -Path $regTLS11 -Name $regTLSDefault -Value $regTLSValue -PropertyType DWORD -Force | Out-Null
}

Write-Output "Creating registry key $regTLS12\$regTLSDefault with value $regTLSValue"

IF(!(Test-Path $regTLS12)) {
    New-Item -Path $regTLS12 -Force | Out-Null
    New-ItemProperty -Path $regTLS12 -Name $regTLSDefault -Value $regTLSValue -PropertyType DWORD -Force | Out-Null
    }
ELSE {
    New-ItemProperty -Path $regTLS12 -Name $regTLSDefault -Value $regTLSValue -PropertyType DWORD -Force | Out-Null
}

Write-Output "`nComplete!"

Save the file as “tls-reg-edit.ps1”

If saving it using notepad, change Save as type: All files (*.*)

Open a PowerShell. Change directories “cd” to the location you saved the above script to. ie. cd Downloads

Run the script with the follow command. Note you will most likely need to hit Y to allow the scripts to run.

Set-ExecutionPolicy Bypass -Scope Process ; .\tls-reg-edit.ps1

After the script runs, you’ll need to reboot your computer.

The script and information was taken from the following link. Thanks cPanel!

https://docs.cpanel.net/knowledge-base/security/how-to-configure-microsoft-windows-7-to-use-tls-version-1.2/

There is also more information at the following Microsoft link.

https://support.microsoft.com/en-us/topic/update-to-enable-tls-1-1-and-tls-1-2-as-default-secure-protocols-in-winhttp-in-windows-c4bd73d2-31d7-761e-0178-11268bb10392

How to Bypass the Windows 11 “Let’s connect you to a network” Screen

Windows 11 seemingly will not let you finish the setup process unless you are connected to a network. Fortunately there is an easy way to side step this issue.

When you get to the “Let’s connect you to a network screen”

Hit the Shift + F10 keys to launch a command prompt

From here, there are two ways we can disable or skip the network setup.

1. Run the OOBE Command

https://www.makeuseof.com/windows-11-set-up-without-internet-connection/

Type OOBE\BYPASSNRO and hit enter. The computer should now reboot and it will give you an option to skip the network setup.

OOBE\BYPASSNRO

2. Kill the Network Connection Flow from Task Manager

https://www.elevenforum.com/t/how-to-bypass-network-connection-during-clean-install-of-windows-11.2647/

Type in “taskmgr.exe” to launch the Task Manager

Find the Network Connection Flow service, select, and End task

It should now skip the network page and go to the License Agreement and let you finish setting up your computer.

The acropalypse Vulnerability

First what is acropalypse?

Acropalypse is a vulnerability in Google’s markup editor (and Windows Snipping Tool). It allows an attacker to recover parts of a cropped or marked up image.

https://en.wikipedia.org/wiki/ACropalypse

There are a couple specific steps you have to follow for the bug to happen.

  1. Take a screenshot
  2. Save screenshot
  3. Crop or markup screenshot in Google Markup or the Windows Snipping Tool
  4. Save screenshot with the same name as original screenshot

The bug is when you save the cropped screenshot with the same name, it overwrites the original file, but the markup tools are not resizing or truncating the file. Meaning that there is extra data in the screenshot.

For example in the following two screenshots, notice the size and dimensions

Here is the first screenshot

The second screenshot shows smaller dimensions because it was cropped, but the size is still the same.

Am I affected?

Potentially. Most images are reprocessed if they are being uploaded to a web service. Discord only started doing that in January. So if you have images on Discord before then, you may want to look into that.

You also have to specifically overwrite the original screenshot image. If you don’t normally save the image first you may be fine. Never hurts to check though.

https://acropalypse.app/

Is macOS or iOS affected?

macOS and so presumably iOS, appear to properly resize the image after cropping has taken place. That would lead me to suspect that iOS and macOS devices are not vulnerable to a variant of apocalypse.

Twitter Post about acropalypse.

VirtualBox – Failed to acquire the VirtualBox COM object.

VirtualBox failed to acquire the VirtualBox COM object.

Under the Details it was complaining about VirtualBox.xml

Looking in Windows Explorer in the .VirtualBox folder

C:\Users\Username\.VirtualBox

it shows that the VirtualBox.xml file being empty. Delete the file. Reinstall VirtualBox. Now go to your VM’s in

C:\Users\Username\VirtualBox VMs

Open up the VM folder and double click on the “Virtual Machine Definition” file to “reimport” them into VirtualBox.