Most configuration changes to Ubiquiti radios can be done on the command line by modifing them in /tmp/system.cfg and then applying the configuration. The device password is a little more complicated. The password is in the system.cfg config file, but it is hashed. To change the password, we must change the password via ssh, then update the config password hash to match the hash in /etc/passwd.
We’ll cover two ways to update the password for a Ubiquiti radio. The first method uses the UBNTMOD script. The second shows a more hands on approach.
Method 1: Using the UBNTMOD script.
Download the UBNTMOD script and make it executable.
wget http://incredigeek.com/home/downloads/ubntmod/ubntmod.sh
chmod u+x ubntmod.sh
./ubntmod.sh -y 'ubnt,ubnt' -p 'newpassword' -i 192.168.1.20 -z
-y is the current username and password pair
-p is the new password
-i is the radio IP
-z saves the changes without rebooting.
Method 2: Changing password over SSH
To change the password we need to:
- SSH to the radio
- Change the current password with
passwd - Copy the hash from
/etc/passwdto/tmp/system.cfg - Save changes with
/usr/etc/rc.d/rc.softrestart save
SSH into radio
ssh ubnt@192.168.1.20Change the Password with passwd
passwd is the default utility to change the password for a user. Simply run passwd and follow the prompts
Example:
XW.v6.1.12# passwd
Changing password for ubnt
New password: <-- Enter password here
Retype password: <-- Reenter password here
Password for ubnt changed by ubnt
XW.v6.1.12#
ℹ️Once you change the password with passwd, the password will change, but it wont be permanently saved until we copy the hash and then apply the change.
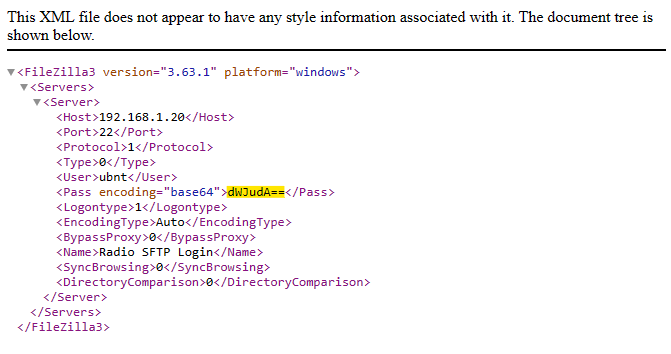
Copy Password hash to system.cfg
We can get the new password hash with
cat /etc/passwdExample output:
admin:$1$QESek5FH$FUPpzbPbAvf0NUbYyJMj21:0:0:Administrator:/etc/persistent:/bin/shThe section between the first and second colon, i.e., the two dots, “:”, is our hashed password. This is what we need to copy into the system.cfg config.
Edit the config file
vi /tmp/system.cfgFind the line that starts with users.1.password= and replace everything after the equals sign with our new hash. For example:
users.1.password=$1$QESek5FH$FUPpzbPbAvf0NUbYyJMj21ℹ️VI can be a little tricky to deal with, you can hit i, to enter insert mode, delete everything after the =, and then right click with your mouse to paste in the password hash.
Apply the new Password Permanently
Save the changes with /usr/etc/rc.d/rc.softrestart save command.
XW.v6.1.12# /usr/etc/rc.d/rc.softrestart save
--- /tmp/.running.cfg.919
+++ /tmp/.system.cfg.919
@@ -81,7 +81,7 @@
 system.cfg.version=65546
 system.eirp.status=disabled
 users.1.name=ubnt
-users.1.password=$1$5FJMj2H$FbkP6UAb8yvfES0NUbPpzbQ <- Old Password Hash
+users.1.password=$1$QESek5FH$FUPpzbPbAvf0NUbYyJMj21 <- New Password Hash
 users.1.status=enabled
 users.status=enabled
 wireless.1.addmtikie=enabled
Fast users script build Success.
Fixup Startup_list …Done.
XW.v6.1.12#
ℹ️Your existing ssh connection should stay connected which can be handy if something did not work correctly. Launch another terminal, or log in the web interface, to verify that the new password works.