The testing methodology was practically the same as our LineageOS test.
Testing methodology.
- A Computer was used as a Hotspot running both Network Miner 2.8 and Wireshark to log all network request
- Pixel 5 was installed with the latest version of GrapheneOS (August 2023)
- Setup was completed without connecting to WiFi or a cellular network
- There was no SIM card in while installing, setting up, or testing
- After setup was complete, WiFi was connected to the computer running the Hotspot
- After a base line was logged, we turned on GPS
Screenshot of Wireshark with DNS filter.
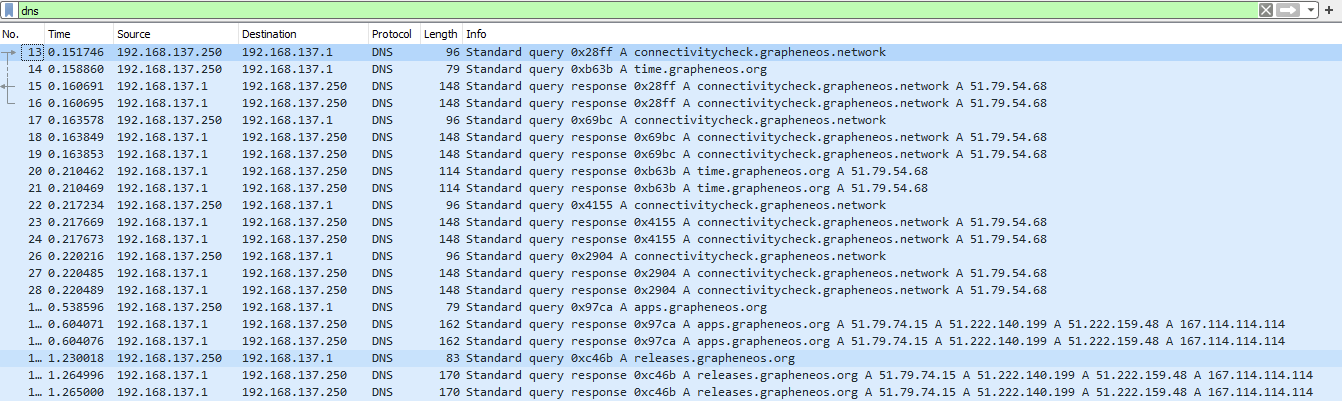
- connectivitycheck.grapheneos.network
- time.grapheneos.org
- apps.grapheneos.org
- releases.grapheneos.org
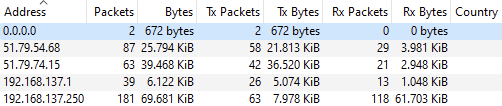
Total bandwidth sent and received for each IP
Some of the IP’s are used for different services. For instance the apps and releases sub domains use the same IP address.
- connectivitycheck.grapheneos.network and time.grapheneos.org – 25.794 KiB
- apps.grapheneos.org and releases.grapheneos.org – 39.468 KiB
- Total – 65.262 KiB
Turning on GPS
After turning on the GPS toggle, there was a DNS query for
qualcomm.psds.grapheneos.org

This will download the files needed to speed up the GPS speed and accuracy. You can turn this off in the Settings -> Location -> Predicted Satellite Data Service (PSDS)
You can also enable/disable the Secure User Plan Location (SUPL)
You can read more about PSDS and SUPL on the GrapheneOS website https://grapheneos.org/faq#other-connections