Bulk Update SNMP v3 Settings for Devices in LibreNMS

With support for DES being dropped, you may be faced with having to upgrade device settings to AES. In this post we’ll explore changing the settings in LibreNMS for all Mikrotik devices and then touch on making changes to a group of Mikrotik devices.

Upgrading SNMP Settings for Devices in LibreNMS

In LibreNMS, we can go to Device -> Device Settings (Gear on the right hand side) -> SNMP, to set the SNMP settings for that device.

Since this would get rather boring to change on multiple devices, and these settings are all in a MySQL database, we can skip using the mouse and use a few MySQL commands to update multiple devices at once.

Log into the LibreNMS server over ssh and then connect to the MySQL database

mysql -u librenms -p librenms

First we can get a list of all the devices (Mikrotik routers in this example) and show the hostname with the SNMP authentication and cryptography algorithms.

select hostname,authalgo,cryptoalgo from devices where os="routeros";

Now if we want to update the cryptography settings for all of our Mikorotik devices, we can do the following.

update devices cryptoalgo set cryptoalgo="AES"  where os="routeros";

This will set all of the devices to use AES for the cryptography algorithm.

We can also change the authentication algorithm to SHA with this

update devices authalgo set authalgo="SHA"  where os="routeros";
LibreNMS update device SNMP settings

Bulk updating of Network Devices

The bottom “script” can be used for changing SNMP settings on multiple Mikrotik devices.

Create a mikrotik.lst file with all the IP addresses of all the devices you need to update. Can you use the above MySQL commands to get a list from LibreNMS.

Change the following options in the script

  • routerpassword to the Mikrotik password
  • admin to your username
  • encryptionpassword to your SNMP encryption password
  • authpassword to your authentication password
  • addresses=192.168.0.0/16 to the list of IP addresses that should be able to access SNMP info on the mikrotik device. AKA your LibreNMS server.
  • SNMPname to your SNMP username
for ip in `cat mikrotik.lst` 
do 
echo $ip 
timeout 15 sshpass -p 'routerpassword' ssh -o StrictHostKeyChecking=no admin@${ip} -p1022 '/snmp community set addresses=192.168.0.0/16 authentication-protocol=SHA1 authentication-password=authpassword encryption-protocol=AES encryption-password=encryptionpassword security=private read-access=yes write-access=no SNMPname'
done

Copy and paste the above “code” in a shell script file.

nano mikrotik.sh
chmod +x mikrotik.sh 
./mikrotik.sh

The script should run and update all the SNMP settings on all the devices in mikrotik.lst

OIDs for UI / Ubiquiti Solar Charge Controller

Here is a list of OIDs for Ubiquiti’s solar charge controller. You can download the

Top interesting ones are

  • Battery Voltage 1.3.6.1.4.1.41112.1.11.1.1.2
  • Panel Voltage 1.3.6.1.4.1.41112.1.11.1.2.2
snmptranslate -Pu -Tz -m ./UBNT-MIB:./UBNT-SUNMAX-MIB
"org"                   "1.3"
"dod"                   "1.3.6"
"internet"                      "1.3.6.1"
"directory"                     "1.3.6.1.1"
"mgmt"                  "1.3.6.1.2"
"mib-2"                 "1.3.6.1.2.1"
"transmission"                  "1.3.6.1.2.1.10"
"experimental"                  "1.3.6.1.3"
"private"                       "1.3.6.1.4"
"enterprises"                   "1.3.6.1.4.1"
"ubnt"                  "1.3.6.1.4.1.41112"
"ubntMIB"                       "1.3.6.1.4.1.41112.1"
"ubntORTable"                   "1.3.6.1.4.1.41112.1.1"
"ubntOREntry"                   "1.3.6.1.4.1.41112.1.1.1"
"ubntORIndex"                   "1.3.6.1.4.1.41112.1.1.1.1"
"ubntORID"                      "1.3.6.1.4.1.41112.1.1.1.2"
"ubntORDescr"                   "1.3.6.1.4.1.41112.1.1.1.3"
"ubntSnmpInfo"                  "1.3.6.1.4.1.41112.1.2"
"ubntSnmpGroups"                        "1.3.6.1.4.1.41112.1.2.1"
"ubntORInfoGroup"                       "1.3.6.1.4.1.41112.1.2.1.1"
"ubntORCompliance"                      "1.3.6.1.4.1.41112.1.2.1.2"
"ubntAirosGroups"                       "1.3.6.1.4.1.41112.1.2.2"
"ubntAirFiberGroups"                    "1.3.6.1.4.1.41112.1.2.3"
"ubntEdgeMaxGroups"                     "1.3.6.1.4.1.41112.1.2.4"
"ubntUniFiGroups"                       "1.3.6.1.4.1.41112.1.2.5"
"ubntAirVisionGroups"                   "1.3.6.1.4.1.41112.1.2.6"
"ubntMFiGroups"                 "1.3.6.1.4.1.41112.1.2.7"
"ubntUniTelGroups"                      "1.3.6.1.4.1.41112.1.2.8"
"ubntAFLTUGroups"                       "1.3.6.1.4.1.41112.1.2.9"
"ubntSunMaxGroups"                      "1.3.6.1.4.1.41112.1.2.10"
"sunMaxCompliances"                     "1.3.6.1.4.1.41112.1.2.10.1"
"sunMaxGroups"                  "1.3.6.1.4.1.41112.1.2.10.2"
"ubntAirFIBER"                  "1.3.6.1.4.1.41112.1.3"
"ubntEdgeMax"                   "1.3.6.1.4.1.41112.1.5"
"ubntUniFi"                     "1.3.6.1.4.1.41112.1.6"
"ubntAirVision"                 "1.3.6.1.4.1.41112.1.7"
"ubntMFi"                       "1.3.6.1.4.1.41112.1.8"
"ubntUniTel"                    "1.3.6.1.4.1.41112.1.9"
"ubntAFLTU"                     "1.3.6.1.4.1.41112.1.10"
"ubntSunMax"                    "1.3.6.1.4.1.41112.1.11"
"sunMaxMIB"                     "1.3.6.1.4.1.41112.1.11.1"
"sunMaxBatteryStats"                    "1.3.6.1.4.1.41112.1.11.1.1"
"sunMaxBatCurrent"                      "1.3.6.1.4.1.41112.1.11.1.1.1"
"sunMaxBatVoltage"                      "1.3.6.1.4.1.41112.1.11.1.1.2"
"sunMaxBatPower"                        "1.3.6.1.4.1.41112.1.11.1.1.3"
"sunMaxBatTemp"                 "1.3.6.1.4.1.41112.1.11.1.1.4"
"sunMaxPvPanelStats"                    "1.3.6.1.4.1.41112.1.11.1.2"
"sunMaxPVCurrent"                       "1.3.6.1.4.1.41112.1.11.1.2.1"
"sunMaxPVVoltage"                       "1.3.6.1.4.1.41112.1.11.1.2.2"
"sunMaxPVPower"                 "1.3.6.1.4.1.41112.1.11.1.2.3"
"sunMaxOutPutStats"                     "1.3.6.1.4.1.41112.1.11.1.3"
"sunMaxOutCurrent"                      "1.3.6.1.4.1.41112.1.11.1.3.1"
"sunMaxOutVoltage"                      "1.3.6.1.4.1.41112.1.11.1.3.2"
"sunMaxOutPower"                        "1.3.6.1.4.1.41112.1.11.1.3.3"
"security"                      "1.3.6.1.5"
"snmpV2"                        "1.3.6.1.6"
"snmpDomains"                   "1.3.6.1.6.1"
"snmpProxys"                    "1.3.6.1.6.2"
"snmpModules"                   "1.3.6.1.6.3"
"zeroDotZero"                   "0.0"

Get battery voltage

We can get the battery voltage from the controller with the following SNMP walk command. Change the community “ubnt” to your SNMP community.

snmpwalk -c ubnt -v2c 10.96.1.9 1.3.6.1.4.1.41112.1.11.1.1.2

Return value is

SNMPv2-SMI::enterprises.41112.1.11.1.1.2.0 = INTEGER: 24990

You may need to add a zero if you are trying to add the OID in LibreNMS for a custom OID.

Hardening SNMP on Debian

Hardening SNMP on Debian by disabling SNMP v1 and v2c, and configuring SNMP v3.

Modify /etc/snmp/snmpd.conf

First we’ll want to open up the /etc/snmp/snmpd.conf file and comment out all lines that begin with

  • rocommunity
  • view
  • rouser authPriv <– “This may be the last line by default, we don’t need it”

Alternatively, you can copy and paste the following sed commands instead of manually editing the file.

sudo sed -i 's/^rocommunity/# rocommunityc/g' /etc/snmp/snmpd.conf
sudo sed -i 's/^view/# view/g' /etc/snmp/snmpd.conf
sudo sed -i 's/^rouser authPriv/# rouser authPriv/g' /etc/snmp/snmpd.conf

Create SNMP v3 User

We can create a SNMP v3 user with the following command. There it will ask you for the username and passwords.

sudo net-snmp-create-v3-user -ro -a SHA-512 -x AES

You may receive an error about not being able to touch /snmp/snmpd.conf. I am not sure why Debian is attempting to create that file. Take the “rouser snmpuser” line and add it to the end of the /etc/snmp/snmpd.conf config.

Debian SNMP Error

Now we can start SNMPD

sudo systemctl start snmpd

Troubleshooting

My created user is not working! This could result from two different issues.

  1. It appears that Debian/SNMP doesn’t like pass phrases with special characters. You can try using a different password or escaping the special characters in “/var/lib/snmp/snmpd.conf” file before starting SNMPD.
  2. The user didn’t get added to /etc/snmp/snmpd.conf To fix, add “rouser snmpuser” (Change snmpuser to your snmp username) to the bottom of the config file.

Hardening SNMP on CentOS/RedHat/Fedora Etc.

These steps should be similar across Red Hat type distros.

Before we proceed, lets stop SNMP

sudo systemctl stop snmpd

Disable SNMP Versions 1 and 2c

First we are going to disable SNMP v1 and v2c

You can manually edit the /etc/snmp/snmpd.conf file and comment out or delete every line starting with com2sec, group, access. Or you can run the following sed commands to change it for you.

sudo sed -i 's/^com2sec/# com2sec/g' /etc/snmp/snmpd.conf
sudo sed -i 's/^group/# group/g' /etc/snmp/snmpd.conf
sudo sed -i 's/^access/# access/g' /etc/snmp/snmpd.conf

https://serverfault.com/questions/376688/how-to-disable-version-1-and-version-2c-in-snmpd

Create SNMP Version 3 User

Follow the prompts to create a SNMP v3 user.

sudo net-snmp-create-v3-user -ro -a SHA -x AES

Start SNMP

sudo systemctl start snmpd

You should be good to go.

If you are running a firewall, you will need to allow an exception for SNMP, UDP port 161. You may also need to allow an SELinux exception. Check out the last portion of both these articles.

Allowing SNMP Through Firewall

Configure AirOS SNMP settings over ssh

In this post we’ll see how we can configure AirOS SNMP settings from the command line.

ubntmod command with save without rebooting.

./ubntmod.sh -i 192.168.1.20 -s "private;monitor@incredigeek.com;[30.69636, -88.04811]" -X '/usr/etc/rc.d/rc.softrestart save'

Alternative manual method.

ssh ubnt@192.168.1.20

Open config file

vi /tmp/system.cfg

Find the SNMP settings and modify as needed. Example below

snmp.community=private
snmp.contact=monitor@incredigeek.com
snmp.location=[30.69636, -88.04811]

Save and exit file with :x

Apply settings

/usr/etc/rc.d/rc.softrestart save

cnMaestro configuration for SNMPv3

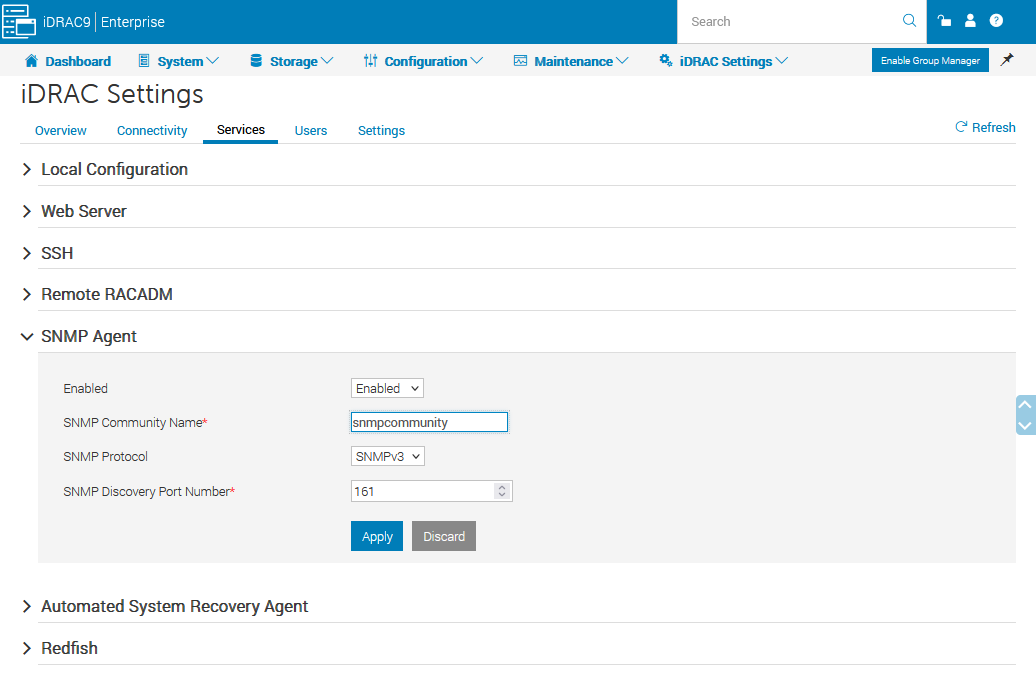
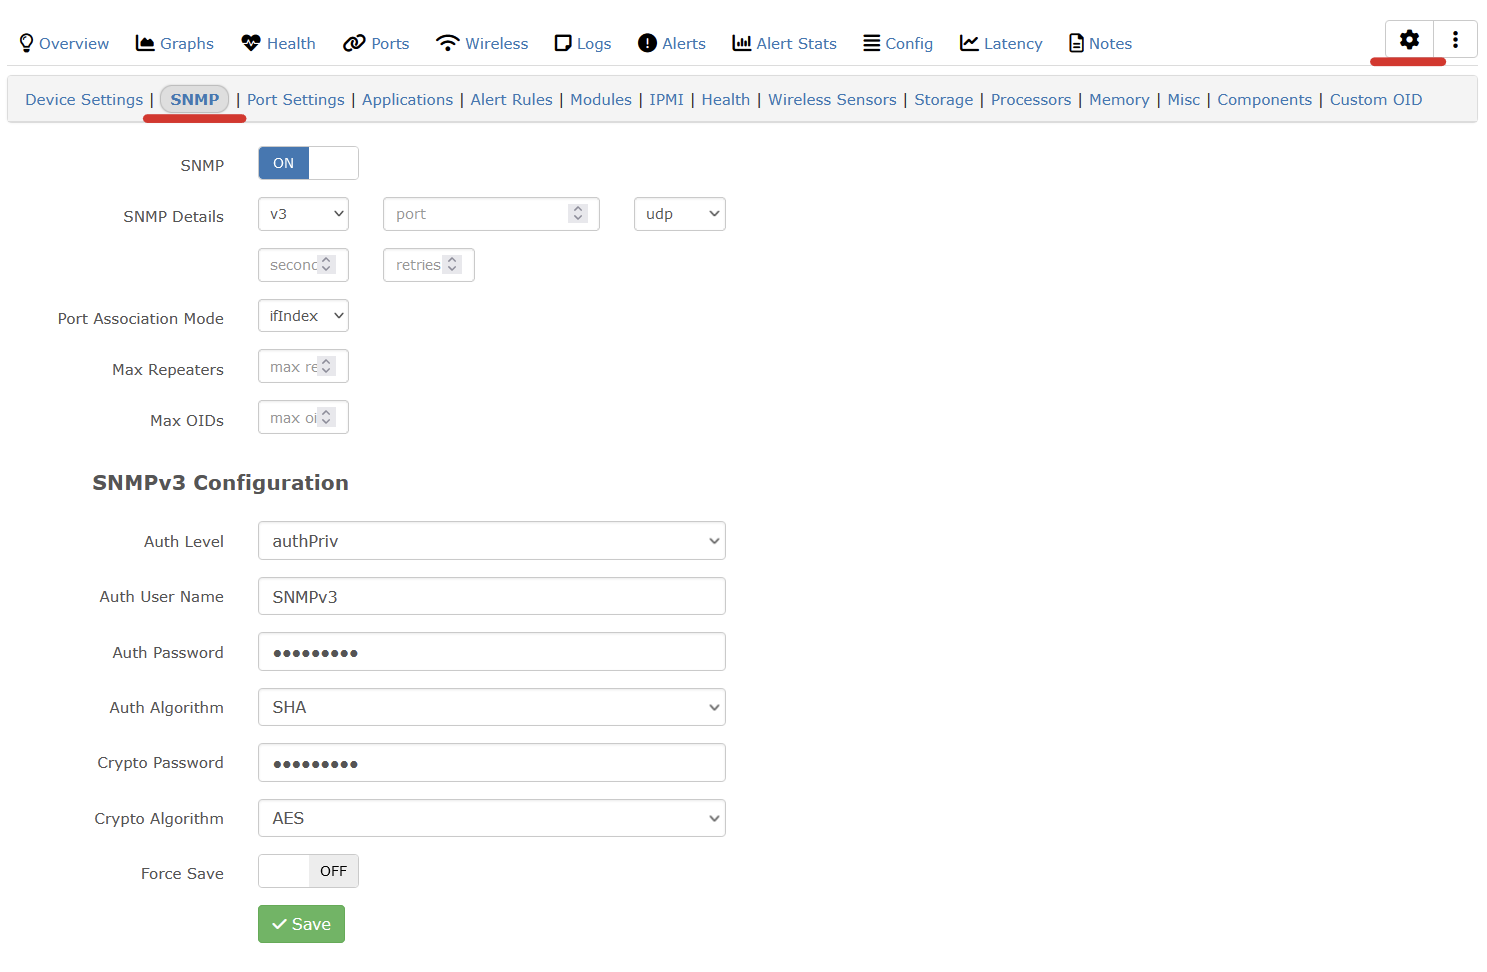
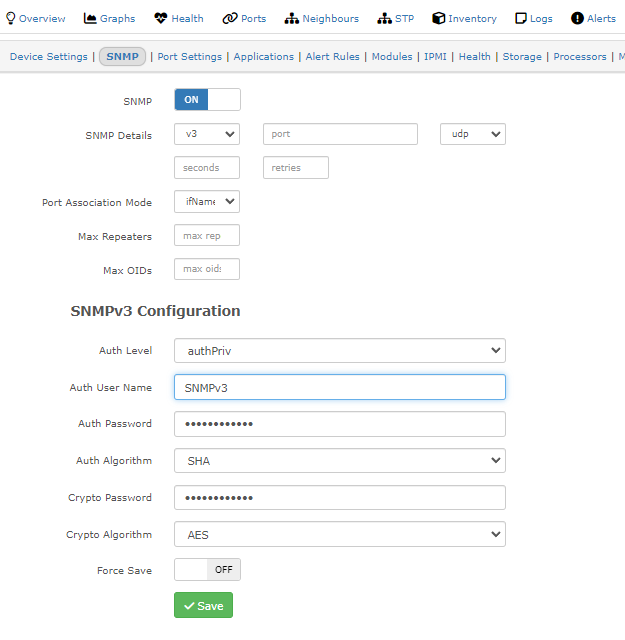
The following works for setting the snmpv3 configuration on cambium 450i 900’s. Once applied it’ll run change the SNMP settings and reboot the radio.

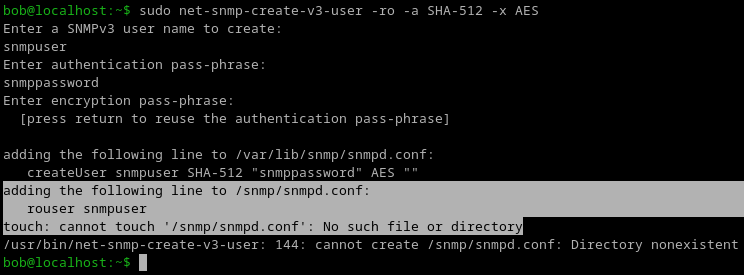
You’ll need to find the hashed password which can be found in a config backup.
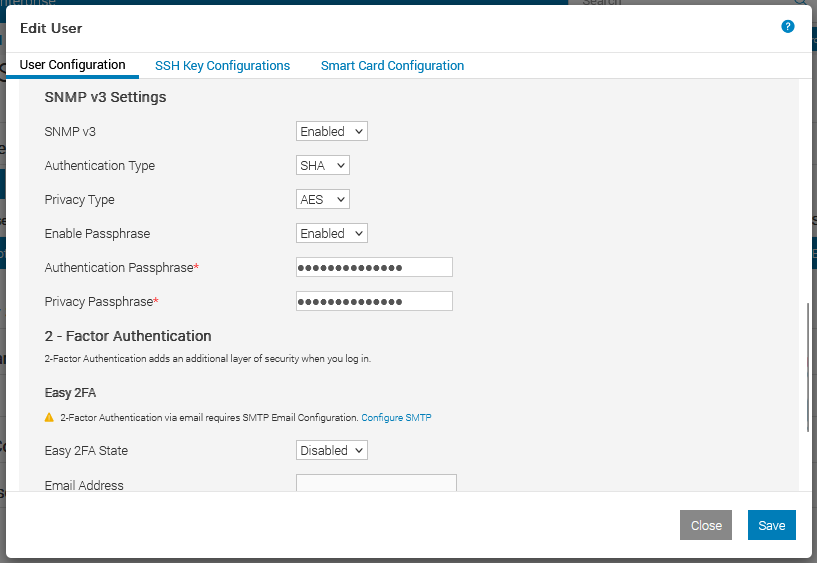
Change the SNMP username/community as needed.

{
"userParameters": {
"snmpConfig": {
"user2Group": 0,
"snmpv3EngineId": "007000a9840a003e464e7a",
"rwAuthPasswordEncrypted": "3e5h24a694a515e81abb6b25986cea91",
"commStringROnly": "rocommunitystring2",
"user2PrivPassword": "",
"user1AuthPassword": "",
"snmpv3AuthProt": 0,
"snmpv3TrapEnable": 0,
"snmpv3PrivProt": 0,
"snmpMibPerm": 1,
"roAuthPasswordEncrypted": "3e5h24a694a515e81abb6b25986cea91",
"commStringRW": "communitystring",
"userGroup1": 0,
"user1Enable": 0,
"snmpv3SecLvl": 2,
"user2Enable": 0,
"rwUserName": "Canopy",
"roUserName": "snmpv3user",
"roPrivPasswordEncrypted": "3e5h24a694a515e81abb6b25986cea91",
"userName1": "",
"snmpPort": 161,
"rwUserEnable": 0,
"trapDomainNameAppend": 0,
"rwPrivPasswordEncrypted": "3e5h24a694a515e81abb6b25986cea91",
"user1PrivPassword": "",
"userName2": "",
"user3PrivPassword": "",
"user2AuthPassword": "",
"userName3": "",
"user3Enable": 0,
"snmpTrapPort": 162,
"user3AuthPassword": "",
"user3Group": 0,
"trapDelayAfterBootup": 5,
"snmpIpAccessFilter": [
{
"address": "192.168.0.0",
"netmask": 24
},
{
"address": "10.0.1.0",
"netmask": 24
},
{
"address": "0.0.0.0",
"netmask": 0
},
{
"address": "0.0.0.0",
"netmask": 0
},
{
"address": "0.0.0.0",
"netmask": 0
},
{
"address": "0.0.0.0",
"netmask": 0
},
{
"address": "0.0.0.0",
"netmask": 0
},
{
"address": "0.0.0.0",
"netmask": 0
},
{
"address": "0.0.0.0",
"netmask": 0
},
{
"address": "0.0.0.0",
"netmask": 0
}
],
"snmpTrapAddresses": [
"0.0.0.0",
"0.0.0.0",
"0.0.0.0",
"0.0.0.0",
"0.0.0.0",
"0.0.0.0",
"0.0.0.0",
"0.0.0.0",
"0.0.0.0",
"0.0.0.0"
]
},
}

Setup SNMP v3 on Mikrotik Router

Setting up SNMP via WinBox is straight forward, the following commands are how to set it up from the command line with some troubleshooting info at the end.

Setup SNMPv3

Setup Community (Change v3Private,encpass, and authpass to their respective names or passwords)

snmp community add name=v3Private encryption-protocol=DES encryption-password=encpass authentication-password=authpass security=private

Enable and set SNMP community (Trap Community needs to match the above command.  Change contact and the location as needed.)

snmp set contact=admin@incredigeek.com location=DeviceLocation trap-community=V3Private

Troubleshooting

Sometimes, for no apparent reason it seems, routerOS will have issues using the default community.  Work around is to create and use a new community.

Cannot connect with AES encryption

AES doesn’t always seem to work reliably.  Seems to work on some and not other.  Work around is to use DES.

Log shows Permission Denied

Double check the allowed from addresses, user, and passwords

Delete SNMPv3 User on Linux

Don’t know if this is the recommended way to delete a user, but it seems to work.

sudo service snmpd stop

Open up the snmpd.conf file in /var/lib and find the line with the SNMP user and delete the line

sudo vi /var/lib/snmp/snmpd.conf

The above file may be in the following location on RPM based systems.

sudo vi /var/lib/net-snmp/snmpd.conf

Save, exit, and start snmpd

sudo service snmpd start

These steps work for Ubuntu, but should work for any Debain based distro as well as CentOS, Fedora, RedHat etc.

semanage Allow and Delete ports in CentOS

The commands are for CentOS, but should work on Fedora and RedHat.

If semanage is not installed refer to here.

You would typically use this along with the systems firewall to allow a port through.  Guide for firewalld and iptables.  If you change it in the firewall and fail to add/edit it in semanage you can potentially get weird behavior like sshd not wanting to start after changing the port.

Add port

semanage port -a -t ssh_port_t -p tcp 2222

The above command allows the sshd service to start, using port 2222.

List allowed ports

semanage port -l

You can use grep to filter the results

Example:

[admin@localhost ~]# semanage port -l | grep ssh
ssh_port_t tcp 2222, 22
[admin@localhost ~]#

Delete port

semanage port -d -p tcp 2222

Other examples

Allow SNMP

semanage port -a -t snmp_port_t -p udp 161