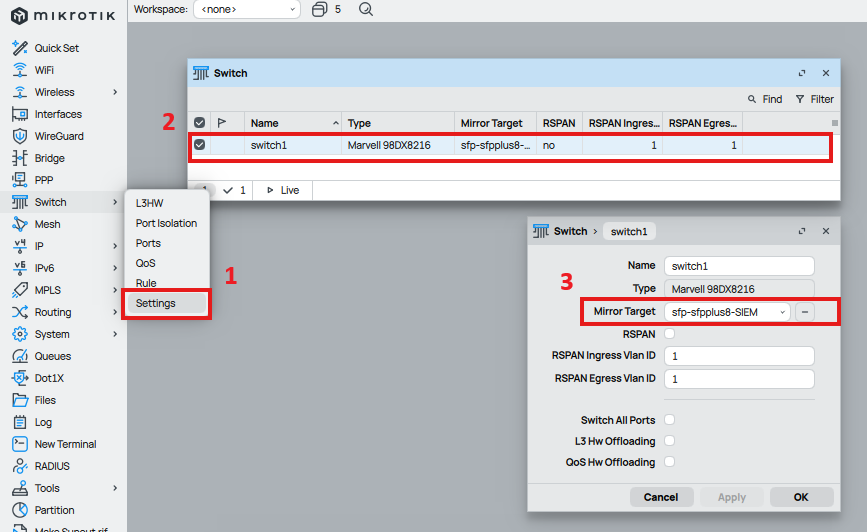
First we need to setup the the Target port, i.e., the port we want to send our mirrored traffic to. Go to Switch -> Settings -> Select the Switch -> Mirror Target. Select the port you want to mirror to.
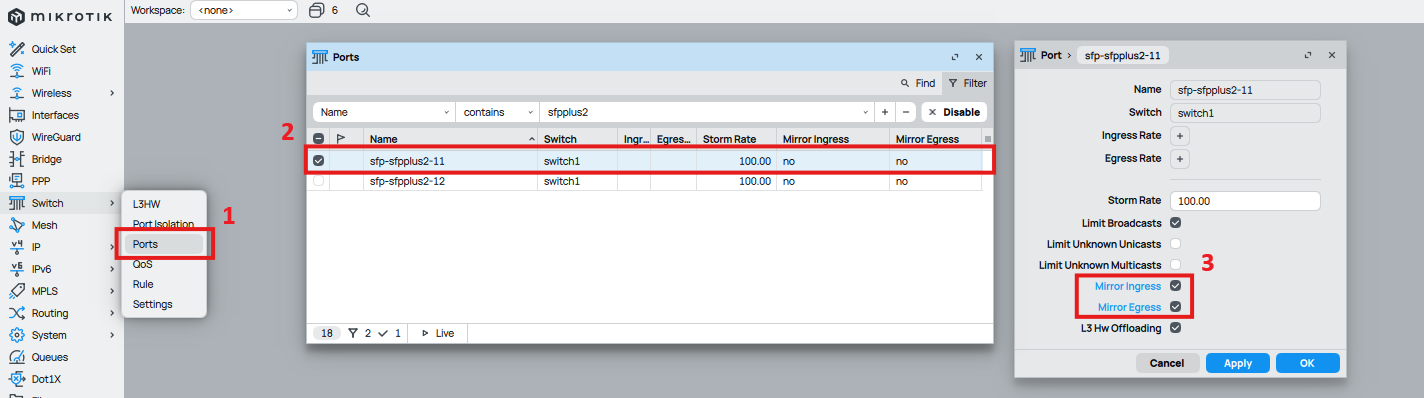
Next, we need to configure which port(s) we want to use as source ports.
Go to Switch -> Ports -> Select the Port
Select Mirror Ingress and/or Mirror Egress and apply.
That is it. All traffic on your configured ports will now mirror to the target port.
If there is a line that says ;;; Firmware upgraded successfully, please reboot for changes to take effect!, then the firmware has been updated at some point and the router needs a reboot to apply it. Remember you need to update both the RouterOS version and the firmware version when upgrading.
This playbook is for updating Mikrotik routers. It will update both the RouterOS version and the firmware.
The playbook executes in the following order.
Check for RouterOS Updates
Update RouterOS (Router will reboot if there is an update)
Sleep 120 seconds to allow the router(s) to boot up
Check current firmware version, and if there is an available upgrade
Update firmware
Reboot router to apply firmware upgrade
This playbook attempts to be smart and will not reboot a router if there is not an update available. Routers that have updates available will reboot twice. Once to apply the RouterOS version, and the second time to apply the firmware.
Prerequisites
You should already have an inventory file and the Ansible RouterOS collection installed. If not, check out the following post.
Here is the playbook. A quick command syntax note, RouterOS 7 and newer typically use slashes / between commands. i.e. /system/package/update/install. Older versions of RouterOS have spaces in the command path i.e. /system package update install Since this still works on newer versions, we use it here.
---
- name: Mikrotik RouterOS and Firmware Upgrades
  hosts: routers
  gather_facts: false
  tasks:

# Update RouterOS version.  Mikrotik update/install command automatically reboots the router
  - name: Check for RouterOS updates
    community.routeros.command:
      commands:
        - /system package update check-for-updates
    register: system_update_print

  - name: Update RouterOS version
    community.routeros.command:
      commands:
        - /system package update install
    when: system_update_print is not search('System is already up to date')

# Check if firmware needs an upgrade, upgrade and reboot.
  - name: Sleeping for 120 seconds.  Giving time for routers to reboot.
    ansible.builtin.wait_for:
      timeout: 120
    delegate_to: localhost

  - name: Check Current firmware
    community.routeros.command:
      commands:
        - ':put [/system routerboard get current-firmware]'
    register: firmware_current

  - name: Check Upgrade firmware
    community.routeros.command:
      commands:
        - ':put [/system routerboard get upgrade-firmware]'
    register: firmware_upgrade

  - name: Upgrade firmware
    community.routeros.command:
      commands:
        - ':execute script="/system routerboard upgrade"'
    when: firmware_current != firmware_upgrade

  - name: Wait for firmware upgrade and then reboot
    community.routeros.command:
      commands:
        - /system routerboard print
    register: Reboot_Status
    until: "Reboot_Status is search(\"please reboot\")"
    notify:
      - Reboot Mikrotik
    retries: 3
    delay: 15
    when: firmware_current != firmware_upgrade

  handlers:
    - name : Reboot Mikrotik
      community.routeros.command:
        commands:
          - ':execute script="/system reboot"'
Quick and simple way to check the details on a fiber SFP on a Mikrotik router. Replace sfp1_name with the SFP name or leave out the name and select a number.
Note that there are a couple of limitations of using the Cloud Hosted Router (CHR). The main issue is that the default license doesn’t allow for more than 1Mbps on each interface.
We’ll create a tunnel between two Mikrotik RouterOS routers. Once we have the tunnel connected, we can then route traffic between them.
Note: You can add Preshared keys, but we don’t cover that in this post, just to keep things simple. Check out the following post if you want to add Preshared keys.
Here is how we will want our routers set up. The WireGuard PtP IP is the IP addresses used on both ends of the tunnel. The WAN IP is the IP of each Router. Local IP on Host B is setup to distribute DHCP.
Host A
WAN IP: 172.16.0.1 WireGuard PtP IP: 10.1.1.1/30
Host B
WAN IP: 10.0.0.2 WireGuard PtP IP: 10.1.1.2/30 Local IP: 192.168.0.1/24
We need Host A to be able to access Private IP’s (192.168.0.0/24) behind Host B.
We’ll pretend that the 172.16.0.1 address is a public IP, and Host B, is behind some sort of NAT network.
To create the Point-to-point, or PtP, we will create a WireGuard VPN tunnel, and then add routes from Host A to Host B.
For each Mikrotik we need to create a WireGuard interface, and then a peer. One of the peers needs a keep alive if we are behind a NAT.
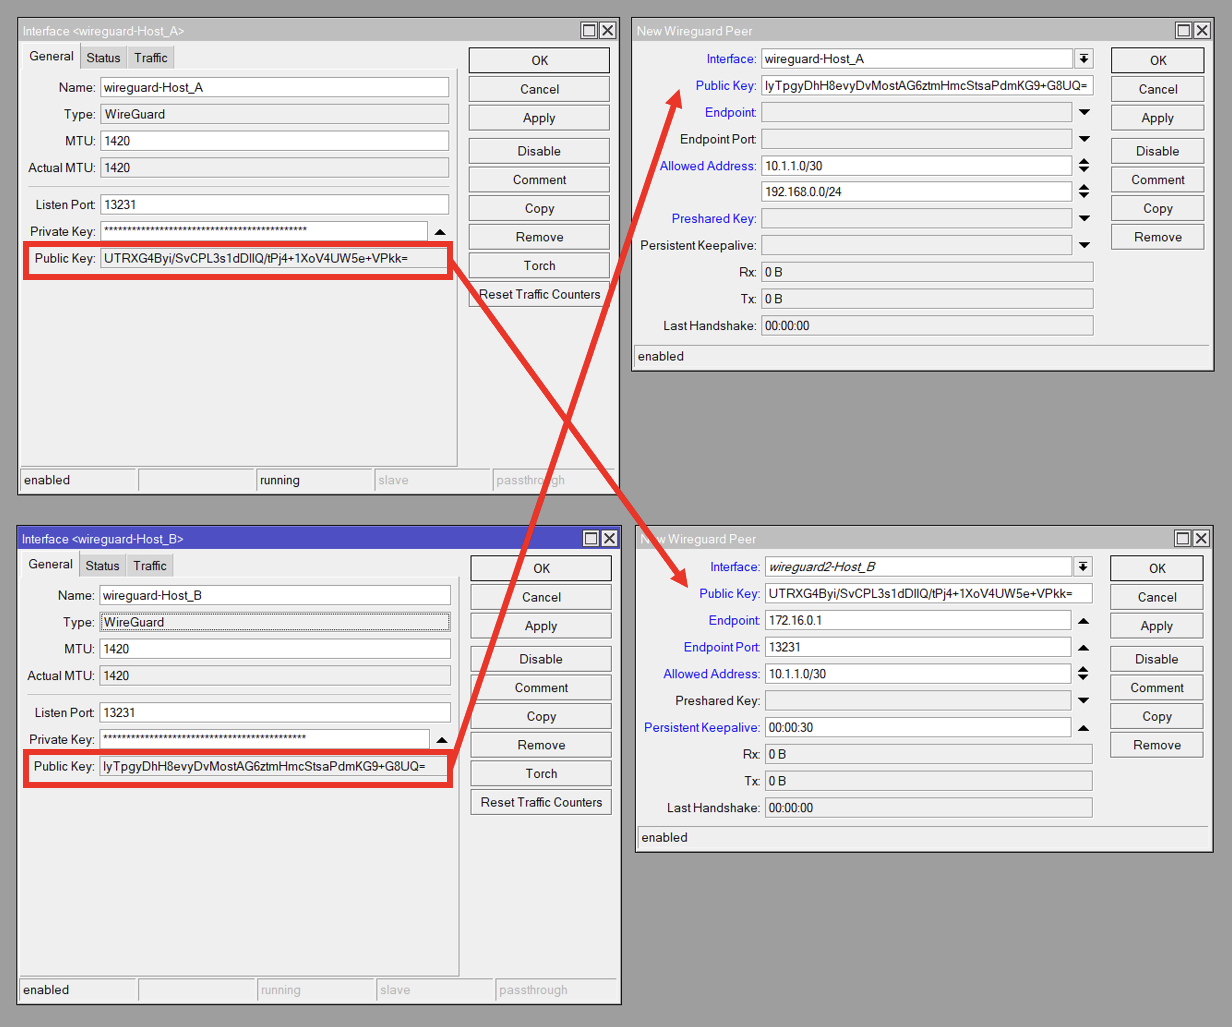
Wireguard Setup Overview
Here is an overview screenshot of what our WireGuard settings will look like. Host A is on top, and Host B on the bottom. On the left are the WireGuard interfaces, and the right contains the Peers.
We copy the Public Key from the remote WireGuard interface, to the Public Key on the local Peer. I.e. The Host_B Peer contains Host_A’s Interface Public Key and vice verse
Host A
If you want to, you can use the WinBox GUI to setup and configure the router.
In the Allowed Addresses, put 10.1.1.0/30 and 192.168.0.0/24*.
Finally, put in the Public Key from Host B. Note that we can’t do this until we create the WireGuard Interface on Host B, so you’ll need to come back for this step.
*The Allowed Address sets which addresses work on the other side of the tunnel. If we don’t specify 192.168.0.0/24, then we won’t be able to route to those addresses. If we don’t add 10.1.1.0/30, then our tunnel won’t work at all. Since we only need to route to the 192.168.0.0/24 network from the Host A side, we don’t need this IP range on Host B.
That should be it. Verify that there is a connection. From Host A, ping 192.168.0.1 or any other remote device.
Troubleshooting
Unfortunately, there appear to be some wonky bugs with WireGuard on RouterOS. It does appear to be getting better, but here are a couple things to check if the tunnel is not connecting.
Verify that the Firewall is not blocking WireGuard. You can allow the WireGuard port in the Firewall.
Try disabling and re-enabling the Interfaces and/or Peers
Verify that all the routes for the PtP are in /ip/routes. If not, try manually adding the route (10.1.1.0/30) on the WireGuard interface on both routers.
Add a keep alive if a router is behind a firewall/NAT.
Reboot and or Upgrade the RouterOS version and firmware.
Note: running /user/add will prompt you for the rest of the options.
Delete the default admin user with
/user remove admin
We want to delete the default admin user for two reasons. 1. There is no default password for this user. 2. It is a default username which means it will be targeted for brute force attacks.
Consider using the /users/groups for more granular control.
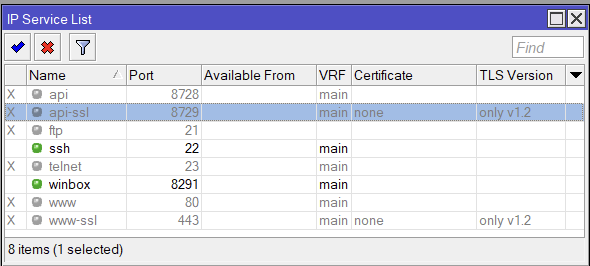
Disable unused services
In the following, we disabled all services except SSH and Winbox. We also limit access to those services only from private “RFC 1918” IP addresses. Customize as needed.
/ip service
set telnet disabled=yes
set ftp disabled=yes
set www disabled=yes
set www-ssl tls-version=only-1.2
set ssh address="set winbox address="192.168.0.0/16,172.16.0.0/12,10.0.0.0/8"
set api disabled=yes
set winbox address="set winbox address="192.168.0.0/16,172.16.0.0/12,10.0.0.0/8"
set api-ssl disabled=yes tls-version=only-1.2
for www-ssl and api-ssl, tls-version is not a required argument, but you may consider using it if you need the API or Webfig.