We’ll create a tunnel between two Mikrotik RouterOS routers. Once we have the tunnel connected, we can then route traffic between them.
Note: You can add Preshared keys, but we don’t cover that in this post, just to keep things simple. Check out the following post if you want to add Preshared keys.
How to Create a Preshared Key for Wireguard
Here is how we will want our routers set up. The WireGuard PtP IP is the IP addresses used on both ends of the tunnel. The WAN IP is the IP of each Router. Local IP on Host B is setup to distribute DHCP.
Host A
WAN IP: 172.16.0.1
WireGuard PtP IP: 10.1.1.1/30
Host B
WAN IP: 10.0.0.2
WireGuard PtP IP: 10.1.1.2/30
Local IP: 192.168.0.1/24
We need Host A to be able to access Private IP’s (192.168.0.0/24) behind Host B.
We’ll pretend that the 172.16.0.1 address is a public IP, and Host B, is behind some sort of NAT network.
To create the Point-to-point, or PtP, we will create a WireGuard VPN tunnel, and then add routes from Host A to Host B.
For each Mikrotik we need to create a WireGuard interface, and then a peer. One of the peers needs a keep alive if we are behind a NAT.
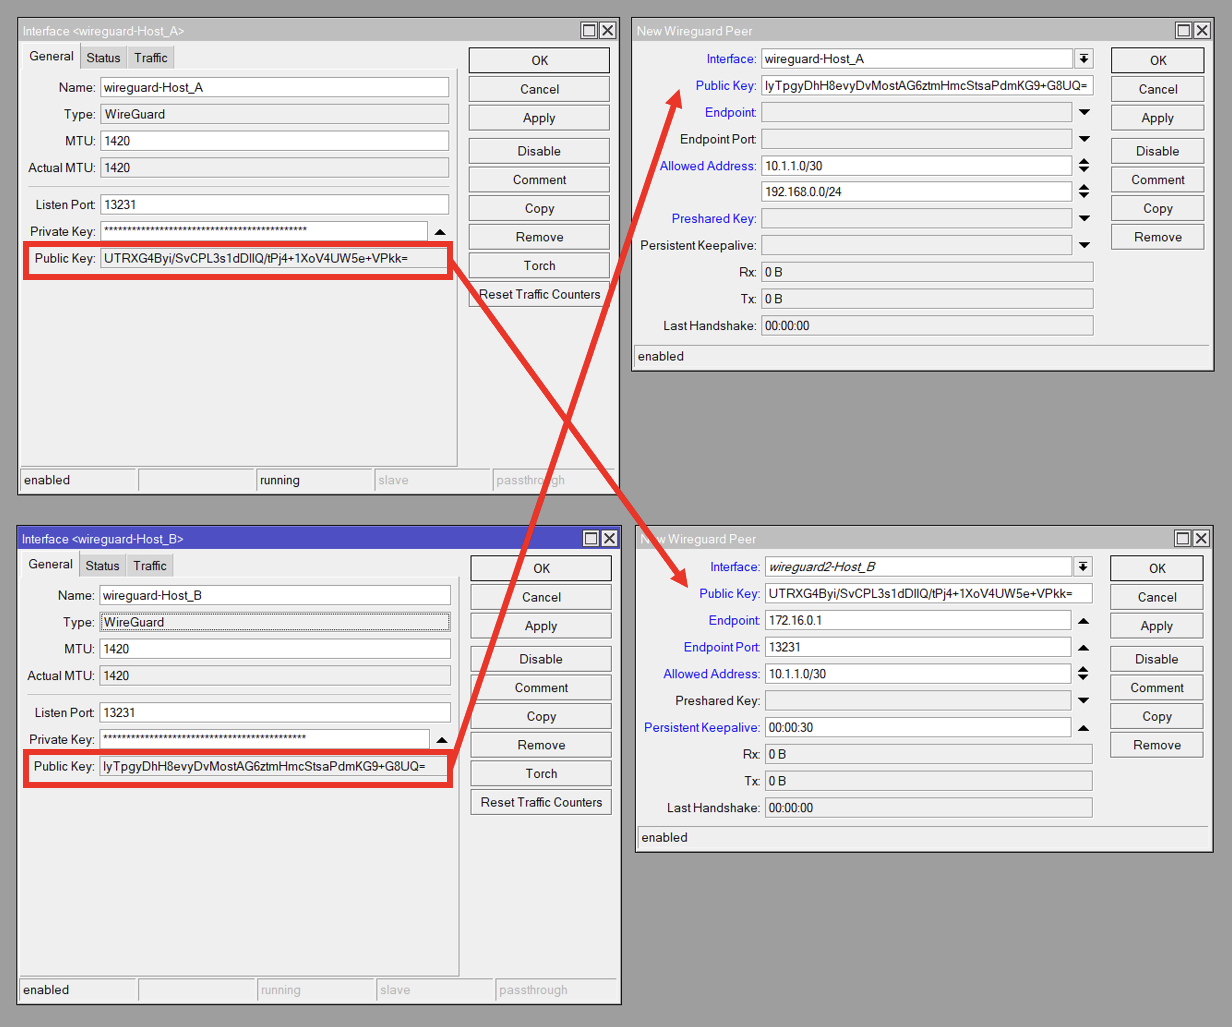
Wireguard Setup Overview
Here is an overview screenshot of what our WireGuard settings will look like. Host A is on top, and Host B on the bottom. On the left are the WireGuard interfaces, and the right contains the Peers.
We copy the Public Key from the remote WireGuard interface, to the Public Key on the local Peer. I.e. The Host_B Peer contains Host_A’s Interface Public Key and vice verse
Host A
If you want to, you can use the WinBox GUI to setup and configure the router.
Create the WireGuard interface
/interface/wireguard/add name=wireguard-Host_A disabled=no
Add IP address 10.1.1.1/30 to the newly created WireGuard Interface in /IP/Address
/ip/address/add address=10.1.1.1/30 interface=wireguard-Host_A disabled=no
Create WireGuard Peer, WireGuard -> Peers
- Select the WireGuard interface,
- In the Allowed Addresses, put 10.1.1.0/30 and 192.168.0.0/24*.
- Finally, put in the Public Key from Host B.
Note that we can’t do this until we create the WireGuard Interface on Host B, so you’ll need to come back for this step.
interface/wireguard/peers/add interface=wireguard-Host_A public-key=HOST_B_WG_PUBLIC_KEY allowed-address=10.1.1.0/30,192.168.0.0/24
Add route for 192.168.0.0/24 to point to 10.1.1.2
/ip/route/add dst-address=192.168.0.0/24 gateway=10.1.1.2
*The Allowed Address sets which addresses work on the other side of the tunnel. If we don’t specify 192.168.0.0/24, then we won’t be able to route to those addresses. If we don’t add 10.1.1.0/30, then our tunnel won’t work at all. Since we only need to route to the 192.168.0.0/24 network from the Host A side, we don’t need this IP range on Host B.
Host B
Create the WireGuard interface, WireGuard -> Add
/interface/wireguard/add name=wireguard-Host_B disabled=no
Add IP address 10.1.1.2/30 to the newly created WireGuard Interface in /IP/Address
/ip/address/add address=10.1.1.2/30 interface=wireguard-Host_B disabled=no
Create a WireGuard Peer, WireGuard -> Peers
- Select the WireGuard interface,
- In the Allowed Addresses, put 10.1.1.0/30
- Finally, put in the Public Key from Host A.
/interface/wireguard/peers/add interface=wireguard-Host_A public-key=HOST_A_WG_PUBLIC_KEY endpoint-address=172.16.0.1 endpoint-port=13231 allowed-address=10.1.1.0/30 persistent-keepalive=00:00:30
Conclusion
That should be it. Verify that there is a connection. From Host A, ping 192.168.0.1 or any other remote device.
Troubleshooting
Unfortunately, there appear to be some wonky bugs with WireGuard on RouterOS. It does appear to be getting better, but here are a couple things to check if the tunnel is not connecting.
- Verify that the Firewall is not blocking WireGuard. You can allow the WireGuard port in the Firewall.
- Try disabling and re-enabling the Interfaces and/or Peers
- Verify that all the routes for the PtP are in /ip/routes. If not, try manually adding the route (10.1.1.0/30) on the WireGuard interface on both routers.
- Add a keep alive if a router is behind a firewall/NAT.
- Reboot and or Upgrade the RouterOS version and firmware.