Armory relies on Bitcoin Core. You can install BitCoin core from https://bitcoincore.org. It will need to be fully synced which can take a long time “as in days/weeks”. Note that Armory will not work if you have the blockchain pruned. Which means you’ll need about 500GB of space for the BitCoin blockchain.
Note that if you are plotting on a harvester that the p2 singleton or the pool contract address does not have to be on the harvester system. You can grab it off the main node and then use the address on the machine plotting.
The first phase generates all of your proofs of space by creating seven tables of cryptographic hashes and saving them to your temporary directory. Phase 2 back-propagates through the hashes, phase 3 sorts and algorithmically compress these hashes in the temporary directory while starting to build the final file and phase 4 completes the file and moves it into your final plot destination.
There are 4 phases when plotting Chia. Lets break these down
Phase 1
Phase 1 according to the link above creates 7 tables of cryptographic hashes and puts them in a temp directory. This phase is CPU intensive and is the only phase that takes advantage of multiple cores/threads. All the succeeding phases are single threaded. This phase also looks to use the most memory.
Phase 2
Phase 2 back propagates through the hashes, what this means exactly, I am not sure. This phase will use the most storage space. Phase 2 also seems to be a good time to start another plot if your plotting in parallel. Plotman by default starts another plot when a plot reaches phase 2:1 (:1 is a minor phase within phase 2)
Phase 3
Phase 3 sorts and compresses the hashes and starts building the final plot file. The total temp storage should decrease throughout the entire phase.
Phase 4
Phase 4 completes the plot file and moves it to the destination. It looks like if something happens with the destination you can manually move the 2.plot.tmp file to .plot and copy it to a destination file.
Plotman is a great way to semi automate plot creation. It can manage all your temp and destination directories as well as spacing out plots for parallel plotting.
It will download all the correct files and set everything up. If you run into any issues, check for any errors on the terminal.
After it finishes installing, lets run “plotman version” to verify that it is working
(venv) plotter@chia1:~/chia-blockchain$ plotman version
plotman 0.3.1
(venv) plotter@chia1:~/chia-blockchain$
Configure Plotman config file
First lets generate a config that we will then edit. Use the “plotman config generate” command. It by default puts the config in ~/.config/plotman/plotman.yaml
(venv) plotter@chia1:~/chia-blockchain$ plotman config generate
Wrote default plotman.yaml to: /home/plotter/.config/plotman/plotman.yaml
(venv) plotter@chia1:~/chia-blockchain$
Use your favorite text editor to open up the config file. Nano is a easy to use terminal text editor.
nano ~/.config/plotman/plotman.yaml
Changes we need to make
Change log directory (Line 18)
Set tmp directories i.e. where temp plot files go (Line 27)
I will put a full config at the bottom of this post with the important settings in bold.
A note about the config file. The config files uses a yaml format which is picky about indentation and how things work. If you run into an error and can’t figure out what is up, the easiest thing to do may be to delete the config and regenerate it.
Change log directory
Change username to your Ubuntu username. Plotman should create the logs directory if it is not created.
log: /home/username/logs
Setup tmp directories
The tmp directories are the folders where the temporary plot files are created. Ideally each line should be a path to a physical ssd. Change the path to your SSD. If you have more, then add more lines. Note the – is needed in front.
       tmp:
                - /media/username/ssd
Set up destination directories
The destination directories are our drives that hold our plots. Same idea as our tmp drive setup above, but you’ll need to add the path to all your destination drives. Below is an example of how I have some set up.
You can configure the archive settings so that when a plot finishes it can copy it over the network. I am not using this feature at the moment so just add a # to the first part of the line to comment it out.
# archive:
# rsyncd_module: plots # Define this in remote rsyncd.conf.
# rsyncd_path: /plots # This is used via ssh. Should match path
# # defined in the module referenced above.
# rsyncd_bwlimit: 80000 # Bandwidth limit in KB/s
# rsyncd_host: myfarmer
# rsyncd_user: chia
Scheduling!
Now this is the confusing part, but don’t worry! I’ll do my best to explain what is going on to the best of my knowledge. The defaults do work, but this is where the tuning is going to create the most Plots per day. Below I put in bold the options we’ll want to look at and then we’ll go through those options and explain what they mean.
scheduling:
# Run a job on a particular temp dir only if the number of existing jobs
# before [tmpdir_stagger_phase_major : tmpdir_stagger_phase_minor]
# is less than tmpdir_stagger_phase_limit.
# Phase major corresponds to the plot phase, phase minor corresponds to
# the table or table pair in sequence, phase limit corresponds to
# the number of plots allowed before [phase major : phase minor].
# e.g, with default settings, a new plot will start only when your plot
# reaches phase [2 : 1] on your temp drive. This setting takes precidence
# over global_stagger_m
tmpdir_stagger_phase_major: 2
tmpdir_stagger_phase_minor: 1
# Optional: default is 1
tmpdir_stagger_phase_limit: 1
# Don't run more than this many jobs at a time on a single temp dir.
tmpdir_max_jobs: 3
# Don't run more than this many jobs at a time in total.
global_max_jobs: 12
# Don't run any jobs (across all temp dirs) more often than this, in minutes.
global_stagger_m: 30
# How often the daemon wakes to consider starting a new plot job, in seconds.
polling_time_s: 20
Are what plotman uses to figure out when to start the next plot. I’ll see about posting some info soon about the different phases a plot goes through, but there are phases 1:1 – 4:something, so when the first plot phase hits 2:1, it will launch another parallel plot.
This is helpful because the different phases use different portions of a system, first phase is multi threaded and uses more CPU, where as other phases can use more storage. So by waiting for a plot to hit a certain phase before launching another plot can increase the efficiency of the computers components.
The next option is
tmpdir_stagger_phase_limit: 1
This is how many plotting jobs you can have running before the major:minor phases (Above options). By default it is 1. Meaning that plotman launches a job, once that job hits phase 2:1, it launches another job, once that new job hits 2:1, it launches a 3rd job, so you have 3 jobs running. But only one of those jobs is pre 2:1 phase.
tmpdir_max_jobs
The following option
tmpdir_max_jobs: 3
is the limit on how many jobs can run on a single tmp directory. If you are using a 2TB NVME SSD for plotting, you will probably want to increase this to allow up to 6-8 (maybe more?) jobs to run at the same time. Note that a 1TB SSD is is going to be limited to about 4 plots, maybe 5 if you were super precise with your timing. I have been running 4 though.
global_max_jobs: 12
This option is the total jobs limit. This number will probably be dependent on CPU, RAM, and SSD(s). This guy has some helpful information for calculating that out. I will say I don’t think you want to exceed your CPU thread count. So if you have a Ryzen 5600X, I would not go more then 12 jobs just from a CPU perspective.
This option is how many minutes to wait before starting a new job. 30 minutes seems like a good number so you can probably leave it. The previous options do override this though. So if your above setting for the phase_limit is 1, and it takes 1 hour for a plot to go from 1:1 to 2:1, then it will be starting a new job every hour. Or whenever the job gets past 2:1.
Add Farmer and Pool keys
Almost there! The following options are optional, but if you are running a harvester and generating plots for a different node, you’ll probably want to update the farmer_pk and pool_pk
Save the file. You should now have a good plotman config file to work from.
Running Plotman
Tip: Plotman launches the jobs in the background, so if you need to make a config change, kill plotman with ctrl+c and edit the config. When you relaunch plotman, it will scan for the existing jobs and pick up from there.
Plotman -h offers a bunch of helpful options. One of which is plotman status which will list active jobs. Side note that it shows the phase a job is in.
(venv) plotter@chia1:~/chia-blockchain$ plotman status
plot id k tmp dst wall phase tmp pid stat mem user sys io
1569c6a8 32 /mnt/chia3/tmp /mnt/chia5 0:07 1:2 39G 26063 SLP 4.0G 0:07 0:01 0s
# Default/example plotman.yaml configuration file
# Options for display and rendering
user_interface:
# Call out to the `stty` program to determine terminal size, instead of
# relying on what is reported by the curses library. In some cases,
# the curses library fails to update on SIGWINCH signals. If the
# `plotman interactive` curses interface does not properly adjust when
# you resize the terminal window, you can try setting this to True.
use_stty_size: True
# Where to plot and log.
directories:
# One directory in which to store all plot job logs (the STDOUT/
# STDERR of all plot jobs). In order to monitor progress, plotman
# reads these logs on a regular basis, so using a fast drive is
# recommended.
log: /home/plotter/logs
# One or more directories to use as tmp dirs for plotting. The
# scheduler will use all of them and distribute jobs among them.
# It assumes that IO is independent for each one (i.e., that each
# one is on a different physical device).
#
# If multiple directories share a common prefix, reports will
# abbreviate and show just the uniquely identifying suffix.
tmp:
- /mnt/chia0/tmp
# Optional: Allows overriding some characteristics of certain tmp
# directories. This contains a map of tmp directory names to
# attributes. If a tmp directory and attribute is not listed here,
# it uses the default attribute setting from the main configuration.
#
# Currently support override parameters:
# - tmpdir_max_jobs
tmp_overrides:
# In this example, /mnt/tmp/00 is larger than the other tmp
# dirs and it can hold more plots than the default.
"/mnt/tmp/00":
tmpdir_max_jobs: 5
# Optional: tmp2 directory. If specified, will be passed to
# chia plots create as -2. Only one tmp2 directory is supported.
# tmp2: /mnt/tmp/a
# One or more directories; the scheduler will use all of them.
# These again are presumed to be on independent physical devices,
# so writes (plot jobs) and reads (archivals) can be scheduled
# to minimize IO contention.
    dst:
            - /mnt/chia0
            - /mnt/chia1
            - /mnt/chia2
            - /mnt/chia3
            - /mnt/chia4
            - /mnt/chia5
# Archival configuration. Optional; if you do not wish to run the
# archiving operation, comment this section out.
#
# Currently archival depends on an rsync daemon running on the remote
# host.
# The archival also uses ssh to connect to the remote host and check
# for available directories. Set up ssh keys on the remote host to
# allow public key login from rsyncd_user.
# Complete example: https://github.com/ericaltendorf/plotman/wiki/Archiving
archive:
rsyncd_module: plots # Define this in remote rsyncd.conf.
rsyncd_path: /plots # This is used via ssh. Should match path
# defined in the module referenced above.
rsyncd_bwlimit: 80000 # Bandwidth limit in KB/s
rsyncd_host: myfarmer
rsyncd_user: chia
# Optional index. If omitted or set to 0, plotman will archive
# to the first archive dir with free space. If specified,
# plotman will skip forward up to 'index' drives (if they exist).
# This can be useful to reduce io contention on a drive on the
# archive host if you have multiple plotters (simultaneous io
# can still happen at the time a drive fills up.) E.g., if you
# have four plotters, you could set this to 0, 1, 2, and 3, on
# the 4 machines, or 0, 1, 0, 1.
# index: 0
# Plotting scheduling parameters
scheduling:
# Run a job on a particular temp dir only if the number of existing jobs
# before [tmpdir_stagger_phase_major : tmpdir_stagger_phase_minor]
# is less than tmpdir_stagger_phase_limit.
# Phase major corresponds to the plot phase, phase minor corresponds to
# the table or table pair in sequence, phase limit corresponds to
# the number of plots allowed before [phase major : phase minor].
# e.g, with default settings, a new plot will start only when your plot
# reaches phase [2 : 1] on your temp drive. This setting takes precidence
# over global_stagger_m
    tmpdir_stagger_phase_major: 2
    tmpdir_stagger_phase_minor: 1
# Optional: default is 1
tmpdir_stagger_phase_limit: 1
# Don't run more than this many jobs at a time on a single temp dir.
tmpdir_max_jobs: 3
# Don't run more than this many jobs at a time in total.
global_max_jobs: 6
# Don't run any jobs (across all temp dirs) more often than this, in minutes.
global_stagger_m: 30
# How often the daemon wakes to consider starting a new plot job, in seconds.
polling_time_s: 20
# Plotting parameters. These are pass-through parameters to chia plots create.
# See documentation at
# https://github.com/Chia-Network/chia-blockchain/wiki/CLI-Commands-Reference#create
plotting:
k: 32
e: False # Use -e plotting option
n_threads: 2 # Threads per job
n_buckets: 128 # Number of buckets to split data into
job_buffer: 3389 # Per job memory
# If specified, pass through to the -f and -p options. See CLI reference.
farmer_pk: farmerkey
pool_pk: poolkey
This is a basic script for starting the Chia Harvester on Ubuntu. You can download the script here or use the following commands to download with wget.
#!/bin/bash

# Script for starting the Chia Harvester

cd ~/chia-blockchain/
. ./activate
chia start harvester

sleep 5

if ( echo $(ps aux | grep -v grep | grep chia_harvester) | grep chia_harvester); then
    echo "Harvester started"
else
    echo "Looks like the harvester is not running, try manually checking and/or running the commands to figure out what is wrong."
fi
A Chia Harvest is a computer that farms Chia and connects back to a Master Node. You can almost think of it like the Master Node being a Pool and the harvesters as nodes on that “pool”. In this post we’ll talk about setting up a Chia Harvester on Ubuntu. Shouldn’t matter which version of Ubuntu. LTS or the latest should work fine.
Note: In the following commands we are assuming that the Chia directory is in your home “~/” directory on the harvester. Change the path if different.
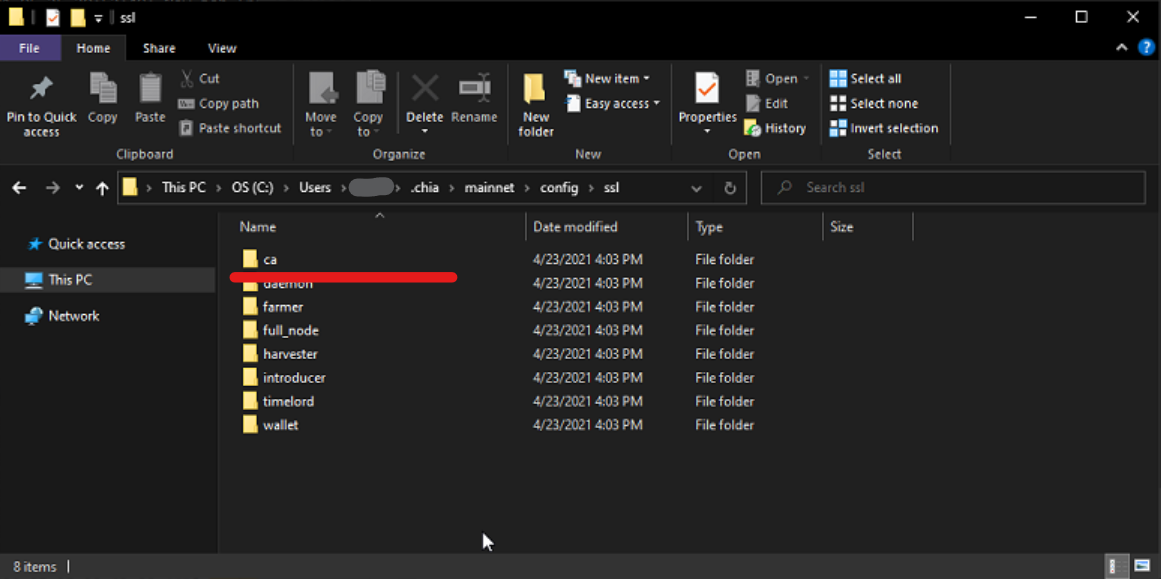
Before we start you will need the ca directory from your Main/Master node uploaded or accessible to your Ubuntu harvester. You can get the CA directory from the following locations on Windows and Linux.
On Linux
~/.chia/mainnet/config/ssl/ca
On Windows
C:\User\username\.chia\mainnet\config\ssl\ca
You should be able to copy and paste the following path into Explorer to get to the correct directory.
%homepath%\.chia\mainnet\config\ssl\ca
Copy Chia ca directory
Copy this folder onto your Desktop, thumbdrive, network share, just some place you can access it.
Upload ca folder
You can use scp to upload the ca folder of the Harvester. In the following example we put the ca directory on our Windows desktop and we are uploading to our harvesters home directory.
scp -r Desktop\causer@192.168.1.5:~/
Activate Chia
The rest of the commands are run on the harvester. You can either ssh or physically log into it. If Chia was installed in a different directory, then you will need to change the path.
cd chia-blockchain
. ./activate
Configure Harvester
You should be able to copy and paste all the following commands in, change the parts in bold as needed.
The –set-farmer-peer option is your main node’s ip address.
Should be all set. You can check the Main Node to verify that the harvester is connecting.
Important Notes: UPNP needs to be turned off. It can cause problems if there are multiple wallets running on a local network that both have upnp on.
Add your plot drive locations. We need something to harvest :)
Verify that the Linux user can write to the Chia Plot drives
The following command will give the ubuntu user write access to the drive. Change the path to your drive.
sudo chmod ugo+wx /media/username/your_drive
Creating Plots
Create plots by specifying the Farmer Public Key and the Pool Public Key. You can get these from the Main Node. Plan on adding info on how to retrieve that info soon.