Operation Triangulation – iOS Zero-click APT Exploit Info

Quick Summary: Operation Triangulation is an iOS zero-click exploit that will self destruct, looks to have been used since at least 2019, works on iOS 15.7, unsure if it works on iOS 16. Can collect location, mic recordings, photos, and manipulate iMessages. First point of entry is from an iMessage message, that compromises the device, after compromise, the message gets deleted.

https://securelist.com/operation-triangulation/109842/

https://www.kaspersky.com/about/press-releases/2023_kaspersky-reports-on-new-mobile-apt-campaign-targeting-ios-devices

https://arstechnica.com/information-technology/2023/06/clickless-ios-exploits-infect-kaspersky-iphones-with-never-before-seen-malware/

Links for checking for infection.

https://securelist.com/find-the-triangulation-utility/109867/

https://github.com/KasperskyLab/triangle_check

The following is a list of C&C domains from the securelist.com article. Did a quick DNS lookup for each domain and they currently have the following records & IP addresses. Note that these can change at any time.

addatamarket.net - sandy.ns.cloudflare.com, doug.ns.cloudflare.com - No A records, or TXT
backuprabbit.com - nelci.ns.cloudflare.com, morgan.ns.cloudflare.com - No A records, or TXT
businessvideonews.com - ns2.dnsowl.com, ns3.dnsowl.com, ns1.dnsowl.com - 198.251.81.30, 209.141.38.71, 107.161.23.204
cloudsponcer.com - Cloudflare, kipp.ns.cloudflare.com, joyce.ns.cloudflare.com
datamarketplace.net - ns78.domaincontrol.com, ns77.domaincontrol.com, 34.98.99.30
mobilegamerstats.com - ns1.bitdomain.biz, No A records, TXT=v=spf1 redirect=_spf.mailhostbox.com
snoweeanalytics.com - cody.ns.cloudflare.com, arlee.ns.cloudflare.com - 104.21.76.6, 172.67.184.201
tagclick-cdn.com - ns4.bitdomain.biz, ns3.bitdomain.biz, ns2.bitdomain.biz, ns1.bitdomain.biz - No A records, TXT=v=spf1 redirect=_spf.mailhostbox.com"
topographyupdates.com - nero.ns.cloudflare.com, dalary.ns.cloudflare.com - 104.21.27.67, 172.67.141.199
unlimitedteacup.com - nelci.ns.cloudflare.com, javon.ns.cloudflare.com - 104.21.55.58, 172.67.145.72
virtuallaughing.com - elaine.ns.cloudflare.com, braden.ns.cloudflare.com - 104.21.60.240, 172.67.202.140
web-trackers.com - dns1.registrar-servers.com, dns2.registrar-servers.com - 15.164.228.250
growthtransport.com - ns3.dnsowl.com, ns2.dnsowl.com, ns1.dnsowl.com - 198.251.81.30, 107.161.23.204, 209.141.38.71
anstv.net - ns64.domaincontrol.com, ns63.domaincontrol.com. - 93.90.223.185
ans7tv.net - ns37.domaincontrol.com,ns37.domaincontrol.com - 93.90.223.185

List of domains

addatamarket.net
backuprabbit.com
businessvideonews.com
cloudsponcer.com
datamarketplace.net
mobilegamerstats.com
snoweeanalytics.com
tagclick-cdn.com
topographyupdates.com
unlimitedteacup.com
virtuallaughing.com
web-trackers.com
growthtransport.com
anstv.net
ans7tv.net

List of IPv4 addresses used

107.161.23.204
198.251.81.30
209.141.38.71
34.98.99.30
172.67.184.201
104.21.76.6
172.67.141.199
104.21.27.67
172.67.145.72
104.21.55.58
104.21.60.240
172.67.202.140
15.164.228.250
209.141.38.71
198.251.81.30
93.90.223.185

Bash command to get an updated IP address list. bad.txt contains all the above domain names.

for i in `cat bad.txt` ; do dig $i a +short >> badips.lst; done

Mikrotik packet sniffer settings to capture traffic coming or going to the above IP addresses.

/tool sniffer
set file-limit=32000KiB file-name=Triangulation filter-ip-address="107.161.23.20\
    4/32,198.251.81.30/32,209.141.38.71/32,34.98.99.30/32,172.67.184.201/32,104.\
    21.76.6/32,172.67.141.199/32,104.21.27.67/32,172.67.145.72/32,104.21.55.58/3\
    2,104.21.60.240/32,172.67.202.140/32,15.164.228.250/32,209.141.38.71/32,198.\
    251.81.30/32,93.90.223.185/32" 

You can then start the sniffer by running Tools -> Packet Sniffer Settings -> Start

or run

/tool/sniffer/start

Installing a specific package version on Ubuntu

On Ubuntu and potentially other Debian based distributions, you can check the available versions of a package with the apt show command

apt show -a

Example showing firefox versions

~$ apt show -a firefox
Package: firefox
Version: 87.0+build3-0ubuntu0.20.04.2
Priority: optional
Section: web
Origin: Ubuntu
Maintainer: Ubuntu Mozilla Team <ubuntu-mozillateam@lists.ubuntu.com>
..................
 More information
..................

Package: firefox
Version: 75.0+build3-0ubuntu1
Priority: optional
Section: web
Origin: Ubuntu
Maintainer: Ubuntu Mozilla Team <ubuntu-mozillateam@lists.ubuntu.com>
Bugs: https://bugs.launchpad.net/ubuntu/+filebug
..................

To install a specific version, use the version number

sudo apt install firefox=75.0+build3-0ubuntu1

Enable Automatic Update for Ubuntu Server 22.04

These steps should work for multiple versions of Ubuntu Server.

Thankfully enabling automatic updates in Ubuntu is super easy.

First make sure that the “unattended-upgrades” package is installed

sudo apt install unattended-upgrades

It was already installed on my Ubuntu 20.04 server instance.
Next run dpkg to reconfigure and enable updates

sudo dpkg-reconfigure unattended-upgrades

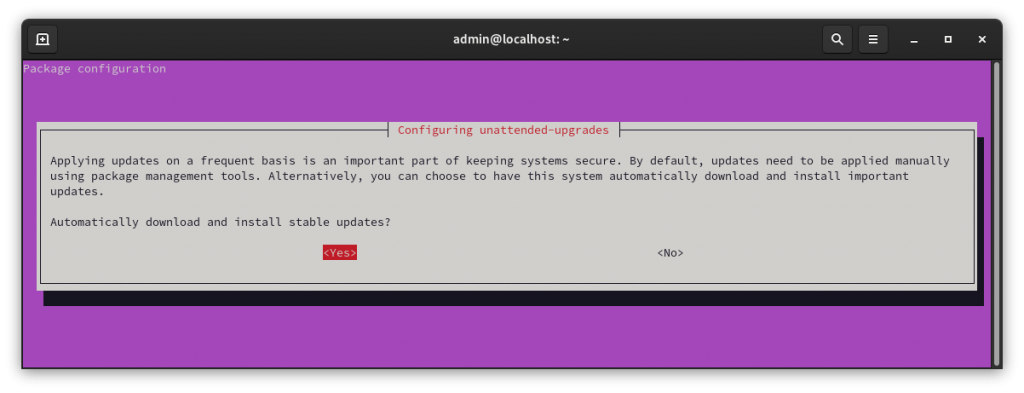
You should get the following prompt.

Configuring automatic updates

Hit “Yes” to enable.

Your system should now automatically install updates. however, if it needs to reboot it may not. You can configure the reboot options in

sudo vi /etc/apt/apt.conf.d/50unattended-upgrades

Scroll down to the Reboot lines and uncomment

// Automatically reboot *WITHOUT CONFIRMATION* if
//  the file /var/run/reboot-required is found after the upgrade
Unattended-Upgrade::Automatic-Reboot "true";  // <- Uncomment line

// If automatic reboot is enabled and needed, reboot at the specific
// time instead of immediately
// Default: "now"
Unattended-Upgrade::Automatic-Reboot-Time "02:00";  // <- Uncomment line

Save the file. Your system should now automatically install stable updates.

Disable automatic update

You can disable the automatic updates by running the dpkg command again.

sudo dpkg-reconfigure unattended-upgrades

and selecting “No”

Automatic updates should now be off.

More information can be found at the following link.

https://www.cyberciti.biz/faq/set-up-automatic-unattended-updates-for-ubuntu-20-04/

Kali Linux Hash Sum Mismatch while doing apt update

https://askubuntu.com/questions/1235914/hash-sum-mismatch-error-due-to-identical-sha1-and-md5-but-different-sha256

Looks like the problem is caused by the Windows Hypervisor Platform. Work around is to disable it.

In the Start menu search for “turn Windows features on or off”

Once open, disable “Virtual Machine Platform” and “Windows Hypervisor Platform”

Disable Virtual Machine Platform

You will need to reboot after it finishes.

I deleted apt on Ubuntu, now what?

Apparently if you do

apt purge ubuntu*

You’ll end up deleting apt. Which is a bummer, because you can’t install anything else, or fix the problem. But not to worry, the resolution is fairly easy.

You can go download the apt deb from Ubuntu’s website and install it with dpkg.

Go to the following link and find the packages for your Ubuntu version

https://packages.ubuntu.com/

You’ll need to show “All packages” at the bottom of the page.

https://packages.ubuntu.com/xenial/allpackages

Download and install ubuntu-keyring, apt-transport-https, and apt packages. Example below

wget security.ubuntu.com/ubuntu/pool/main/a/apt/apt_1.6.6ubuntu0.1_amd64.deb
wget security.ubuntu.com/ubuntu/pool/main/a/apt/apt-transport-https_1.2.29ubuntu0.1_amd64.deb
wget mirrors.kernel.org/ubuntu/pool/main/u/ubuntu-keyring/ubuntu-keyring_2012.05.19_all.deb

Install Packages

sudo dpkg -i ubuntu-keyring_2012.05.19_all.deb
sudo dpkg -i apt-transport-https_1.2.29ubuntu0.1_amd64.deb
sudo dpkg -i apt_1.6.6ubuntu0.1_amd64.deb

Run apt and make sure it is all working

sudo apt update && sudo apt upgrade

kubuntu-desktop : Depends: software-properties-kde but it is not going to be installed

Try installing software-properties-kde and get

The following packages have unmet dependencies:
  software-properties-kde : Depends: python3-software-properties (= 0.96.24.32.11) but 1.8.8 is to be installed
 E: Unable to correct problems, you have held broken packages.

Try to install python3 from the bionic from bionic-updates

sudo apt install -t bionic-updates python3-software-properties

Install software-properties-kde

sudo apt install software-properties-kde

If it fails try force installing it

sudo dpkg -i --force-overwrite /var/cache/apt/archives/software-properties-kde_0.96.24.32.11_all.deb

Install Kubuntu desktop

sudo apt install kubuntu-desktop

More info here
https://pravin517.wordpress.com/2019/07/14/kubuntu-desktop-depends-software-properties-kde-but-it-is-not-going-to-be-installed/

apt install python-pip, Unable to locate package – Ubuntu

When trying to install pip on Ubuntu with

sudo apt install python-pip

get the following error

Unable to locate package python-pip

Does the same thing for other basic packages. One of which was nasm “Dependency for Chipsec”

Issue ended up being that the Community-maintaned source was not enabled. Enabled via the Software & Updates. Should be able to search for it and it should come up.

Install dig on Ubuntu, Debian or Kali Linux

install dig
Help options for dig


Dig is a DNS lookup utility.  It is included in most Linux distributions by default, but if it isn’t you can easily install dig with the following command.

The dig utility is apart of the dnsutils package

sudo apt-get install dnsutils -y

After it is installed, we can verify that it is working with

dig -v

For more information on how to use dig, refer to the following link.

https://www.howtogeek.com/663056/how-to-use-the-dig-command-on-linux/

The following is copied and pasted from the dig man page.

NAME
       dig - DNS lookup utility

SYNOPSIS
       dig [@server] [-b address] [-c class] [-f filename] [-k filename] [-m] [-p port#] [-q name]
           [-t type] [-v] [-x addr] [-y [hmac:]name:key] [[-4] | [-6]] [name] [type] [class]
           [queryopt...]

       dig [-h]

       dig [global-queryopt...] [query...]

DESCRIPTION
       dig is a flexible tool for interrogating DNS name servers. It performs DNS lookups and
       displays the answers that are returned from the name server(s) that were queried. Most DNS
       administrators use dig to troubleshoot DNS problems because of its flexibility, ease of use
       and clarity of output. Other lookup tools tend to have less functionality than dig.

       Although dig is normally used with command-line arguments, it also has a batch mode of
       operation for reading lookup requests from a file. A brief summary of its command-line
       arguments and options is printed when the -h option is given. Unlike earlier versions, the
       BIND 9 implementation of dig allows multiple lookups to be issued from the command line.

       Unless it is told to query a specific name server, dig will try each of the servers listed
       in /etc/resolv.conf. If no usable server addresses are found, dig will send the query to the
       local host.

       When no command line arguments or options are given, dig will perform an NS query for "."
       (the root).

       It is possible to set per-user defaults for dig via ${HOME}/.digrc. This file is read and
       any options in it are applied before the command line arguments. The -r option disables this
       feature, for scripts that need predictable behaviour.

       The IN and CH class names overlap with the IN and CH top level domain names. Either use the
       -t and -c options to specify the type and class, use the -q the specify the domain name, or
       use "IN." and "CH." when looking up these top level domains.

SIMPLE USAGE
       A typical invocation of dig looks like:

            dig @server name type

       where:

       server
           is the name or IP address of the name server to query. This can be an IPv4 address in
           dotted-decimal notation or an IPv6 address in colon-delimited notation. When the
           supplied server argument is a hostname, dig resolves that name before querying that name
           server.

           If no server argument is provided, dig consults /etc/resolv.conf; if an address is found
           there, it queries the name server at that address. If either of the -4 or -6 options are
           in use, then only addresses for the corresponding transport will be tried. If no usable
           addresses are found, dig will send the query to the local host. The reply from the name
           server that responds is displayed.

       name
           is the name of the resource record that is to be looked up.

       type
           indicates what type of query is required — ANY, A, MX, SIG, etc.  type can be any valid
           query type. If no type argument is supplied, dig will perform a lookup for an A record.