Replace ens160 with the connection name. “vmcli con show”
sudo nmcli connection mod ens160 ipv4.method auto
Should be able to restart the networking service or reboot the server
Replace ens160 with the connection name. “vmcli con show”
sudo nmcli connection mod ens160 ipv4.method auto
Should be able to restart the networking service or reboot the server
The Problem
We have been experiencing a problem with our Cambium routers where they randomly drop and are unresponsive till a reboot. They’ll also stop handing out addresses on the LAN side.
A reboot “fixes” the problem, until it does it again. You can trigger the behavior by running a port scan against the router. Wondering if the CPU/Memory get overloaded?
nmap -T4 -A -v 192.168.11.1
While running a scan on the LAN side, the web interface slows down, but doesn’t seem to take it down as fast as a scan on the WAN side.
goahead.sh is a script that may be maxing out the cpu, but could be completely unrelated.
Configuring the “Allowed Remote IP(IP1;IP2;)” to limit WAN access effectively blocks port scans and resolves the issue. Setting is under Administration -> Management -> Web Settings. You can add multiple ranges with
10.0.0.0/8;172.16.0.0/12;192.168.0.0/16
It looks like the public ip ranges are limited to /24’s so if you you have a block of public IP addresses larger than a /24, you’ll need to break it down into 24’s to work properly.
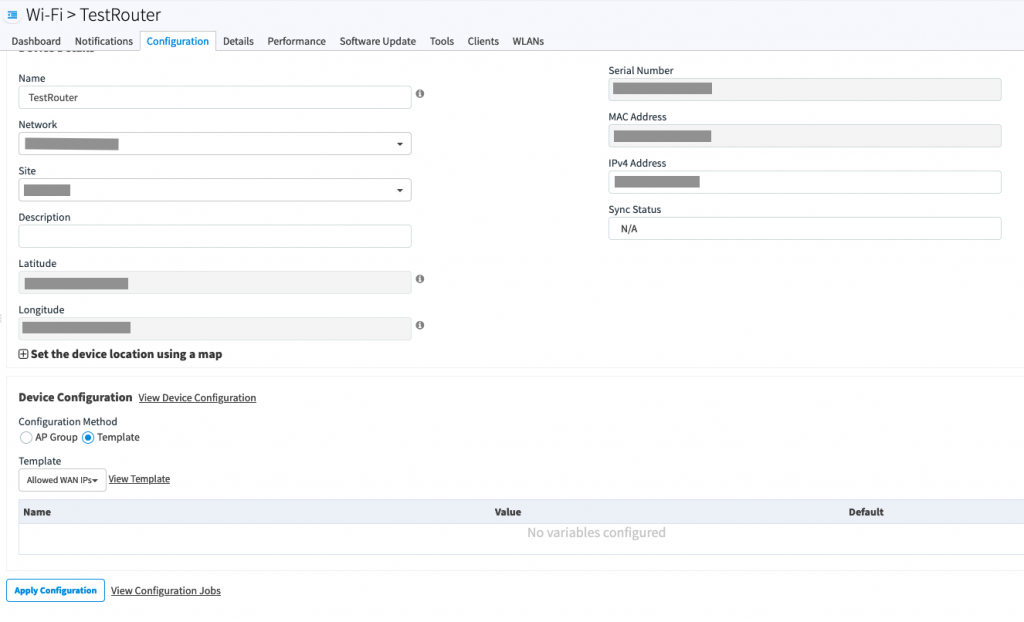
You can also create a template in the Cambium Cloud so you can apply the change to multiple routers fairly easily.
Go to Configuration -> Templates and add a new template.
WebRemoteLegalIP=10.0.0.0/8;192.168.0.0/16;172.16.0.0/12
And then you can go to your device -> Configuration and apply your new config.
Do note that if you run a scan from an allowed range, it still seems to cause problems. But at least setting the Allowed Remote IPs will keep others from scanning your network and causing problems on your R195’s.
Open up the following file, change eth0 to your primary ethernet adapter. More info here.
vi /etc/sysconfig/network-scripts/ifcfg-eth0
and under IPADDR set it to the new IP. Update netmask and gateway if needed.
Save file and restart network
systemctl restart network
You may need to run the following to update the license on the server.
/usr/local/cpanel/cpkeyclt
You may need to migrate IP’s to the new address.
If you are keeping the old address on the server, then you may need to readd it through the IP Functions.
Had a problem with a WHM/cPanel server where it was working fine from a couple different networks, but then would not work on others. The server itself seemed fine and fully operational.
Checked firewall rules on routers, server, checked IP routes, tried disabling cPHulk. Ended up being there were a couple addresses added with the incorrect subnet mask which was keeping it from working. Removed the IP’s with the wrong subnet and it started working on all networks.
[root@host ~]# ifconfig eth0: flags=4163 mtu 1500 inet 192.168.1.70 netmask 255.255.255.224 broadcast 192.168.1.95 inet6 7f80::4588:523f:a697:c311 prefixlen 64 scopeid 0x20 ether 4b:02:de:0d:cf:1a txqueuelen 1000 (Ethernet) RX packets 171071 bytes 83556877 (79.6 MiB) RX errors 0 dropped 0 overruns 0 frame 0 TX packets 163710 bytes 76482245 (72.9 MiB) TX errors 0 dropped 0 overruns 0 carrier 0 collisions 0 eth0:cp1: flags=4163 mtu 1500 inet 192.168.1.74 netmask 255.255.255.224 broadcast 192.168.1.95 ether 4b:02:de:0d:cf:1a txqueuelen 1000 (Ethernet) eth0:cp6: flags=4163 mtu 1500 inet 192.168.1.75 netmask 255.255.224.0 broadcast 23.145.159.255 ether 4b:02:de:0d:cf:1a txqueuelen 1000 (Ethernet) … [root@host ~]#
Under eth0:cp6 the IP has a 255.255.224.0 subnet which is incorrect. Should have been a 255.255.255.224 (/27) subnet.
Removed the IP out of WHM and then readded with the correct subnet mask and it now works.
SSH into AirFiber
ssh ubnt@192.168.1.20
Open up the “/tmp/system.cfg” configuration file
vi /tmp/system.cfg
Find the line that has the ip address and modify the address.
Note that you’ll need to hit i to enter text if you are using vi
... netconf.3.hwaddr.status=disabled netconf.3.ip=192.168.1.10 <-- Change IP here netconf.3.mtu=1500 ...
Save file by hitting the esc key then type :x and then hit Enter
Now run the following command to write the changes to the device. Once it comes back up it should have the new IP address from the config file.
cfgmtd -f /tmp/system.cfg -w && reboot
The default DSTNATed firewall rule keeps traffic from the WAN accessing LAN side IP addresses.
More info here
Printing the rules on a router with the default config should show the following.
;;; defconf: drop all from WAN not DSTNATed chain=forward action=drop connection-nat-state=!dstnat in-interface=ether1
If you are wanting to add the rule to a router, you can copy and past the following command. Replace in-interface=ether with your in interface.
/ip firewall add action=drop chain=forward comment=\ "defconf: drop all from WAN not DSTNATed" connection-nat-state=!dstnat in-interface=ether1
Change eth0 to the interface you would like to change.
SSH into EdgePoint and type in configure to get into a configuration prompt
configure
Now set interface eth0 to dhcp
set interfaces ethernet eth0 address dhcp
Delete the static IP address on eth0 if needed
delete interfaces ethernet eth0 address 192.168.1.1/24
Save changes
commit
Install dhcp server software
sudo apt install isc-dhcp-server
Edit the following config file and set the networking interface it should use. In this case enp60s0
sudo vi /etc/default/isc-dhcp-server
Example line to change
INTERFACESv4="enp60s0"
Now edit the dhcpd.con file
sudo vi /etc/dhcp/dhcpd.conf
Add the following in. Change the addresses and settings as needed.
subnet 192.168.47.0 netmask 255.255.255.0 { range 192.168.47.26 192.168.47.30; option domain-name-servers ns1.internal.example.org; option domain-name "internal.example.org"; option subnet-mask 255.255.255.0; option routers 192.168.47.1; option broadcast-address 192.168.47.255; default-lease-time 600; max-lease-time 7200; }
Set a static ip on the computer that’ll be acting as the dhcp server. You can set it as the gateway if it is the gateway.
Allow dhcp through the firewall
sudo ufw allow 67/udp sudo ufw reload
Restart the service and connect a client.
sudo systemctl restart isc-dhcp-server
You can look at dhcp leases with the following command
tail -f /var/lib/dhcp/dhcpd.leases
Disable the service from starting on system boot
systemctl disable NetworkManager
Stop the service from running
systemctl stop NetworkManager
And if you want to remove it from the system.
yum remove NetworkManager
Refer to this post if you need to set a static IP Address
The network configuration settings for the server edition of Ubuntu are now stored in the following location. Create the file if it does not exist.
sudo vi /etc/netplan/01-network-manager-all.yaml
Add or edit the config file to the following. Change eno1 to your interface name and the address and gateway to the appropriate IP’s
For more information, see netplan(5). network: version: 2 renderer: networkd ethernets: eno1: dhcp4: no addresses: [192.168.200.24/24] gateway: 192.168.200.1 nameservers: addresses: [8.8.8.8,8.8.4.4]
Now apply the changes with the following command.
sudo netplan apply