To enable the developer options on Android go to Settings -> About phone -> Tap on Build number until it says your a Developer.
Now you can go to Settings -> System -> Advanced -> Developer options to edit developer settings.

To enable the developer options on Android go to Settings -> About phone -> Tap on Build number until it says your a Developer.
Now you can go to Settings -> System -> Advanced -> Developer options to edit developer settings.
Bunch of tweaks and enhancements are on the arch wiki
https://wiki.archlinux.org/index.php/Firefox/Tweaks
Two specific ones that can help with performance are enabling OMTC and WebRender
https://wiki.archlinux.org/index.php/Firefox/Tweaks#Enable_OpenGL_Off-Main-Thread_Compositing_(OMTC)
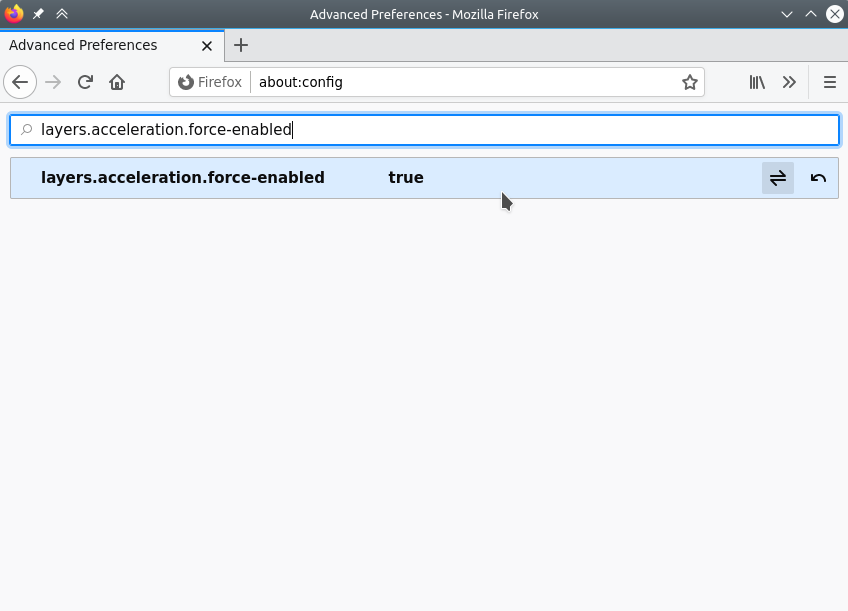
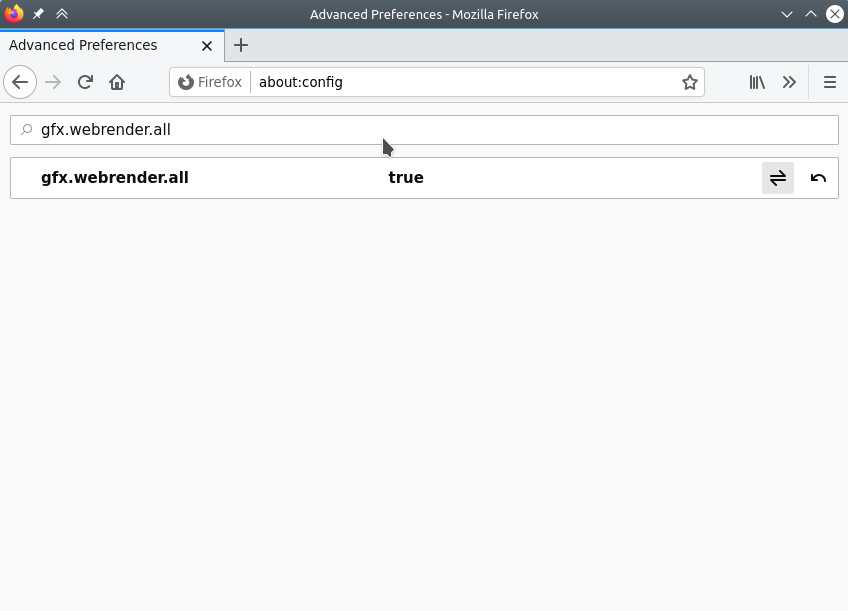
Open up Firefox and about:config
Search for “layers.acceleration.force-enabled”
Search for “gfx.webrender.all” and set to true
Restart Firefox.
The certificate does not match the expected identity of the site that it was retrieved from.
The server's identity does not match the identity in the certificate
Hostname in certificate didn't match
The reason for the above errors are due to the fact that the email client is trying to use mail.mydomain.com and the email server is mail.emailserver.com.
So the email client pulls the certificate for mail.emailserver.com and reads that this certificate is for mail.emailserver.com, NOT for mail.mydomain.com. Hence the conflict and it throws an error.
If you can, accepting the certificate should let everything work. It appears that on recent versions of iOS their may be some problems trusting it. The other work around is to use the actual mail server host. So mail.emailserver.com
Download LineageOS
Download the unofficial LineageOS 16 build from the following page
https://konstakang.com/devices/rpi3/LineageOS16.0/
Unzip
Unzip the file with
unzip ~/Downloads/lineage-16.0-20200207-UNOFFICIAL-KonstaKANG-rpi3.zip
Write to SD Card
Either use the instructions on the following link to write it to the SD card
https://www.raspberrypi.org/documentation/installation/installing-images/windows.md
Or use DD
WARNING! Make sure “/dev/mmcblk0” is the correct SD Card. Refer to here if you need to locate the path for the SD Card.
sudo dd if=~/Downloads/lineage-16.0-20200207-UNOFFICIAL-KonstaKANG-rpi3.img of=/dev/mmcblk0 bs=1M status=progress
Plug you SD Card into your Pi and boot it up.
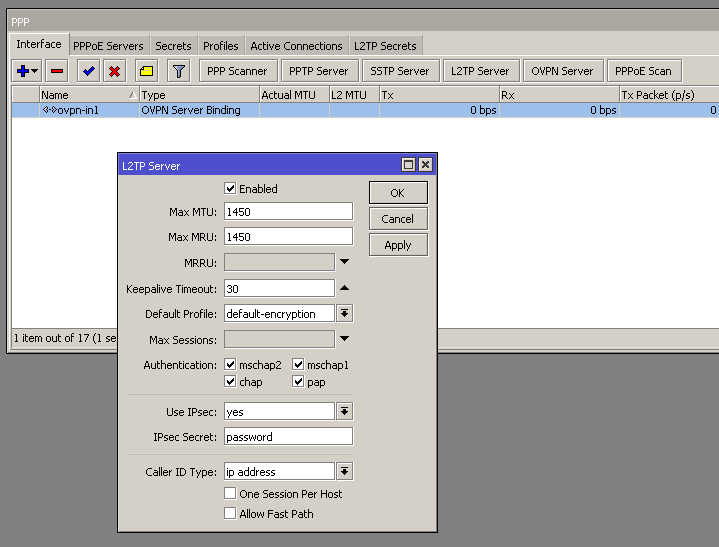
Open up PPP and select L2TP Server. Set it to Enabled, set IPsec to yes, and set the IPsec secret.
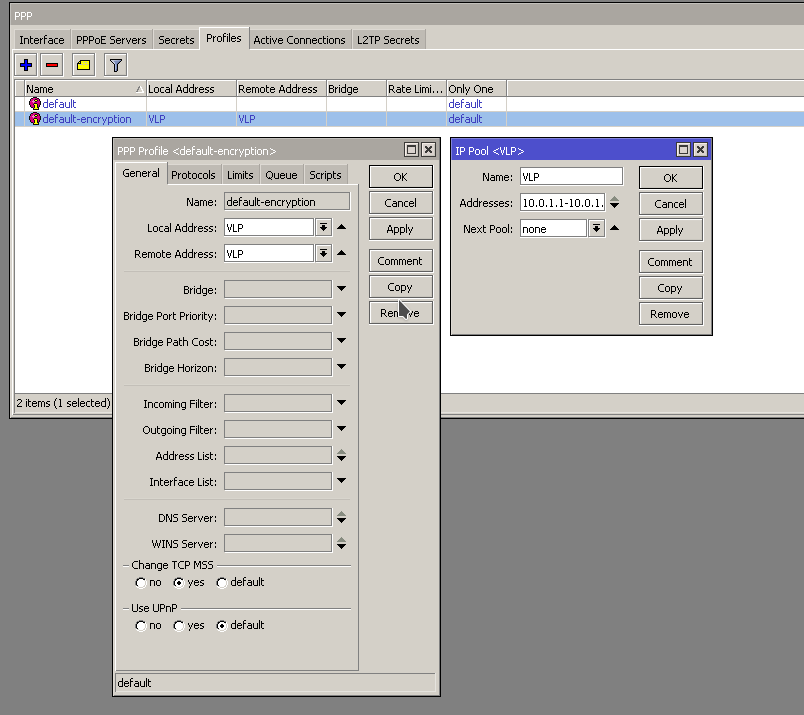
Next go to PPP -> Profiles and modify the default-encryption one. You can setup an IP Pool to use for the VPN clients when they connect.
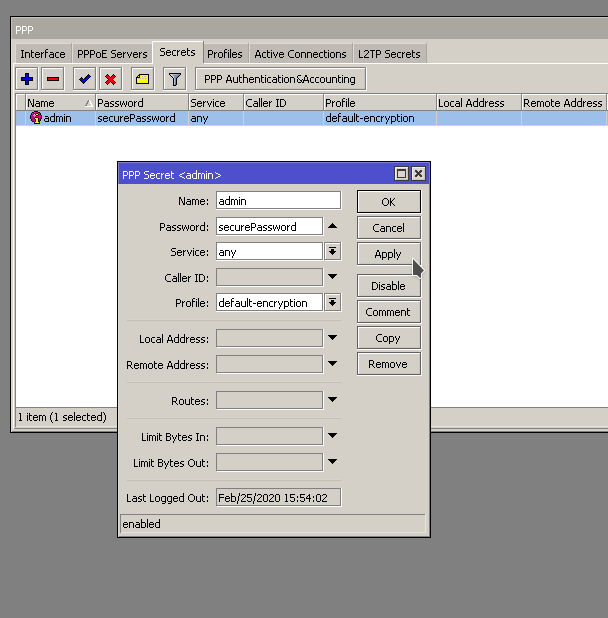
Next go to the PPP -> Secrets and configure the user to connect.
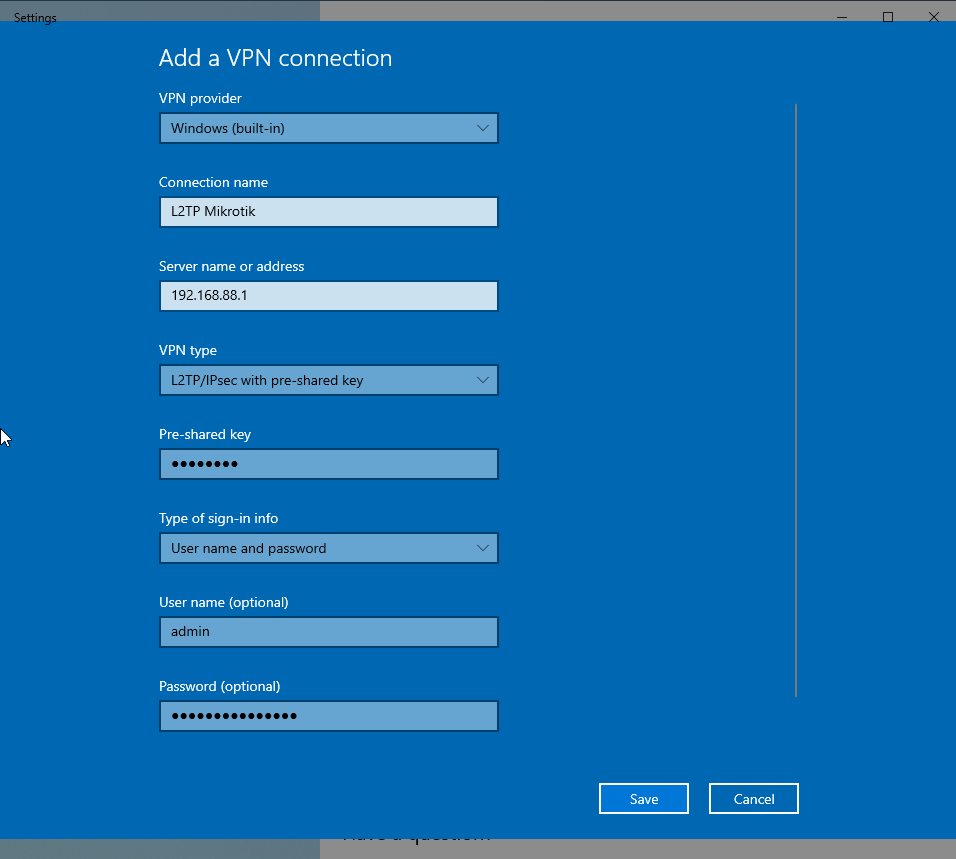
Setup your VPN client and connect.
All the following commands are run from the “/opt/librenms” directory
$ sudo ./daily.sh
Re-running /opt/librenms/daily.sh as librenms user
Updating to latest codebase                        FAIL
error: Your local changes to the following files would be overwritten by merge:
        html/js/lang/de.js
        html/js/lang/en.js
Please, commit your changes or stash them before you can merge.
...
$
Checking with validate.php shows that you can run githup-remove to fix it
$ sudo ./validate.php
[WARN]  Your install is over 24 hours out of date, last update: Mon, 23 Feb 2020 05:43:12 +0000
         [FIX]:
         Make sure your daily.sh cron is running and run ./daily.sh by hand to see if there are any errors.
 [WARN]  Your local git contains modified files, this could prevent automatic updates.
         [FIX]:
         You can fix this with ./scripts/github-remove
         Modified Files:
          html/js/lang/de.js
...
$
Run “sudo ./scripts/github-remove -d”
$ sudo ./scripts/github-remove -d
Are you sure you want to delete all modified and untracked files? [y/N] y
$
You should also be able to remove the files individually if the above command does not work.
Run validate again to make sure it checks out good.
Now run ./daily.sh
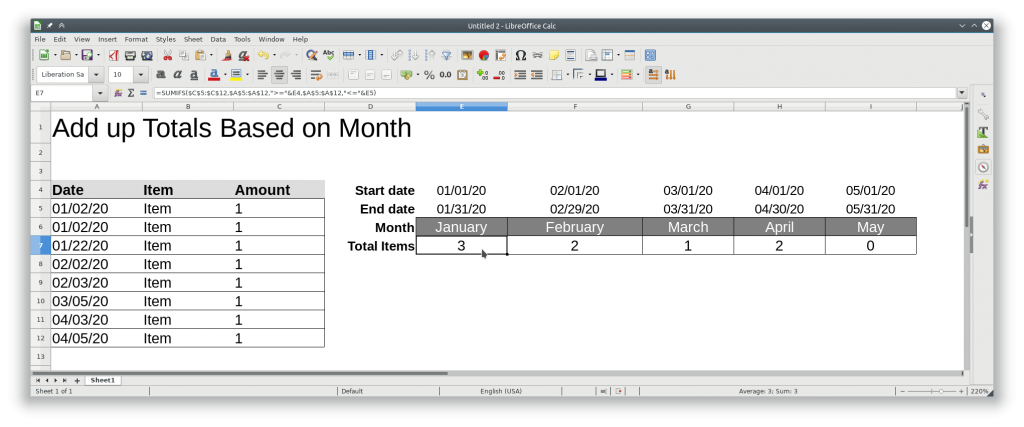
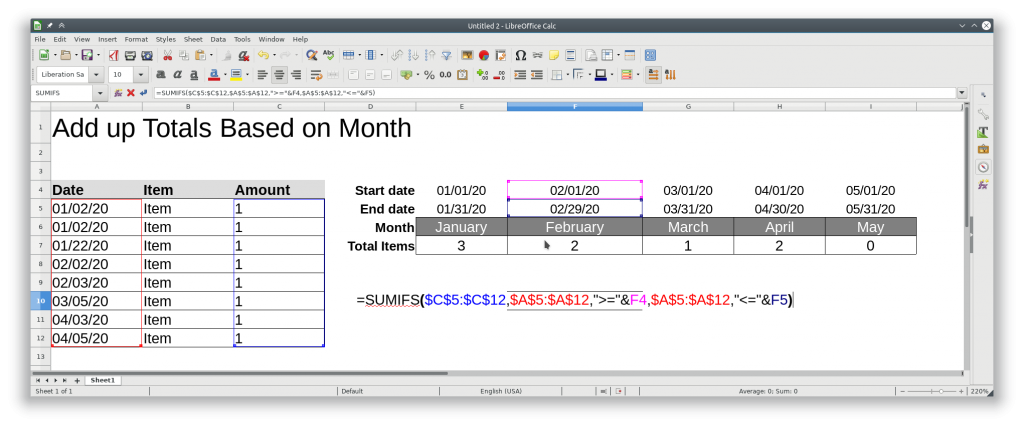
You can use SUMIFS to check if a date is between two other dates and sum if it is.
The formula is as follows
=SUMIFS(RangeToAdd,DateRange,">="StartDate,SecondDateRange,"<="EndDate")
Where
RangeToAdd = Range to add, or amount of items to count up
DateRange = Date field to compare against start date
StartDate = Should be the start of the month (Can change to whatever date you need)
SecondDateRange = Same as DateRange, this is used to compare against the EndDate
EndDate = End of month date (Can change to whatever date you need)
The approx exact formula is.
=SUMIFS($C$5:$C$12,$A$5:$A$12,”>=”&E4,$A$5:$A$12,”<=”&E5)
More info
https://exceljet.net/formula/sum-if-date-is-between
Can look here to set a certificate up in Winbox
or here to configure from command line
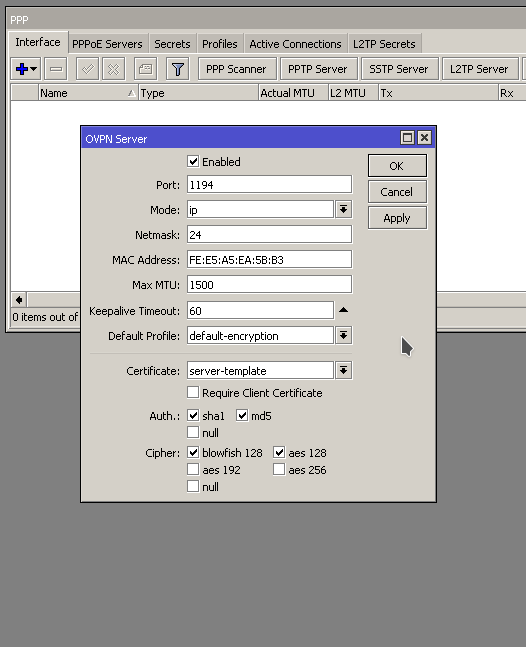
To setup a OpenVPN server on a router there are a few things that need to be done.
Create an IP pool that clients can pull and address from when they connect
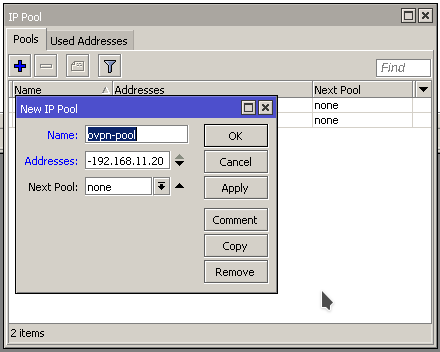
Modify the default-encryptoin Profile and specify the VPN IP pool.

Create new user, specify the default-encryptio profile
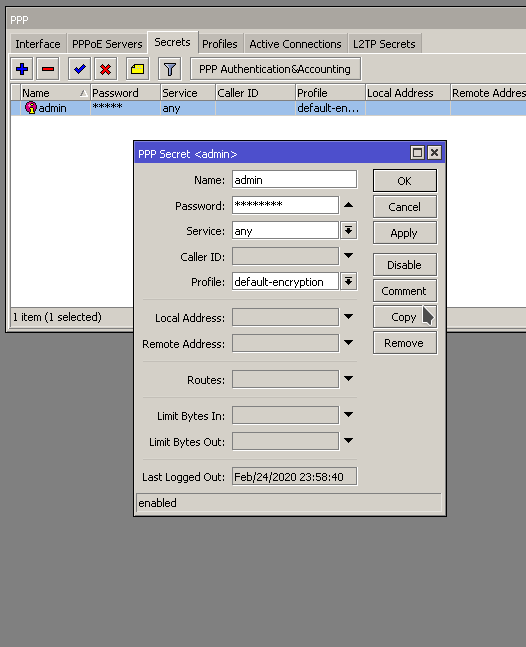
Enable the OVPN server. Specify the “Default Profile:” to be the default-encyption, specify the certificate to be the server-template, or whatever the name is of the certificate you created.
https://wiki.mikrotik.com/wiki/Manual:Create_Certificates
https://www.medo64.com/2016/12/simple-openvpn-server-on-mikrotik/
/certificate add name=ca-template common-name=myCa days-valid=3650 key-size=2048 key-usage=key-cert-sign,crl-sign

/certificate add name=server-template common-name=server days-valid=3650 key-size=2048 key-usage=digital-signature,key-encipherment,tls-server
/certificate sign ca-template name=myCa

/certificate sign server-template ca=myCa name=server
/certificate set myCa trusted=yes

/certificate set server trusted=yes
Open up the Certificates window by going to /System -> Certificates. Hit the + to add a new certificate
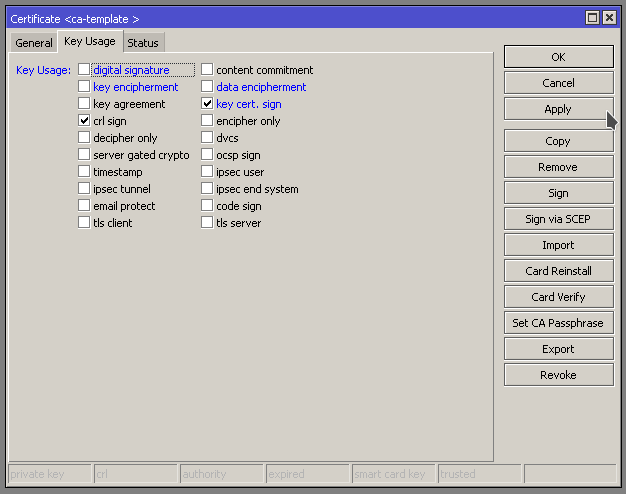
First we are going to create a Certificate Authority template
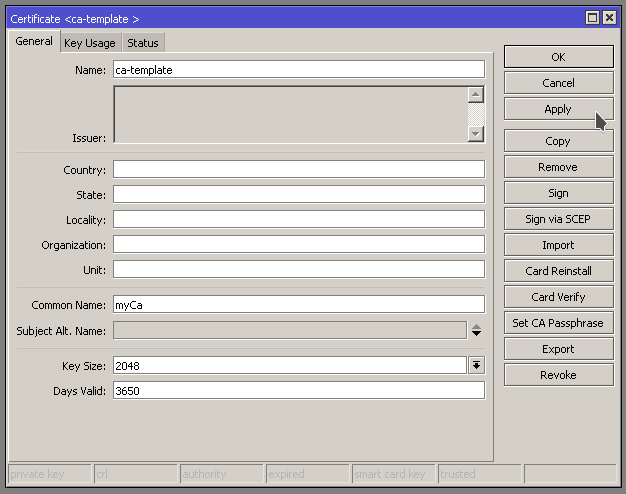
Specify the key usage to “crl sign” and “key cert. sign” and apply
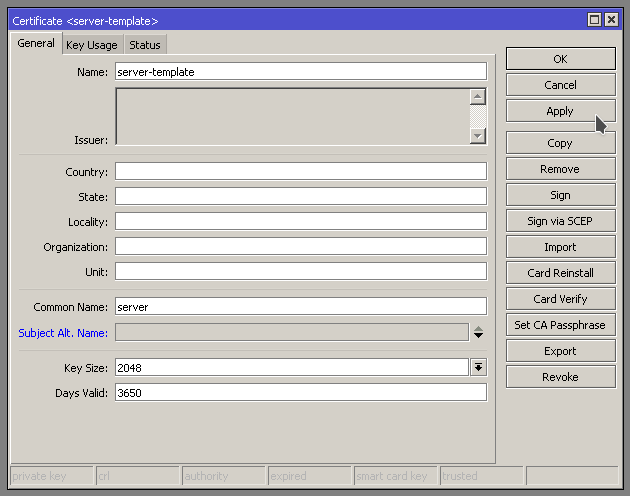
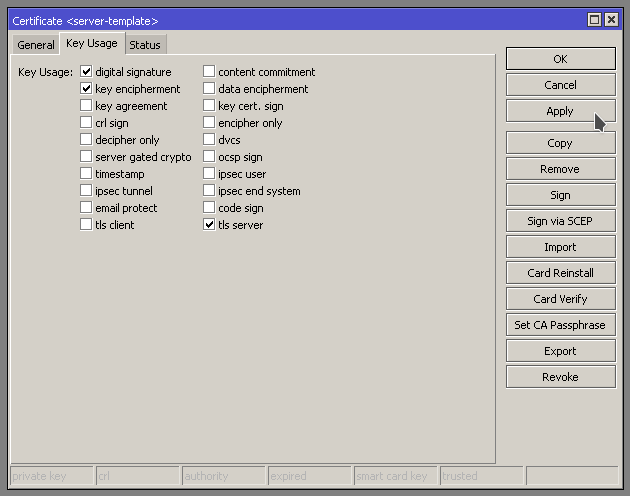
Now we are going to create a server template
We need to specify “Digital signature, key encipherment, and tls server” You may need to enable/disable more depending on your use case scenario. In this case we are setting it up for OpenVPN.
First we need to sign the ca-template by opening up the the Certificate and hitting Sign on the right hand side. Should get the little Sign window pop up.
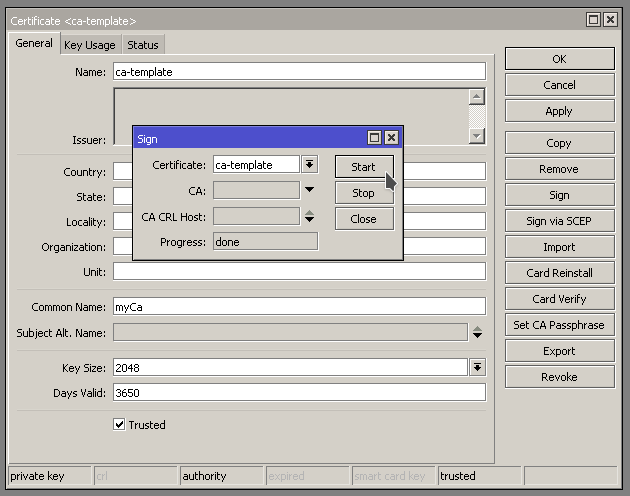
Progress will show done when it is finished signing.
Next we need to sign the server-template. When Signing the server template, specify the ca-template in the CA: field. See below
