Nvidia RTX 3090 – Hashrate and Power Consumption

Nvidia RTX 3090 ETH Hashrate and Power Consumption

The following is the estimated Hashrate and power consumption of a RTX 3090 based on web sources.

RTX 3090

Cost

Cost Used (eBay)
February 2021: $2300 – $2700

Hasrate for Ethash and Power Consumption

Hashrate: 120/Mhs

Power Consumption
Average: 300 W


Average Mhs Per Watt : 0.40/Mhs
Average Watts Per Mhs: 2.50 W

Profitability is about $15.40/day as of February 9, 2021

https://whattomine.com/coins/151-eth-ethash?hr=120&p=300&fee=0.0&cost=0.1&hcost=0.0&commit=Calculate

Enable Automatic Update for Ubuntu Server 22.04

These steps should work for multiple versions of Ubuntu Server.

Thankfully enabling automatic updates in Ubuntu is super easy.

First make sure that the “unattended-upgrades” package is installed

sudo apt install unattended-upgrades

It was already installed on my Ubuntu 20.04 server instance.
Next run dpkg to reconfigure and enable updates

sudo dpkg-reconfigure unattended-upgrades

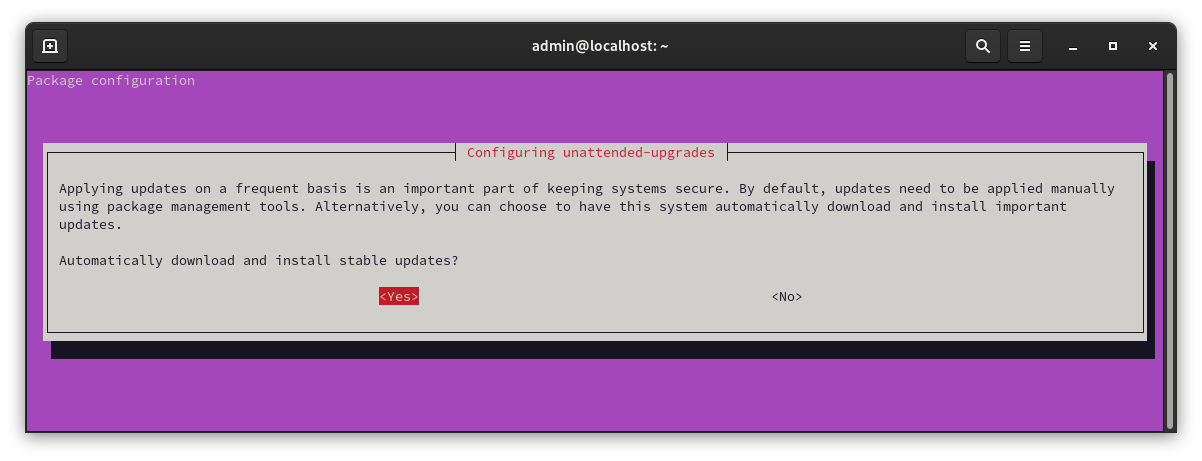
You should get the following prompt.

Configuring automatic updates

Hit “Yes” to enable.

Your system should now automatically install updates. however, if it needs to reboot it may not. You can configure the reboot options in

sudo vi /etc/apt/apt.conf.d/50unattended-upgrades

Scroll down to the Reboot lines and uncomment

// Automatically reboot *WITHOUT CONFIRMATION* if
//  the file /var/run/reboot-required is found after the upgrade
Unattended-Upgrade::Automatic-Reboot "true";  // <- Uncomment line

// If automatic reboot is enabled and needed, reboot at the specific
// time instead of immediately
// Default: "now"
Unattended-Upgrade::Automatic-Reboot-Time "02:00";  // <- Uncomment line

Save the file. Your system should now automatically install stable updates.

Disable automatic update

You can disable the automatic updates by running the dpkg command again.

sudo dpkg-reconfigure unattended-upgrades

and selecting “No”

Automatic updates should now be off.

More information can be found at the following link.

https://www.cyberciti.biz/faq/set-up-automatic-unattended-updates-for-ubuntu-20-04/

Limit Network Speed of wget

You can limit the download speed for wget with the –limit-rate option.

Example command

wget --limit-rate=128K incredigeek.com/file-to-download.html

Replace 128K with the rate you would like. Rate is in Bytes, K for kilobytes M for megabytes.

More info from the man pages

  --limit-rate=amount        Limit the download speed to amount bytes per second.  Amount may be expressed in bytes, kilobytes with the k suffix, or megabytes with the m suffix.  For example,        --limit-rate=20k will limit the retrieval rate to 20KB/s.  This is useful when, for whatever reason, you don't want Wget to consume the entire available bandwidth.        This option allows the use of decimal numbers, usually in conjunction with power suffixes; for example, --limit-rate=2.5k is a legal value.        Note that Wget implements the limiting by sleeping the appropriate amount of time after a network read that took less time than specified by the rate.  Eventually        this strategy causes the TCP transfer to slow down to approximately the specified rate.  However, it may take some time for this balance to be achieved, so don't        be surprised if limiting the rate doesn't work well with very small files.

wget –limit-rate options

Installing Discord on Fedora 33

For some reason a lot of applications out there do not have a built RPM package. Fortunately, there are a bunch of applications built into snap, so we can install snap and then install Discord.

You can also use the copr repo. Visit the following link for instructions.

Install Snap Store

sudo dnf install snapd

https://snapcraft.io/docs/installing-snap-on-fedora

Install Discord

snap install discord

You may need to try signing out and back in or restarting your computer for the applications to show up in your application menu.

You can also manually run the application with

snap run discord

OLED Screen Brightness on Fedora 33

By default Linux and OLED displays don’t really want to play well together. icc-brightness is a handy utility that resolves the problem, but all the instructions I found online were for Ubuntu/Debian based distributions.

https://github.com/udifuchs/icc-brightness

Fortunately, after a few failed attempts to compile the program I was able to figure out which dependency was required.

[admin@local icc-brightness]$ sudo make
cc -W -Wall  icc-brightness-gen.c -l lcms2  -o icc-brightness-gen 
icc-brightness-gen.c:9:10: fatal error: lcms2.h: No such file or directory
    9 | #include <lcms2.h>
      |          ^~~~~~~~~
compilation terminated.
make: *** [Makefile:10: icc-brightness-gen] Error 1
admin@local icc-brightness]$

We are missing the lcms2-devel package. Not sure if the utils package is required, but installed it anyway.

sudo dnf install lcms2-utils lcms2-devel

With that installed we can now make and install icc-brightness

sudo make install

Reboot the laptop and it should automatically start icc-brightness in the background and the brightness controls should work

You can find more information for installing on Debian based systems at the following link.

no permissions (user in plugdev group; are your udev rules wrong?)

While trying to use ADB on a Linux Computer, I received the following error from “adb devices”

no permissions (user in plugdev group; are your udev rules wrong?);

Not exactly sure what causes the above error, but the information in the following Stack Exchange link was helpful.

https://stackoverflow.com/questions/53887322/adb-devices-no-permissions-user-in-plugdev-group-are-your-udev-rules-wrong

I was able to get around the issue by putting the USB option to “File Transfer Mode” from the notifications menu

Show Down Devices From SSH – LibreNMS

Fortunately, it is super easy to get a list of down devices in LibreNMS. All we need to do is a dump of the devices from MySQL.

You can use the following command to print which devices are down. Should be the same devices that show down on your dashboard.

mysql -u librenms -p librenms -e 'use librenms ; select hostname,sysName,status from devices where status=0'

Tip: You can change 0 to 1 to see all up devices.

Show down devices via SSH in LibreNMS

Migrate LibreNMS to new Server

Some quick notes on manually moving LibreNMS to a new server.  For more detailed instructions you can refer to the following post

Recovering LibreNMS from crashed XenServer VM

Steps

  1. Backup /opt/librenms file
  2. Backup librenms database
  3. Install LibreNMS on new server
  4. Import /opt/librenms files
  5. Import librenms database

Backing up LibreNMS files

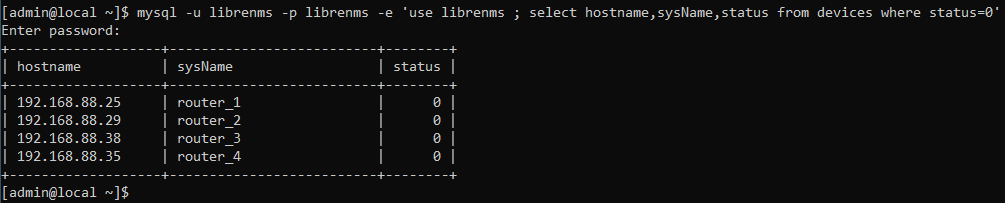
LibreNMS stores all it’s files in /opt/librenms
Quick and easy way to back up the LibreNMS files is to use tar.

tar zcvf librenms_backup.tgz /opt/librenms

Migrating Database

I believe you can copy the whole /var/lib/mysql directory.  Should be able to use the above command.  If not you can do a mysqldump and then import it on the new system.

How to Restore Pixel to Factory Image

Restoring a Pixel to the factory image is a pretty straight forward operation if you are familiar with fastboot and adb. This guide assumes you have fastboot already installed and setup in your user path. If not you can refer to the following link for more information.

WARNING – THESE STEPS WILL DELETE ALL USER DATA OFF THE DEVICE.

https://developers.google.com/android/images#instructions

1. Download OTA Image

Go to the following link and download the Factory Image for your device

https://developers.google.com/android/images

Extract the file and then open a terminal or command prompt in that directory.

2. Boot up Pixel in recovery

You can do this with “adb reboot recovery” or with the volume key to boot into the Android boot menu.

3. Flash Image

On Windows you can flash the firmware with

flash-all.bat

Or on Linux

./flash-all.sh

Should take it a couple of minutes to complete.

Next we can lock bootloader with

fastboot flashing lock

You will need to confirm the lock on your phone.

Unable to Remove Authorized SSH Keys from AirOS

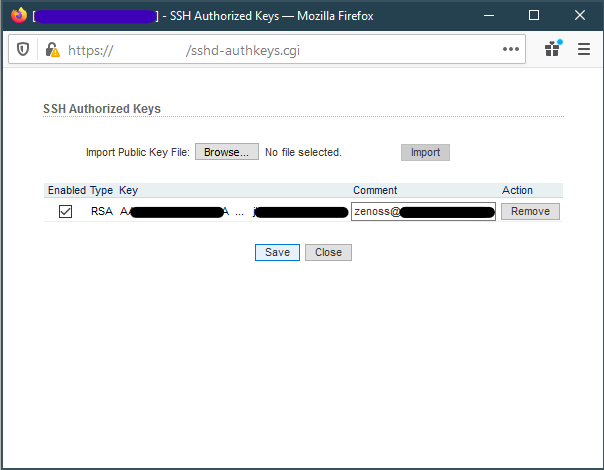
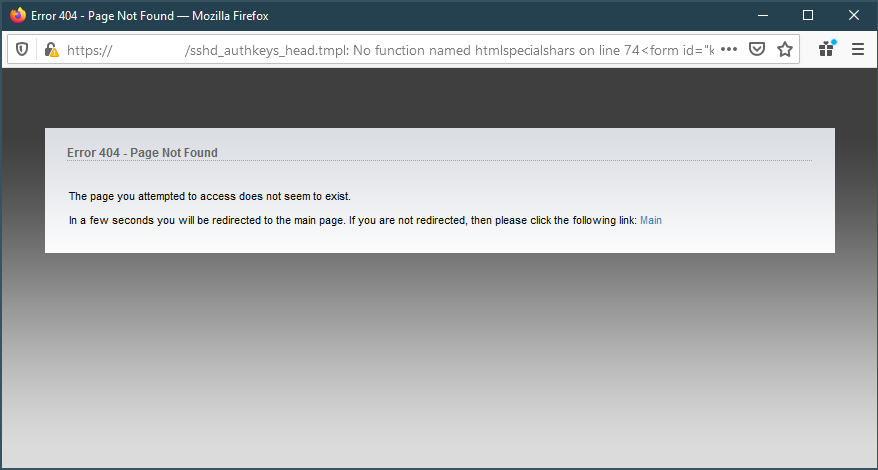
For some reason I ran into an issue where I can not remove authorized SSH Keys in AirOS version 6.3. It redirects to a 404 page and then to the main page.

Attempting to remove SSH keys in AirOS
404 Error while attempting to remove SSH keys

Thankfully, we can still remove the authorized keys from the command line. For more information on making changes over SSH, refer to the following post.

SSH into radio. Replace username and IP address with your radios user and IP.

ssh ubnt@192.168.1.20

Open up config file

vi /tmp/system.cfg

Search for the lines that contain

the sshd.auth.key and remove them

Remove the sshd.auth.key lines

Save the file and write the configuration with

/usr/etc/rc.d/rc.softrestart save

Once the command completes, you should be good to go.