In this post we are going to extract the contents of a UniFi .unf backup.
This is helpful if we need to do any sort of recovery, or need to look through the database to find system information.
- Acquire backup
- Decrypt and extract backup
- Dump database to JSON file
Acquire Backup
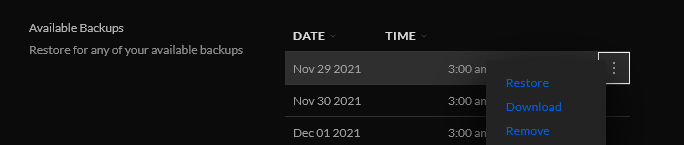
This is easy to do. Log into the web interface go to Settings -> System -> Maintenance -> Backup and Restore
Scroll down to Available Backups and download.
You can also get the file via scp or sftp. Manual backups are located in
/usr/lib/unifi/data/backup
and auto backups are in
/usr/lib/unifi/data/backup/autobackup
Decrypt and Extract Backup
We’ll be getting the following decrypt script from here. https://github.com/zhangyoufu/unifi-backup-decrypt More notes on it below.
We’ll need to make sure that openssl and zip are installed
sudo apt install openssl zip
Download the script with wget
wget https://raw.githubusercontent.com/zhangyoufu/unifi-backup-decrypt/master/decrypt.sh
Make it executable
sudo chmod u+x decrypt.sh
And now we can convert the UniFi .unf backup file to a .zip
sudo ./decrypt.sh autobackup_6.2.33.unf autobackup_6.2.33.zip
Now we can extract the zip archive. You can do this on Windows, macOS, or Linux through the GUI or you can extract with
sudo unzip autobackup_6.2.33.zip -d unifi
This will extract all the files and folders to a directory named unifi.
cd unifi
Dump database to JSON
You should now see the db.gz file. This is a compressed archive of the database in BSON (Binary JSON) format. We can use the mongo-tools to convert this to a more human readable JSON format.
sudo apt install mongo-tools
Now we can extract the archive and pipe it through bsondump.
gunzip -c db.gz | bsondump
You can run it through grep to filter out what you need.
You can also dump the db to a json file with
bsondump --bsonFile=db --outFile=db.json
More notes on the decrypt script.
The decrypt script is really simple. It looks like it uses a key to decrypt the UniFi backup and then puts all the contents into a zip file. There is also an encryption script. Theoretically you can decrypt, make changes to the config and then reencrypt and restore to a server.
#!/bin/sh

# Authors:
# 2017-2019 Youfu Zhang
# 2019 Balint Reczey <balint.reczey@canonical.com>

set -e

usage() {
    echo "Usage: $0 <input .unf file> <output .zip file>"
}

if [ -z "$2" -o ! -f "$1" ]; then
    usage
    exit 1
fi

INPUT_UNF=$1
OUTPUT_ZIP=$2

TMP_FILE=$(mktemp)
trap "rm -f ${TMP_FILE}" EXIT

openssl enc -d -in "${INPUT_UNF}" -out "${TMP_FILE}" -aes-128-cbc -K 626379616e676b6d6c756f686d617273 -iv 75626e74656e74657270726973656170 -nopad
yes | zip -FF "${TMP_FILE}" --out "${OUTPUT_ZIP}" > /dev/null 2>&1