Looks like you can use Darling to run MacOS command line applications in Linux.
Running macOS Applications on Linux
Reply

Looks like you can use Darling to run MacOS command line applications in Linux.
You should be able to copy and paste the following in a backup.sh file and then execute from cron. Should work out of the box, but you can change the backup directory and the teams.sh path if needed/wanted.
#!/bin/bash

# LibreNMS backup script
# Jan 1, 2019

lDate=`date +%Y%m%d-%H%M`       # local date + hour minute
dDate=`date +%Y%m%d`            # todays date

# If you have the teams.sh script, you can trigger a backup notification
ALERT="/home/admin/teams.sh -b"

# Directory to backup to
bDir="/backup"
bName="librenms_backup"

# MySQL settings for tar and sqldump
sqlDir="/var/lib/mysql"
sqlDB="librenms"
sqlUN="root"
sqlPW=""
LOG="${bDir}/${lDate}-${bName}.log"

# Directory that contains data
dDir="/opt/librenms"

# tar LibreNMS dir
# tar SQL dir "the whole thing with the innode files
# sql dump of the db for extra redundancy

if [ -d ${bDir} ]; then
echo "backup dir exist, starting to backup"
else
        echo "backup dir not available.  Quiting"
        exit 1
fi

${ALERT} "Starting backup for ${bName} - `date`"

systemctl stop mariadb httpd
# LibreNMS data backup
tar -zcvf ${bDir}/${lDate}-${bName}.tgz ${dDir}
if [ $? -eq 0 ]; then
        echo "Tar succesfully backed up ${bDir}"
else
        echo "Tar failed while trying to backup ${dDir}"
        echo " ${lDate} - Tar failed while trying to backup ${dDir}" >> ${LOG}
        ${ALERT} "${lDate} - Tar failed while trying to backup ${dDir}"
fi

# MySQL data backup
tar -zcvf ${bDir}/${lDate}-${bName}-mysql.tgz ${sqlDir}
if [ $? -eq 0 ]; then
        echo "Tar succesfully backed up ${sqlDir}"
else
        echo "Tar failed while trying to backup ${sqlDir}"
        echo " ${lDate} - Tar failed while trying to backup ${sqlDir}" >> ${LOG}
        ${ALERT} "${lDate} - Tar failed while trying to backup ${sqlDir}"
fi

systemctl start mariadb httpd
sleep 5

 # SQL dump
mysqldump -u ${sqlUN} -p'4rfvBHU8!' ${sqlDB} > ${bDir}/${lDate}-${bName}.sql
if [ $? -eq 0 ]; then
        echo "MySQL DB dumped"
else
        echo "Ran into error while doing sql dump"
        echo "${lDate} - Ran into error while doing sql dump" >> ${LOG}
        ${ALERT} "${lDate} - Ran into error while doing sql dump"
fi

echo "Removing old backups"
if ( ls ${bDir} | grep -q ${dDate} );then
        find ${bDir}/* -prune -mtime +31 -exec rm {} \;
else
        echo "Looks like there are no backup files!  Aborting!!!"
        ${ALERT} "${lDate} - Error: find failed to find any backup files in backup dir.  Aborting!!!"
fi

${ALERT} "Finished backup for ${bName} - `date`"Warning: Be extremely careful when making changes to partitions and disk as it can lead to broken systems and lost data. Make sure you have a backup.
This scenario is done on a basic Ubuntu install. No fancy LVM stuff going on. If you need that, refer to here
Disk /dev/sda: 64 GiB, 68719476736 bytes, 134217728 sectors
Units: sectors of 1 * 512 = 512 bytes
Sector size (logical/physical): 512 bytes / 512 bytes
I/O size (minimum/optimal): 512 bytes / 512 bytes
Disklabel type: dos
Disk identifier: 0x2062ec28
Device     Boot    Start      End  Sectors  Size Id Type
/dev/sda1  *        2048 65011711 65009664   31G 83 Linux
/dev/sda2       65013758 67106815  2093058 1022M  5 Extended
/dev/sda5       65013760 67106815  2093056 1022M 82 Linux swap / Solaris
From the above output of fdisk -l, we see that the disk has 64GiB available, but the primary partition is only 31G. To make the primary partition larger we need to
You may need to boot up in recovery to get this command working. Also if you boot up in recovery, you’ll need to remount the root / partition read/write. More info here.
resize2fs /dev/sda1Helpful Links
https://access.redhat.com/articles/1190213
https://access.redhat.com/articles/1196353
Commands taken from here
https://www.digitalocean.com/community/tutorials/how-to-upgrade-to-ubuntu-16-04-lts
Install the update manager
sudo apt-get install update-manager-coreThen run the upgrade
sudo do-release-upgradeAccept all the prompts and should be good to go.
Apparently if you do
apt purge ubuntu*
You’ll end up deleting apt. Which is a bummer, because you can’t install anything else, or fix the problem. But not to worry, the resolution is fairly easy.
You can go download the apt deb from Ubuntu’s website and install it with dpkg.
Go to the following link and find the packages for your Ubuntu version
You’ll need to show “All packages” at the bottom of the page.
https://packages.ubuntu.com/xenial/allpackages
Download and install ubuntu-keyring, apt-transport-https, and apt packages. Example below
wget security.ubuntu.com/ubuntu/pool/main/a/apt/apt_1.6.6ubuntu0.1_amd64.deb
wget security.ubuntu.com/ubuntu/pool/main/a/apt/apt-transport-https_1.2.29ubuntu0.1_amd64.deb
wget mirrors.kernel.org/ubuntu/pool/main/u/ubuntu-keyring/ubuntu-keyring_2012.05.19_all.deb
Install Packages
sudo dpkg -i ubuntu-keyring_2012.05.19_all.deb
sudo dpkg -i apt-transport-https_1.2.29ubuntu0.1_amd64.deb
sudo dpkg -i apt_1.6.6ubuntu0.1_amd64.deb
Run apt and make sure it is all working
sudo apt update && sudo apt upgrade
Had a problem with resize2fs not resizing the root partition of Ubuntu. Was giving the following error
resize2fs: Read-only file system While checking for on-line resizing support
The problem is the root partition I was trying to resize was mounted read only. Remounting as read/write fixed the problem
mount -o remount /
Then rerun the resize command to fill up the rest of the free space
resize2fs /dev/sda1
In the following commands, 367c7a1465ec = Docker container ID
systemctl start docker
systemctl stop docker
systemctl enable docker
sudo docker container list
sudo docker container list
367c7a1465ec        jacobalberty/unifi:latest   "/usr/loca/bin/dock…" 15 minutes ago      Up 14 minutes (healthy) unifi-controller
The bold part is your Docker container ID
sudo docker images
sudo docker images
jacobalberty/unifi   latest              baebbe301633        9 days ago          711MB
sudo docker stop 367c7a1465ec
sudo docker stop 367c7a1465ec
Need to stop the container first.
sudo docker rmi 367c7a1465ec
We can connect to a Docker container with the following, replace DockerContainerName with the Docker container name.
docker exec -it DockerContainerName sh
Ran into an issue where it looked like imapsync would fail to connect to the server on the first line when trying to do a bulk move.
mail.maildomain.com;user1@incredigeek.com;password1;mail.incredigeek.com;user2@incredigeek.com;password2
Was able to work around the issue by Adding a comment line to the top of the file. May have to do with how the script I was using handles the lines.
### Email Import list mail.maildomain.com;user1@incredigeek.com;password1;mail.incredigeek.com;user2@incredigeek.com;password2
Script used to copy
#!/bin/sh
# $Id: sync_loop_unix.sh,v 1.6 2015/11/04 18:23:04 gilles Exp gilles $
#Example for imapsync massive migration on Unix systems.
#See also http://imapsync.lamiral.info/FAQ.d/FAQ.Massive.txt
#
Data is supposed to be in file.txt in the following format:
host001_1;user001_1;password001_1;host001_2;user001_2;password001_2; …
#Separator is character semi-colon ";" it can be changed by any character changing IFS=';' in the while loop below.
# Each line contains 6 columns, columns are parameter values for
--host1 --user1 --password1 --host2 --user2 --password2
and a trailing empty fake column to avoid CR LF part going
in the 6th parameter password2. Don't forget the last semicolon.
# You can add extra options after the variable "$@" Use character backslash \ at the end of each supplementary line, xcept for the last one. You can also pass extra options via the parameters of this script since they will be in "$@" The credentials filename "file.txt" used for the loop can be renamed by changing "file.txt" below. echo Looping on account credentials found in file.txt
echo
file="${1}"
{ while IFS=',' read  h1 u1 p1 h2 u2 p2 fake
    do
        { echo "$h1" | egrep "^#" ; } > /dev/null && continue # this skip commented lines in file.txt
        echo "==== Starting imapsync from host1 $h1 user1 $u1 to host2 $h2 user2 $u2 ===="
         imapsync --host1 "$h1" --user1 "$u1" --password1 "$p1" \
                  --host2 "$h2" --user2 "$u2" --password2 "$p2" \
                  "$@" --delete2
         echo "==== Ended imapsync from host1 $h1 user1 $u1 to host2 $h2 user2 $u2 ===="
         echo
    done
} < ${file}
Bunch of tweaks and enhancements are on the arch wiki
https://wiki.archlinux.org/index.php/Firefox/Tweaks
Two specific ones that can help with performance are enabling OMTC and WebRender
https://wiki.archlinux.org/index.php/Firefox/Tweaks#Enable_OpenGL_Off-Main-Thread_Compositing_(OMTC)
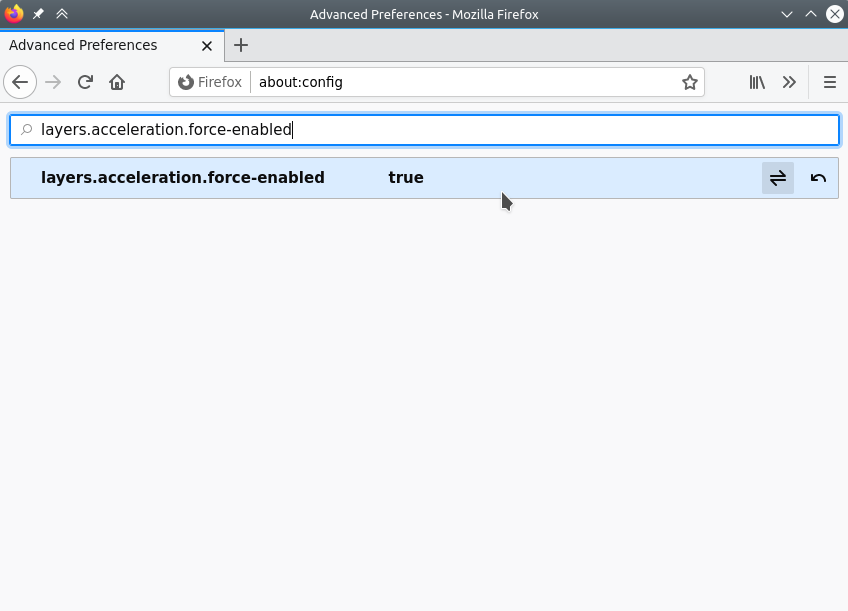
Open up Firefox and about:config
Search for “layers.acceleration.force-enabled”
Search for “gfx.webrender.all” and set to true
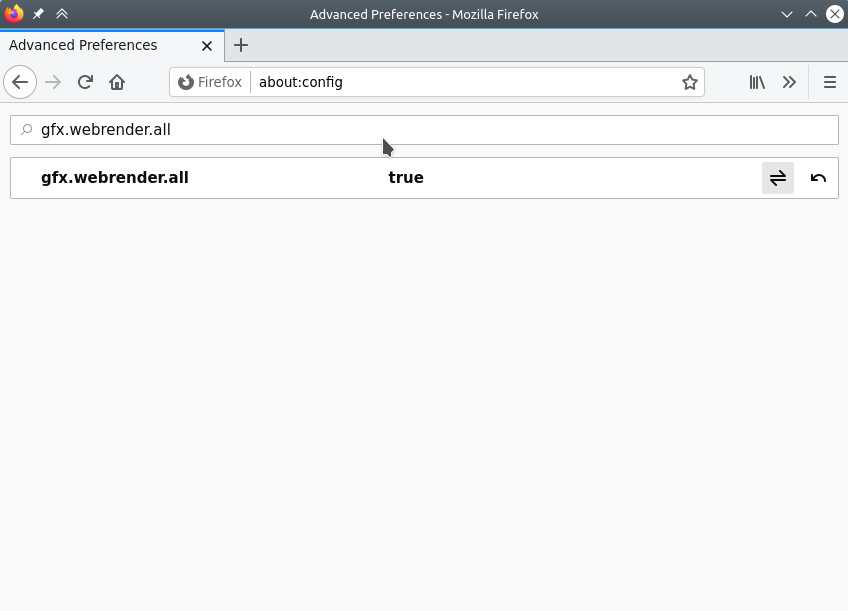
Restart Firefox.
Download LineageOS
Download the unofficial LineageOS 16 build from the following page
https://konstakang.com/devices/rpi3/LineageOS16.0/
Unzip
Unzip the file with
unzip ~/Downloads/lineage-16.0-20200207-UNOFFICIAL-KonstaKANG-rpi3.zip
Write to SD Card
Either use the instructions on the following link to write it to the SD card
https://www.raspberrypi.org/documentation/installation/installing-images/windows.md
Or use DD
WARNING! Make sure “/dev/mmcblk0” is the correct SD Card. Refer to here if you need to locate the path for the SD Card.
sudo dd if=~/Downloads/lineage-16.0-20200207-UNOFFICIAL-KonstaKANG-rpi3.img of=/dev/mmcblk0 bs=1M status=progress
Plug you SD Card into your Pi and boot it up.