Now we can extract the zip archive. You can do this on Windows, macOS, or Linux through the GUI or you can extract with
sudo unzip autobackup_6.2.33.zip -d unifi
This will extract all the files and folders to a directory named unifi.
cd unifi
Dump database to JSON
You should now see the db.gz file. This is a compressed archive of the database in BSON (Binary JSON) format. We can use the mongo-tools to convert this to a more human readable JSON format.
sudo apt install mongo-tools
Now we can extract the archive and pipe it through bsondump.
gunzip -c db.gz | bsondump
You can run it through grep to filter out what you need.
You can also dump the db to a json file with
bsondump --bsonFile=db --outFile=db.json
More notes on the decrypt script.
The decrypt script is really simple. It looks like it uses a key to decrypt the UniFi backup and then puts all the contents into a zip file. There is also an encryption script. Theoretically you can decrypt, make changes to the config and then reencrypt and restore to a server.
By default the passwords are “encrypted” so you can not tell what the password is.
No way to view cnPilot WiFi password in the Web UI
We covered decrypting the passwords from the config file from cambium cloud. But what about a local router that is not connected to the cloud. What then?
Thankfully everything you need is on the router. We’ll need to use the command line tools.
Now we can decrypt the password. Replace the string at the end with the encrypted string
3des_hex -d c760ba8ffe65c669
It should now display the decrypted password
# 3des_hex -d c760ba8ffe65c669
12345678#
Note that it puts the # symbol after the password and if you try to type something in, it clears the line. you can use the following to have cleaner output.
So if I want to continuously ping a website, say incredigeek.com, I can put in the following
ping -n 0 incredigeek.com
Hit return and we are off to the races. But wait. I can’t get it to stop. Ctrl + C, doesn’t do anything, Ctrl + D or Ctrl +Z don’t help either.
Okay well fine. We’ll launch another terminal and ssh into it again and see what we can do. Excellent, now we are in aaand… wait… why are the ping results showing up here too? Help!!!
Buried in the heart of the helpful help command are these lines.
       ping -- Send ICMP ECHO_REQUEST packets to network hosts
    pingend -- End ICMP ECHO_REQUEST packets to network hosts
You don’t say. Well lets try typing in pingend with all the commotion going on in the terminal.
SSH+> pingend
Ping statistics for 142.250.191.206:
        Packets: Sent = 3, Received = 3, Lost = 0 (0% loss)
Well good to know. Saves having to reboot the device.
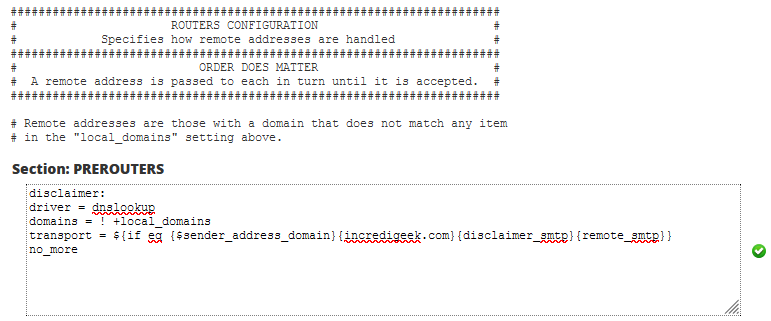
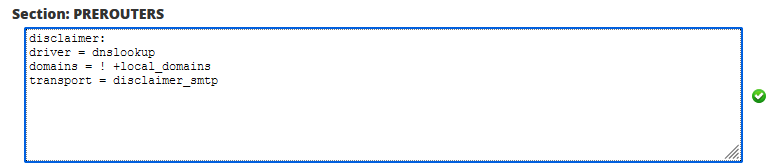
That should be everything that you need. Send a test email to an external email account to verify that it works.
Note that it looks like sending an email locally to email addresses on the same domain or to yourself bypass the filter and do not get the disclaimer added.
The following links were helpful for getting this set up.
Sometimes it is nice to have a list of just the IP addresses and the hostname or mac address. Can be especially helpful when you are trying to get a list of devices to do a bulk update in LibreNMS. Helpful LibreNMS links for renaming and showing down devices
we are going to run the command to pull the DHCP information and then use Unix utilities to parse the data out.
Replace dhcp8 with the correct dhcp server in the mikrotik.
First, SSH into your Mikrotik router.
ssh user@mikrotik
Next we’ll want to go to the ip dhcp-server lease directory
/ip dhcp-server lease
Now we can run the following command to loop through and pull out all the info we need. You can change the info like “mac-address” for something like “status”. You can use Tab to see what options are available. Just delete mac-address and hit tab twice.
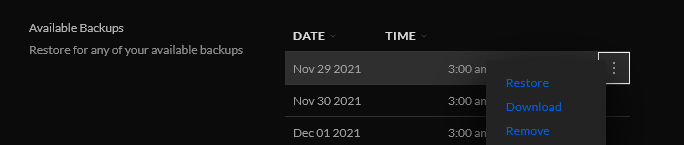
I had a command that was used to see if. It used some arithmetic operators to subtract 1 from the current day. That would give us yesterdays day which we could then use to check if a backup was created then.
day=$(date +%d) ; date=$(($day - 1)) ; echo "yesterday date is $date"
-bash: 08: value too great for base (error token is "08")
The better way
Fortunately there is an easier and more reliable way to do this. Using the date command, you can specify yesterday and it will print out yesterdays date.