Create docker compose file with the following options
vi docker-compose.yml
Change the TZ to your time zone. If you have issues with the graphs, most likely something is off with the time zone between this container and Grafana/LibreNMS server
A note on SSL/TLS certificates. If you have an SSL certificate for LibreNMS, you can use it for grafana. If you run into issues, try copying the cert (fullchain.pem, privkey.pem) to /etc/grafana/
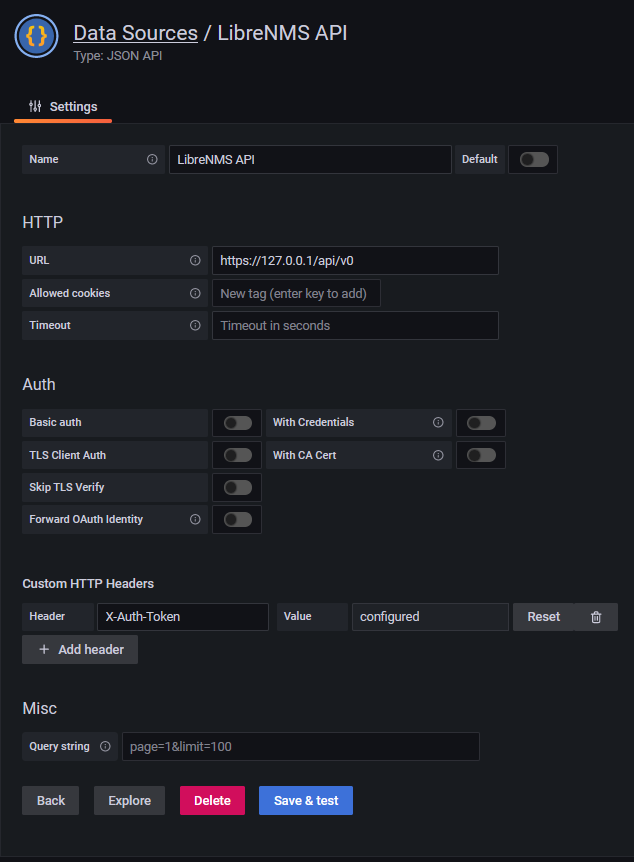
In Grafana, go to Configuration -> Data Sources -> Add data source
Set Name for Data Source
URL should be https://your_librenms_url/api/v0
Add Custom HTTP Header
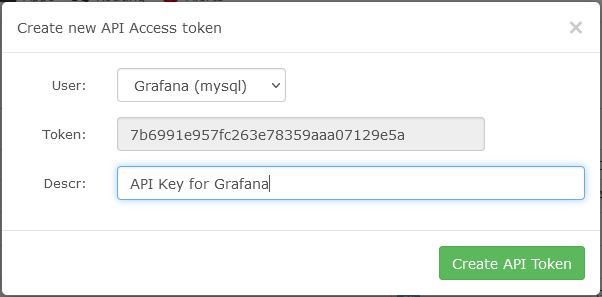
Header field should be “X-Auth-Token”
Value field should contain the API token we created in LibreNMS
Save and Test If you receive any errors, refer to the Troubleshooting part at the end.
Adding LibreNMS API Data Source in Grafana
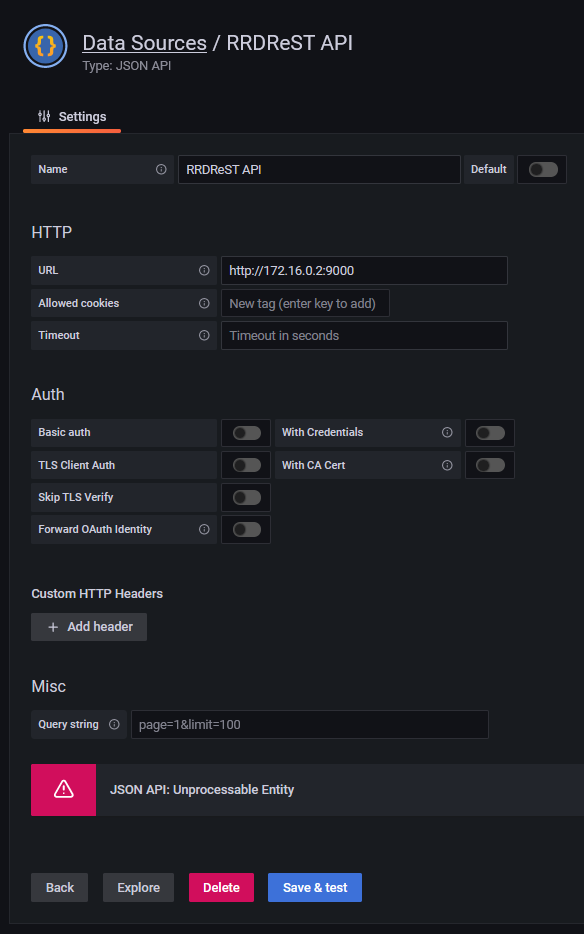
Add RRDReST Data Source
In Grafana, go to Configuration -> Data Sources -> Add data source
Set Name for Data Source
URL needs to be your docker container IP address (Steps above)
Save and Test (Should return “Unprocessable Entity”)
Adding RRDReST API Data Source in Grafana
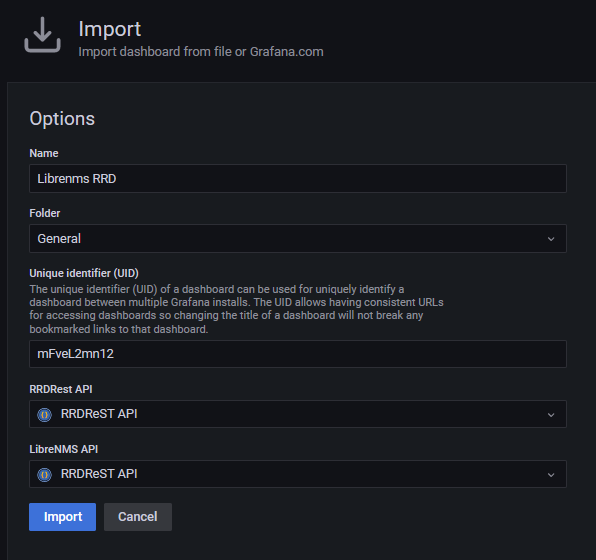
Import Dashboard into Grafana
Now we need a dashboard to present our data.
Go to Create -> Import
Upload JSON file (Download from here or PasteBin )
Under RRDReST API , select our RRDReST Data Source
Under LibreNMS API , select our LibreNMS Data Source
Click Import
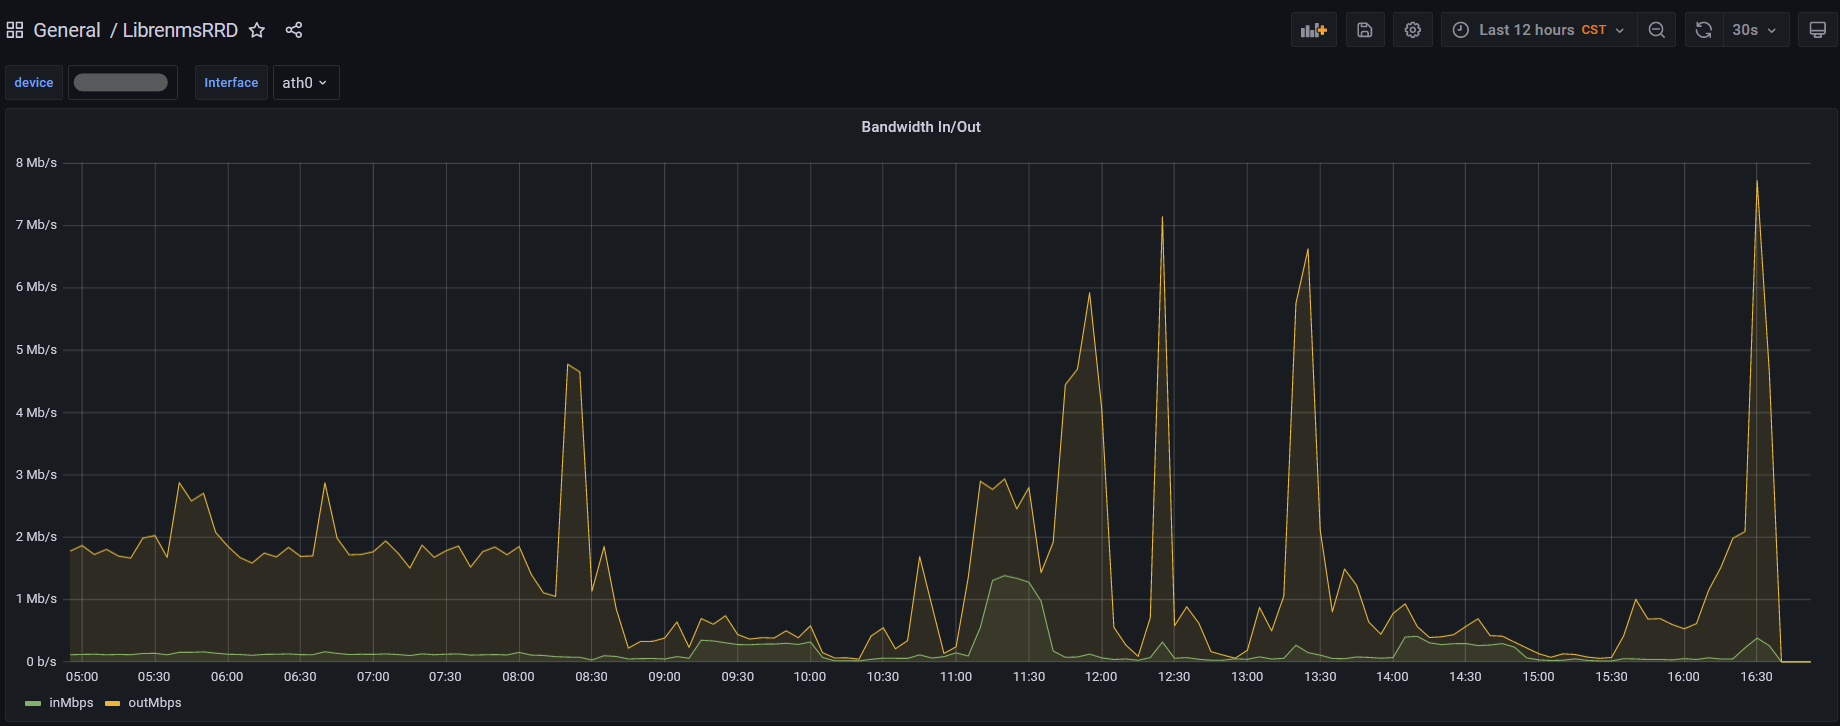
You should now be able to view your dashboard and use the drop down menus to select devices
Grafana viewing bandwidth on device being monitored by LibreNMS
Troubleshooting
There were a couple of issues I ran into while trying to get everything working together.
RRDReST shows 404 Not Found
Issue: When trying to run RRDReST with uvicorn, I was never able to access the rrd files, even the test rrd files that are included when installing RRDReST. I am guessing it is either a permisions issue, or something unable to access the files. Work around: Install RRDReST via Docker container.
Error Running uvicorn RRDReST
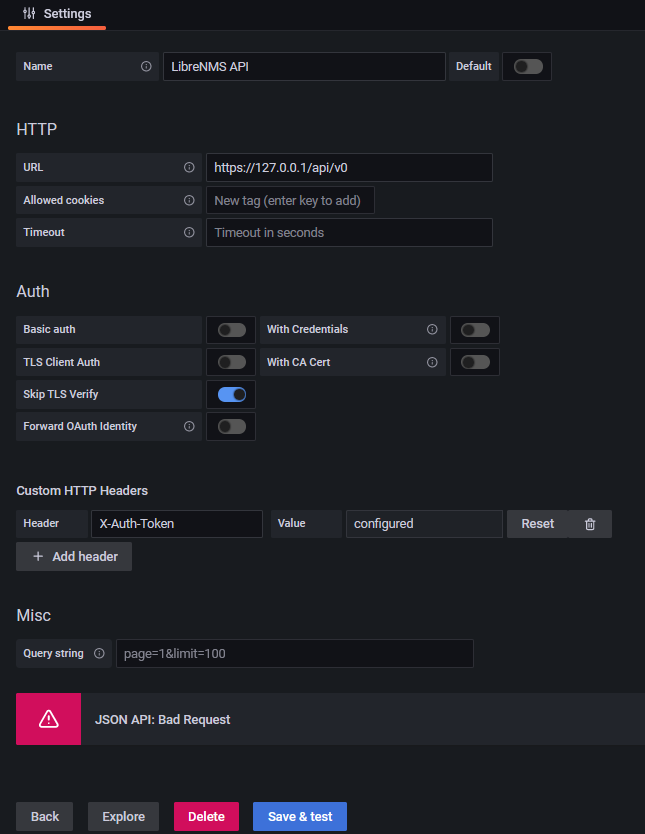
Error Adding LibreNMS API
Issue: Get a “JSON API: Bad Request” when trying to set up the LibreNMS API Data Source in Grafana.
Work around: Install a valid SSL Certificate and set up a DNS record so you can access LibreNMS at librenms.yourdomain.com.
More info: I would assume that “Skip TLS Verify” would work with or without a valid certificate, but it would not work for me. There are potentially some other options with modifying how Nginx or Apache is set up that would get this working. If you setup Grafana to use a SSL certificate, you may need to copy the certificate files (fullchain.pem, privkey.pem) to /etc/grafana/ and run “chown root:grafana *.pem” to let grafana have access to the files.
Running the ./validate.php script returns the following error
[FAIL]  Python3 module issue found: 'Required packages: ['PyMySQL!=1.0.0', 'python-dotenv', 'redis>=3.0', 'setuptools', 'psutil>=5.6.0', 'command_runner>=1.3.0']
Package not found: The 'command_runner>=1.3.0' distribution was not found and is required by the application
'
        [FIX]:
        pip3 install -r /opt/librenms/requirements.txt
Running the [FIX] throws an error saying gcc failed with exit status 1.
The Solution
Fortunately this issue is easy to resolve.
First we need to install python3-devel
sudo yum install python3-devel
Next, as the librenms user, run the pip command to install the requirements.
Some of the UniFi UNVR’s have system files on a USB drive. There seem to be a number of the drives failing recently, rendering the UNVR inoperable. Fortunately it is easy to replace. The following steps should preserve the video recordings.
Remove the USB drive (use a heat gun or screw driver to break the glue that is holding the USB drive)
Install new USB drive
Temporarily remove UNVR HDDs (this may not be necessary, but rather be safe then sorry.)
Boot UNVR with new USB drive. (Give it a little time to format and copy contents to the new USB drive. Should not take more then 30 minutes.)
Setup the UNVR like it was before
Power off the UNVR again
Reinstall the HDD’s
Power on the UNVR
Log in and reconfigure the users
Note on Recovery
You could potentially mount the failed or failing USB drive on a Linux machine copy off a UniFi backup. Unfortunately, the UniFi Protect backup does not preserve the users. Just the video groups. You will probably have to resend invites to users.
Note on the video storage drives
It sounds like the UniFi Protect system will try to read the drives and if it can preserve the data or read the raid information it will try to use that. That is what it sounds like at least from the forums. More info on drive management.
When using the above to run a matrix server, it can be confusing how to verify and check which version of Postgres you are running. Fortunately this is really easy to check.
Run
sudo matrix-postgres-cli --version
And you should get the version of Postgres that is being used.
You will need a hash of the password to put into the database. We don’t cover that in this post. You could copy the password from a different user account or use a different UniFi instance to change the password and then check the DB to find the hash.
SSH into the UniFi Server
ssh unifiadmin@unifiserver
Connect to MongoDB
Connect to Mongo by typing in the following.
mongo -port 27117
Then select the ace database by typing
use ace
Find user ObjectId
The admins are in the admin collection/table. Use the following command to list all the users and their name, email, and password hash.
The following looks complex. Fortunately though you should be able to copy and paste. You should only need to change the – ObjectId to your User Id – Password Hash to your password hash
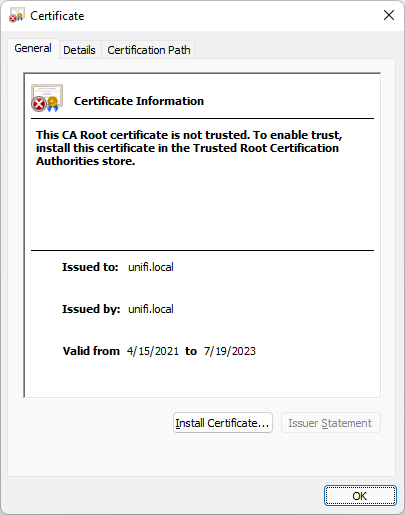
Manually adding the UniFi Protect self signed certificate can be helpful if you are accessing the controller over the local network. It has the benefit of letting your browser remember the password if wanted and not having to verify the certificate.
First we need to acquire the certificate.
Acquire UniFi Protect Certificate
In a Chrome based web browser, go to the IP address of the UniFi Protect NVR
Click in the URL bar where is says “Not secure” -> Certificate -> Details -> Copy to file
Follow the export Wizard. You can use the default settings.
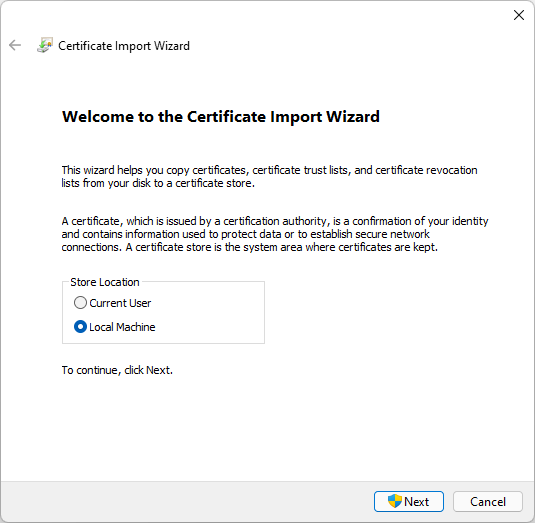
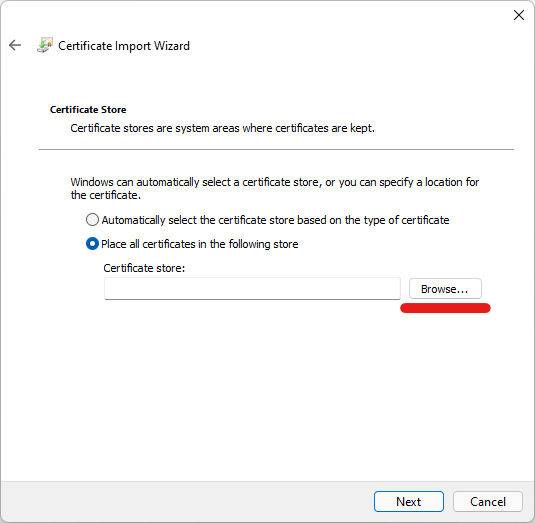
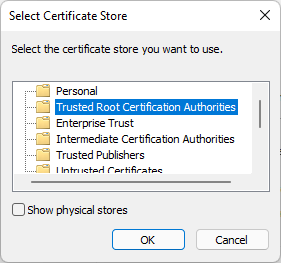
Import Certificate
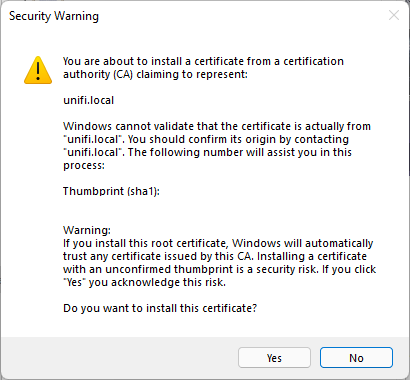
You can now import the certificate by double clicking on the cert.
Importing unifi.local cert
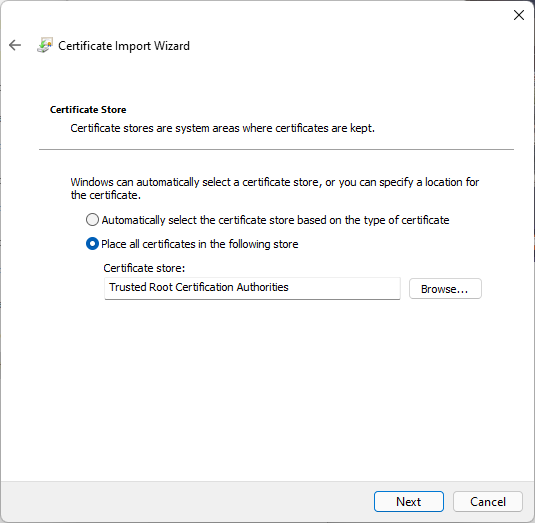
Note that it says to install the cert in the “Trusted Root Certification Authorities” store
Import unifi.local cert select Local MachineBrowse for Certificate StoreSelect Trusted Root Certification AuthoritiesImporting unifi.local to the Trusted Root Certification AuthoritiesConfirm unifi.local certificate import
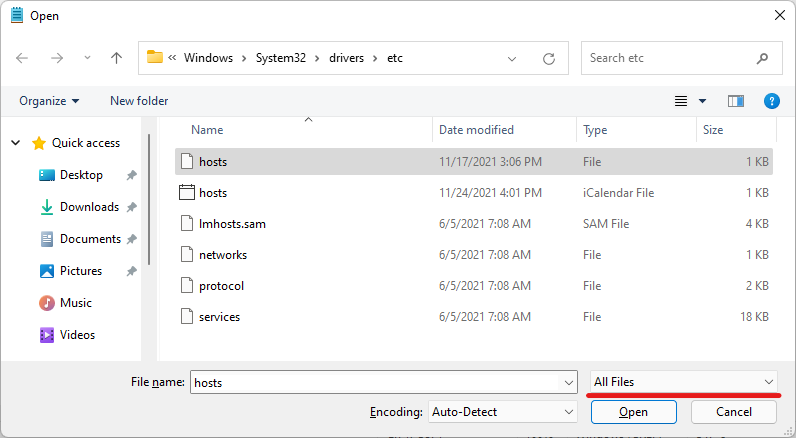
Now we can move on to Configuring the hosts file.
Add unifi.local to system hosts file
We need to add an entry for unifi.local as the cert if for unifi.local hostname and not the controllers IP address.
We’ll essentially be following the same steps outlined in the following post.