Scripting in Mikrotiks can be a little interesting. This is a quick syntax note for using the foreach command to delete all simple queues.
:foreach queue in=[/queue/simple/find ] do={/queue/simple/remove $queue}

Scripting in Mikrotiks can be a little interesting. This is a quick syntax note for using the foreach command to delete all simple queues.
:foreach queue in=[/queue/simple/find ] do={/queue/simple/remove $queue}
Installing Madmax plotter on Fedora/CentOS8/AlmaLinux etc is fairly easy, but doesn’t have instructions on the GitHub page for CentOS 8 or later.
First we need to install the following dependencies
sudo dnf install gmp-devel libsodium libsodium-static
Now we can proceed to install Madmax like normal.
git clone https://github.com/madMAx43v3r/chia-plotter
cd chia-plotter
git submodule update --init
bash make_release.sh
sudo mv build/chia_plot /usr/bin
Run Madmax with
chia_plot --help
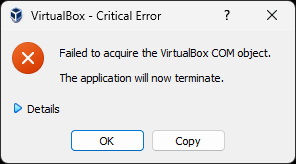
Under the Details it was complaining about VirtualBox.xml
Looking in Windows Explorer in the .VirtualBox folder
C:\Users\Username\.VirtualBox
it shows that the VirtualBox.xml file being empty. Delete the file. Reinstall VirtualBox. Now go to your VM’s in
C:\Users\Username\VirtualBox VMs
Open up the VM folder and double click on the “Virtual Machine Definition” file to “reimport” them into VirtualBox.
Here are the commands you’ll need to harden SSH on your Mikrotik Routers. It looks like it still can use SSH-RSA, but it does get rid of most of the weaker crytpo algorithms.
/ip/ssh/set strong-crypto=yes allow-none-crypto=no always-allow-password-login=no host-key-size=4096
We’ll want to regenerate the Host Key now that the settings have been changed.
/ip/ssh/regenerate-host-key
It will prompt to enter [y/N] to confirm that you actually want to regenerate the host key. Hit y
After your done, you can use something like ssh-audit to check your equipment.
https://www.ssh-audit.com/
Further hardening information is available at the following link.
https://wiki.mikrotik.com/wiki/Manual:Securing_Your_Router
For clarity of instructions, we will use the following terminology.
Server = Remote system, typically like a web server
Client = Local system, the computer/vm you are using
Run the following command on the server.
cat file.txt | nc -l -p 1234
Now on the client we can download the file with the following. Change the IP to the Server IP address
nc 192.168.1.20 1234 > file.txt
If we want to reverse this, aka. send a file from the client to the server, we can do the following
This will write the file to file.txt
nc -l -p1234 -q 1 > file.txt < /dev/null
Send file.txt to 192.168.1.20. Change the file and IP address as needed.
cat file.txt | nc 192.168.1.20 1234
https://superuser.com/questions/98089/sending-file-via-netcat
Prerequisites
In this example, the server is already using Let’s Encrypt to create the certificate for a LibreNMS server. So all we are doing is copying the certificate to a Grafana directory, putting the correct permissions on it, and updating the Grafana config file to use the certificate.
Steps
In the following commands, change librenms.incredigeek.com to the directory that Let’s Encrypt is using for your fully qualified domain name (FQDN). Usually it is just your FQDN, but could also have -0001 or something appended to the end.
cp -f /etc/letsencrypt/live/librenms.incredigeek.com/privkey.pem
/etc/grafana/
cp -f /etc/letsencrypt/live/librenms.incredigeek.com/fullchain.pem /etc/grafana/
chown root:grafana /etc/grafana/*.pem
chmod 640 /etc/grafana/*.pem Enable grafana on system bootup
In the above, we are copying the privkey.pem and fullchain.pem to /etc/grafana. We are then setting the correct owner/permissions on the files so that the Grafana service can read the certificate.
This is super easy. Open up the Grafana config file in /etc/grafana.ini
vi /etc/grafana.ini
Find the following variables and configure them like so
protocol = https
cert_file = /etc/grafana/fullchain.pem
cert_key = /etc/grafana/privkey.pem
Restart Grafana
systemctl restart grafana-server.service
You should now have a working SSL certificate for the site.
Let’s Encrypt certificates need to be updated frequently. This means that we should automate the above steps to avoid any down time. After all, a monitoring tool with down time defeats the purpose of monitoring.
We’ll need to create a root crontab
sudo crontab -e
Add the following changing out the FQDN to your FQDN.
0 0 1 * * cp -f /etc/letsencrypt/live/librenms.incredigeek.com/privkey.pem /etc/grafana/ && cp -f /etc/letsencrypt/live/librenms.incredigeek.com/fullchain.pem /etc/grafana/ && chown root:grafana /etc/grafana/*.pem && chmod 640 /etc/grafana/*.pem
This is set to run once a month. Change if desired. Also change out librenms.incredigeek.com with your FQDN.
Note about domain name and IP addresses. Let’s Encrypt will not create a certificate for an IP address. You should be using a domain name instead (i.e. networkmonitoring.yourdomain.com) If the certificate is installed, and you access it via the IP address, you will receive a HTTPS error in your browser.
LibreNMS uses fping to check if devices are up or not. So if something is broken with fping, say a SELinux permission, you can receive the “Could not ping” error, while trying to add a new device.
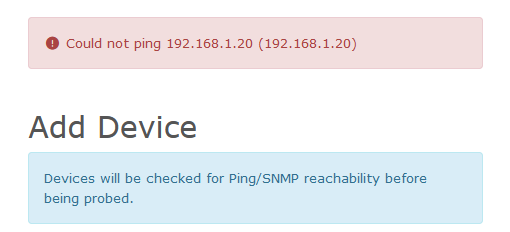
First we need to verify that fping is working. SSH into the LibreNMS server and try pinging an address.
fping 192.168.1.20
There was an issue with fping working if ipv6 was disabled. If fping is not working at all, check out this thread.
If you get an alive or unreachable message, then we know fping is working and can move on to the next stage of troubleshooting.
If you are using SELinux, then there is a good chance the problems has to do with that. You can try rerunning all the SELinux commands from the install guide. Note that it has a specific portion for fping.
https://docs.librenms.org/Installation/Install-LibreNMS/#selinux
If it is still not working, we can take a look at the issue with the audit2why command and feed in the audit log.
audit2why < /var/log/audit/audit.log
Here is some example output.
[root@librenms ~]#
type=AVC msg=audit(1676192040.183:404404): avc:  denied  { bind } for  pid=128555 comm="fping" lport=1 scontext=system_u:system_r:httpd_t:s0 tcontext=system_u:system_r:httpd_t:s0 tclass=rawip_socket permissive=0

        Was caused by:
                Missing type enforcement (TE) allow rule.

[root@librenms ~]#
Another, perhaps more effective way to check the log is to follow it using the “tail -f” command.
tail -f /var/log/audit/audit.log | grep denied
And then in the web browser, try adding a new device. If SELinux is blocking it, it should throw a denied entry.
Example output
type=AVC msg=audit(1676192040.183:404404): avc: denied { bind } for pid=128555 comm="fping" lport=1 scontext=system_u:system_r:httpd_t:s0 tcontext=system_u:system_r:httpd_t:s0 tclass=rawip_socket permissive=0
Now we have verified that the issue is SELinux permissions related. We can create a module to allow it.
audit2allow -a -M fping_http < /var/log/audit/audit.log
And apply the module with
semodule -i fping_http.pp
You may need to do this a couple times. Check the audit log again to see if anything new shows up. Notice the slight difference in this error compared to the above error.
# tail -f /var/log/audit/audit.log | grep denied
type=AVC msg=audit(1676192613.121:404409): avc: denied { node_bind } for pid=153257 comm="fping" scontext=system_u:system_r:httpd_t:s0 tcontext=system_u:object_r:node_t:s0 tclass=rawip_socket permissive=0
We’ll create a new module for this and apply it
audit2allow -a -M node_http < /var/log/audit/audit.log
semodule -i node_http.pp
Not sure that is the best way to fix the problem. But it appears that SELinux is keeping Apache “httpd” from running fping which is why we need to create and load the modules.
Renaming of 192.168.1.20 failed . Does your web server have permission to modify the rrd files?
First thing to check is verify that the IP address is not already being monitored.
If you are getting the above error while trying to rename a device in LibreNMS, you may need to rerun some of the SELinux commands from the installation.
SSH into the server and run
restorecon -RFvv /opt/librenms
Now try renaming the device. Note that you can’t rename the device if the name/ip to a name that is being used by a different device.
If you continue to have issues, check the permissions from the installation guide (Official guide here)
You can also check for SELinux errors with
audit2why < /var/log/audit/audit.log
More SELinux info here
Looks like the issue has something to do with net-ssh. There are some other similar errors people were having.
https://github.com/ytti/oxidized/issues/2642
https://github.com/ytti/oxidized/pull/2570
The easy way to resolve the issue is to install oxidized using git.
Make sure rake is installed
sudo dnf install rake
 or
sudo apt install rake
Steps were copied from here. https://github.com/ytti/oxidized#build-from-git
You should be able to copy and paste these commands in the users home directory.
git clone https://github.com/ytti/oxidized.git
cd oxidized/
gem install bundler
rake install
After it is installed, restart the service
systemctl restart oxidized
Or continue on installing and with LibreNMS
You can install audit2why by installing the policycoreutils package
sudo dnf install policycoreutils-python-utils
Show what and why something is failing
audit2why < /var/log/audit/audit.log
Search with ausearch
ausearch -m avc --start recent
Create and apply a module to fix the failure
This creates two files, a .pp and .te. The .pp is the compiled version of the .te
audit2allow -M mymodule < /var/log/audit/audit.log
semodule -i mymodule.pp
Note that “mymodule.pp” will replace any previous “mymodule.pp”. If your needing to create multiple modules/allow multiple exceptions, you can change the name of each module.
You can also add the rules together then manually compile it. Refer to the first link for more details.
Links with more info
https://danwalsh.livejournal.com/24750.html