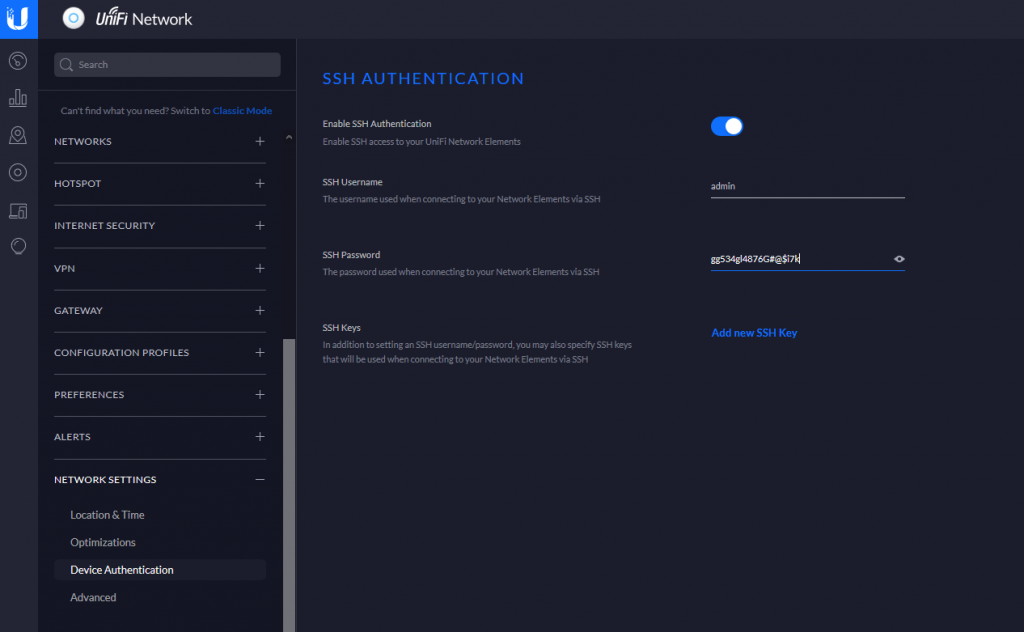
UniFi Controller (New versions)
In the newer controller versions, you should be able to go to
Settings -> NETWORK SETTINGS -> Device Authentication
To view the SSH credentials.
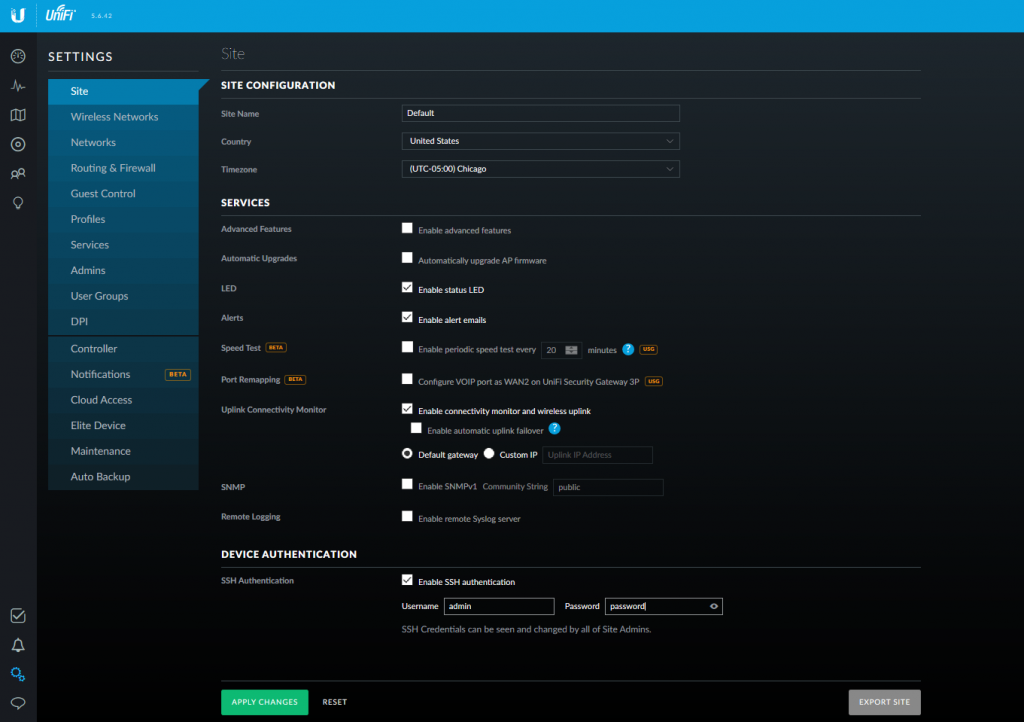
UniFi 5.6.x Controller
Go to Settings -> Site -> DEVICE AUTHENTICATION

In the newer controller versions, you should be able to go to
Settings -> NETWORK SETTINGS -> Device Authentication
To view the SSH credentials.
Go to Settings -> Site -> DEVICE AUTHENTICATION
Pull UniFi 5.6.42 docker image
sudo docker pull jacobalberty/unifi:5.6.42
Install image
sudo docker run -d --init --restart=unless-stopped --name=unifi-controller --net=host --volume=/docker/unifi:/var/lib/unifi -p 8080:8080/tcp -p 8081:8081/tcp -p 8443:8443/tcp -p 8843:8843/tcp -p 8880:8880/tcp -p 8883:8883/tcp -p 3478:3478/udp jacobalberty/unifi:5.6.42
Access and setup the unifi controller from a browser.
https://ip-address:8443

Log files are located in /home/unms/data/logs
larry@localhost:~$ sudo tail -f /home/unms/data/logs/unms.b5a3713b02f71e06fb3a84a3a9a75c558.log
{"msg":"setting permissions on /home/app/unms/data/control","name":"unknown","hostname":"unknown","pid":0,"v":0,"level":30,"tag":"unms","time":"2020-04-17T16:28:35+00:00"}
{"msg":"Linking /home/app/unms/public/site-images -> /home/app/unms/data/images","name":"unknown","hostname":"unknown","pid":0,"v":0,"level":30,"tag":"unms","time":"2020-04-17T16:28:35+00:00"}
{"msg":"Linking /home/app/unms/public/firmwares -> /home/app/unms/data/firmwares","name":"unknown","hostname":"unknown","pid":0,"v":0,"level":30,"tag":"unms","time":"2020-04-17T16:28:35+00:00"}
{"msg":"Stepping down from root: su-exec \"/usr/local/bin/docker-entrypoint.sh\" \"index.js\"","name":"unknown","hostname":"unknown","pid":0,"v":0,"level":30,"tag":"unms","time":"2020-04-17T16:28:35+00:00"}
{"msg":"Running docker-entrypoint index.js","name":"unknown","hostname":"unknown","pid":0,"v":0,"level":30,"tag":"unms","time":"2020-04-17T16:28:35+00:00"}
{"msg":"Version: 1.1.6+e6ec4747d.2020-03-13T10:52:14+01:00","name":"unknown","hostname":"unknown","pid":0,"v":0,"level":30,"tag":"unms","time":"2020-04-17T16:28:35+00:00"}
{"msg":"Waiting for database containers","name":"unknown","hostname":"unknown","pid":0,"v":0,"level":30,"tag":"unms","time":"2020-04-17T16:28:35+00:00"}
{"msg":"psql: fe_sendauth: no password supplied","name":"unknown","hostname":"unknown","pid":0,"v":0,"level":30,"tag":"unms","time":"2020-04-17T16:28:35+00:00"}
{"msg":"nc: bad address 'unms-redis'","name":"unknown","hostname":"unknown","pid":0,"v":0,"level":30,"tag":"unms","time":"2020-04-17T16:28:35+00:00"}
sudo ~unms/app/unms-cli stop
sudo ~unms/app/unms-cli start
sudo ~unms/app/unms-cli fix-redis-aof
Running the above command resolved the problem and let UNMS start working.
larry@localhost:~$ sudo ~unms/app/unms-cli stop
larry@localhost:~$ sudo ~unms/app/unms-cli fix-redis-aof
Creating network "unms_internal" with the default driver
Creating network "unms_public" with the default driver
Creating unms-fluentd
The AOF appears to start with an RDB preamble.
Checking the RDB preamble to start:
[offset 0] Checking RDB file --fix
[offset 26] AUX FIELD redis-ver = '5.0.5'
[offset 40] AUX FIELD redis-bits = '64'
[offset 52] AUX FIELD ctime = '1587130996'
[offset 67] AUX FIELD used-mem = '276217328'
[offset 83] AUX FIELD aof-preamble = '1'
[offset 85] Selecting DB ID 0
[offset 80304063] Checksum OK
[offset 80304063] \o/ RDB looks OK! \o/
[info] 3307 keys read
[info] 0 expires
[info] 0 already expired
RDB preamble is OK, proceeding with AOF tail…
0x 79b7264: Expected prefix '*', got: '
AOF analyzed: size=127631360, ok_up_to=127627876, diff=3484
This will shrink the AOF from 127631360 bytes, with 3484 bytes, to 127627876 bytes
Continue? [y/N]: Successfully truncated AOF
larry@localhost:~$ sudo ~unms/app/unms-cli start
On the forums they seemed to recommend stopping the service and running
sudo ~unms/app/unms-cli rewrite-redis-aof
I was getting the following error when trying to run this command. Running the above command worked though.
larry@localhost:~$ sudo ~unms/app/unms-cli stop
larry@localhost:~$ sudo redis-check-aof --fix ~unms/data/redis/appendonly.aof
The AOF appears to start with an RDB preamble.
Checking the RDB preamble to start:
[offset 0] Checking RDB file --fix
--- RDB ERROR DETECTED ---
[offset 9] Can't handle RDB format version 9
[additional info] While doing: start
[additional info] Reading type 0 (string)
[info] 0 keys read
[info] 0 expires
[info] 0 already expired
RDB preamble of AOF file is not sane, aborting.
larry@localhost:~$
https://community.ui.com/questions/ERROR-UNMS-is-starting-This-should-not-take-more-than-a-minute-/1010b107-dfd4-4c0f-b667-2f3cf4ef713b
https://community.ui.com/questions/UNMS-is-broken-after-upgrade-from-13-x-to-14-x/411ec85e-7a1b-4d17-bb12-34e449b4ae5a
Ran into an issue when trying to figure out some problems with UniFi and UniFi-Video. Upgrading both to the latest version was causing problems, because they both needed different versions of MongoDB.
Was getting the following error when trying to install MongoDB. Think I was trying to install Mongo following the instructions on their site and then it caused issues with apt.
dpkg: error processing archive /var/cache/apt/archives/mongodb-org-server_4.2.5_amd64.deb (--unpack):
 trying to overwrite '/usr/bin/mongod', which is also in package mongodb-server-core 1:3.6.3-0ubuntu1.1
dpkg-deb: error: paste subprocess was killed by signal (Broken pipe)
Removed the following file
rm /etc/apt/sources.list.d/mongodb-org-4.2.list
and was able to use apt again to install MongoDB. Didn’t end up solving my problem because I technically needed two versions, but at least apt was being nice again. Ended up installing the UniFi controller docker container and can run both on the same server that way.
Setting up the SSL cert for UniFi service when running in docker is fairly easy to do. All you have to do is modify the UniFi SSL renew script to use the UniFi Docker directory and change the start and stop service to start and stop the Docker container. The script below should be ready to go.
Download, chmod +x it, and run, drop it in cron to auto renew.
In the below script, change (unifiDir=”/docker/unifi”) to your UniFi directory.
Note: this triggers calling the teams.sh script that will send an update to Microsoft Teams to let you know that the certs should be renewed. Check here for more info.
#!/usr/bin/env bash
# Added support to do UniFi and UniFi controllers at the same time using the same cert.
# Original script from https://git.sosdg.org/brielle/lets-encrypt-scripts/raw/branch/master/gen-unifi-cert.sh
# More info here https://www.reddit.com/r/Ubiquiti/comments/43v23u/using_letsencrypt_with_the_unifi_controller/
# And here https://www.reddit.com/r/Ubiquiti/comments/43v23u/using_letsencrypt_with_the_unifi_controller/
# Modified script from here: https://github.com/FarsetLabs/letsencrypt-helper-scripts/blob/master/letsencrypt-unifi.sh
# Modified by: Brielle Bruns <bruns@2mbit.com>
# Download URL: https://source.sosdg.org/brielle/lets-encrypt-scripts
# Version: 1.7
# Last Changed: 04/10/2020
# 04/10/2020: Changed directories and commands to work with a UniFi Docker install
# 02/02/2016: Fixed some errors with key export/import, removed lame docker requirements
# 02/27/2016: More verbose progress report
# 03/08/2016: Add renew option, reformat code, command line options
# 03/24/2016: More sanity checking, embedding cert
# 10/23/2017: Apparently don't need the ace.jar parts, so disable them
# 02/04/2018: LE disabled tls-sni-01, so switch to just tls-sni, as certbot 0.22 and later automatically fall back to http/80 for auth
# 05/29/2018: Integrate patch from Donald Webster <fryfrog[at]gmail.com> to cleanup and improve tests
# 09/26/2018: Change from TLS to HTTP authenticator

# Location of LetsEncrypt binary we use.  Leave unset if you want to let it find automatically
# LEBINARY="/usr/src/letsencrypt/certbot-auto"

# Change to your UniFi Docker directory
unifiDir="/docker/unifi"

PATH="/usr/local/sbin:/usr/local/bin:/usr/sbin:/usr/bin:/sbin:/bin"

function usage() {
  echo "Usage: $0 -d <domain> [-e <email>] [-r] [-i]"
  echo "  -d <domain>: The domain name to use."
  echo "  -e <email>: Email address to use for certificate."
  echo "  -r: Renew domain."
  echo "  -i: Insert only, use to force insertion of certificate."
}

while getopts "hird:e:" opt; do
  case $opt in
    i) onlyinsert="yes";;
    r) renew="yes";;
    d) domains+=("$OPTARG");;
    e) email="$OPTARG";;
    h) usage
       exit;;
  esac
done

DEFAULTLEBINARY="/usr/bin/certbot /usr/bin/letsencrypt /usr/sbin/certbot
  /usr/sbin/letsencrypt /usr/local/bin/certbot /usr/local/sbin/certbot
  /usr/local/bin/letsencrypt /usr/local/sbin/letsencrypt
  /usr/src/letsencrypt/certbot-auto /usr/src/letsencrypt/letsencrypt-auto
  /usr/src/certbot/certbot-auto /usr/src/certbot/letsencrypt-auto
  /usr/src/certbot-master/certbot-auto /usr/src/certbot-master/letsencrypt-auto"

if [[ ! -v LEBINARY ]]; then
  for i in ${DEFAULTLEBINARY}; do
    if [[ -x ${i} ]]; then
      LEBINARY=${i}
      echo "Found LetsEncrypt/Certbot binary at ${LEBINARY}"
      break
    fi
  done
fi

# Command line options depending on New or Renew.
NEWCERT="--renew-by-default certonly"
RENEWCERT="-n renew"

# Check for required binaries
if [[ ! -x ${LEBINARY} ]]; then
  echo "Error: LetsEncrypt binary not found in ${LEBINARY} !"
  echo "You'll need to do one of the following:"
  echo "1) Change LEBINARY variable in this script"
  echo "2) Install LE manually or via your package manager and do #1"
  echo "3) Use the included get-letsencrypt.sh script to install it"
  exit 1
fi

if [[ ! -x $( which keytool ) ]]; then
  echo "Error: Java keytool binary not found."
  exit 1
fi

if [[ ! -x $( which openssl ) ]]; then
  echo "Error: OpenSSL binary not found."
  exit 1
fi

if [[ ! -z ${email} ]]; then
  email="--email ${email}"
else
  email=""
fi

shift $((OPTIND -1))
for val in "${domains[@]}"; do
        DOMAINS="${DOMAINS} -d ${val} "
done

MAINDOMAIN=${domains[0]}

if [[ -z ${MAINDOMAIN} ]]; then
  echo "Error: At least one -d argument is required"
  usage
  exit 1
fi

if [[ ${renew} == "yes" ]]; then
  LEOPTIONS="${RENEWCERT}"
else
  LEOPTIONS="${email} ${DOMAINS} ${NEWCERT}"
fi

if [[ ${onlyinsert} != "yes" ]]; then
  echo "Firing up standalone authenticator on TCP port 80 and requesting cert..."
  ${LEBINARY} --server https://acme-v01.api.letsencrypt.org/directory \
              --agree-tos --standalone --preferred-challenges http ${LEOPTIONS}
fi

if [[ ${onlyinsert} != "yes" ]] && md5sum -c "/etc/letsencrypt/live/${MAINDOMAIN}/cert.pem.md5" &>/dev/null; then
  echo "Cert has not changed, not updating controller."
  exit 0
else
  echo "Cert has changed or -i option was used, updating controller..."
  TEMPFILE=$(mktemp)
  CATEMPFILE=$(mktemp)

  # Identrust cross-signed CA cert needed by the java keystore for import.
  # Can get original here: https://www.identrust.com/certificates/trustid/root-download-x3.html
  cat > "${CATEMPFILE}" <<'_EOF'
-----BEGIN CERTIFICATE-----
MIIDSjCCAjKgAwIBAgIQRK+wgNajJ7qJMDmGLvhAazANBgkqhkiG9w0BAQUFADA/
MSQwIgYDVQQKExtEaWdpdGFsIFNpZ25hdHVyZSBUcnVzdCBDby4xFzAVBgNVBAMT
DkRTVCBSb290IENBIFgzMB4XDTAwMDkzMDIxMTIxOVoXDTIxMDkzMDE0MDExNVow
PzEkMCIGA1UEChMbRGlnaXRhbCBTaWduYXR1cmUgVHJ1c3QgQ28uMRcwFQYDVQQD
Ew5EU1QgUm9vdCBDQSBYMzCCASIwDQYJKoZIhvcNAQEBBQADggEPADCCAQoCggEB
AN+v6ZdQCINXtMxiZfaQguzH0yxrMMpb7NnDfcdAwRgUi+DoM3ZJKuM/IUmTrE4O
rz5Iy2Xu/NMhD2XSKtkyj4zl93ewEnu1lcCJo6m67XMuegwGMoOifooUMM0RoOEq
OLl5CjH9UL2AZd+3UWODyOKIYepLYYHsUmu5ouJLGiifSKOeDNoJjj4XLh7dIN9b
xiqKqy69cK3FCxolkHRyxXtqqzTWMIn/5WgTe1QLyNau7Fqckh49ZLOMxt+/yUFw
7BZy1SbsOFU5Q9D8/RhcQPGX69Wam40dutolucbY38EVAjqr2m7xPi71XAicPNaD
aeQQmxkqtilX4+U9m5/wAl0CAwEAAaNCMEAwDwYDVR0TAQH/BAUwAwEB/zAOBgNV
HQ8BAf8EBAMCAQYwHQYDVR0OBBYEFMSnsaR7LHH62+FLkHX/xBVghYkQMA0GCSqG
SIb3DQEBBQUAA4IBAQCjGiybFwBcqR7uKGY3Or+Dxz9LwwmglSBd49lZRNI+DT69
ikugdB/OEIKcdBodfpga3csTS7MgROSR6cz8faXbauX+5v3gTt23ADq1cEmv8uXr
AvHRAosZy5Q6XkjEGB5YGV8eAlrwDPGxrancWYaLbumR9YbK+rlmM6pZW87ipxZz
R8srzJmwN0jP41ZL9c8PDHIyh8bwRLtTcm1D9SZImlJnt1ir/md2cXjbDaJWFBM5
JDGFoqgCWjBH4d1QB7wCCZAA62RjYJsWvIjJEubSfZGL+T0yjWW06XyxV3bqxbYo
Ob8VZRzI9neWagqNdwvYkQsEjgfbKbYK7p2CNTUQ
-----END CERTIFICATE-----
_EOF

  md5sum "/etc/letsencrypt/live/${MAINDOMAIN}/cert.pem" > "/etc/letsencrypt/live/${MAINDOMAIN}/cert.pem.md5"
  echo "Using openssl to prepare certificate..."
  cat "/etc/letsencrypt/live/${MAINDOMAIN}/chain.pem" >> "${CATEMPFILE}"
  openssl pkcs12 -export  -passout pass:aircontrolenterprise \
          -in "/etc/letsencrypt/live/${MAINDOMAIN}/cert.pem" \
          -inkey "/etc/letsencrypt/live/${MAINDOMAIN}/privkey.pem" \
          -out "${TEMPFILE}" -name unifi \
          -CAfile "${CATEMPFILE}" -caname root

  docker container stop ${dockerContainerId}
  sleep 10
  dockerContainerId=$(sudo docker container list | grep unifi-controller | awk '{print $1}')
  echo "Removing existing certificate from Unifi protected keystore..."
  keytool -delete -alias unifi -keystore ${unifiDir}/keystore -deststorepass aircontrolenterprise

  echo "Inserting certificate into Unifi keystore..."
  keytool -trustcacerts -importkeystore \
          -deststorepass aircontrolenterprise \
          -destkeypass aircontrolenterprise \
          -destkeystore ${unifiDir}/keystore \
          -srckeystore "${TEMPFILE}" -srcstoretype PKCS12 \
          -srcstorepass aircontrolenterprise \
          -alias unifi

  sleep 2
  echo "Starting Unifi controllers..."
  docker container start ${dockerContainerId}
  ./teams.sh -b "$(hostname) - UniFi service is restarting, ssl cert should be renewed."

  echo "Done!"
fi
Instructions followed from here. Some changes were made
Commands work on Ubuntu 16.04
sudo apt install -y docker docker.io
systemctl enable docker
systemctl start docker
sudo docker pull jacobalberty/unifi:latest
The following command sets up a container which we can later manipulate to start and stop the “service”
You can specify where you want the UniFi files to reside if desired.
sudo docker run -d --init --restart=unless-stopped --name=unifi-controller --net=host --volume=/docker/unifi:/var/lib/unifi -p 8080:8080/tcp -p 8081:8081/tcp -p 8443:8443/tcp -p 8843:8843/tcp -p 8880:8880/tcp -p 8883:8883/tcp -p 3478:3478/udp jacobalberty/unifi:latest
List docker containers
sudo docker container list
367c7a1465ec        jacobalberty/unifi:latest   "/usr/loca/bin/dock…" 15 minutes ago      Up 14 minutes (healthy) unifi-controller
List docker images on system
sudo docker images
jacobalberty/unifi   latest              baebbe301633        9 days ago          711MB
Stop container. Also stops the UniFi service. Change the ID to your container ID.
sudo docker stop 367c7a1465ec
When setting up the Docker image, the directory specified was “/docker/unifi” so all the UniFi files are in there and it looks like if you manipulate the files, it makes the changes fine. At least for setting up the SSL certificates.
Looks like the issue is that the UniFi server can’t be installed with a version of MongoDB newer then 3.6.0
Fix the issue by installing an older version of MongoDB
wget -qO - https://www.mongodb.org/static/pgp/server-3.4.asc | sudo apt-key add -
echo "deb https://repo.mongodb.org/apt/ubuntu xenial/mongodb-org/3.4 multiverse" | sudo tee /etc/apt/sources.list.d/mongodb-org-3.4.list
sudo apt-get update
Then install MongoDB with
apt install mongodb-org-server
You may run into issues if you already have a version of Mongo installed. Uninstall it and then rerun the above install command.
SSH into AirFiber
ssh ubnt@192.168.1.20
Open up the “/tmp/system.cfg” configuration file
vi /tmp/system.cfg
Find the line that has the ip address and modify the address.
Note that you’ll need to hit i to enter text if you are using vi
...
netconf.3.hwaddr.status=disabled
netconf.3.ip=192.168.1.10   <-- Change IP here
netconf.3.mtu=1500
...
Save file by hitting the esc key then type :x and then hit Enter
Now run the following command to write the changes to the device. Once it comes back up it should have the new IP address from the config file.
cfgmtd -f /tmp/system.cfg -w && reboot
When trying to SSH to older devices like a Ubiquiti Bullet2, you may receive an error saying
no matching cipher found. Their offer: aes128-cbc,3des-cbc,aes256-cbc,twofish256-cbc,twofish-cbc,twofish128-cbc,blowfish-cbc
The work around is to manually specify the cipher with the “-c” option. You will also probably need to specify the KexAlgorithm “Key Exchange Algorithm”
ssh -c aes128-cbc -oKexAlgorithms=+diffie-hellman-group1-sha1 admin@192.168.1.20
You can see what ciphers SSH supports by running “ssh -Q cipher”
Example output
ssh -Q cipher
3des-cbc
aes128-cbc
aes192-cbc
aes256-cbc
rijndael-cbc@lysator.liu.se
aes128-ctr
aes192-ctr
aes256-ctr
aes128-gcm@openssh.com
aes256-gcm@openssh.com
chacha20-poly1305@openssh.com
More information
https://www.openssh.com/legacy.html
The following commands can be run from a ssh session to your UNMS instance.
sudo ~unms/app/unms-cli set-superadmin
Should get something like the following
            UNMS Users
 ┌─────────┬───────────┬───────────────────────────┬──────────────┬────────────┐
 │ (index) │ username  │           email           │     role     │ two-factor │
 ├─────────┼───────────┼───────────────────────────┼──────────────┼────────────┤
 │    0    │  'larry'  │  'larry@incredigeek.com'  │   'admin'    │   false    │
 │    1    │   'bob'   │   'bob@incredigeek.com'   │   'admin'    │   false    │
└─────────┴───────────┴───────────────────────────┴──────────────┴────────────┘To change a user to a Super Admin, add “–username username” to the above command.
Example:
sudo ~unms/app/unms-cli set-superadmin --username bob
            UNMS Users
 ┌─────────┬───────────┬───────────────────────────┬──────────────┬────────────┐
 │ (index) │ username  │           email           │     role     │ two-factor │
 ├─────────┼───────────┼───────────────────────────┼──────────────┼────────────┤
 │    0    │  'larry'  │  'larry@incredigeek.com'  │   'admin'    │   false    │
 │    1    │   'bob'   │   'bob@incredigeek.com'   │ 'superadmin' │   false    │
 └─────────┴───────────┴───────────────────────────┴──────────────┴────────────┘
Note that there does not appear to be a way to