https://wiki.mikrotik.com/wiki/Manual:Securing_Your_Router
Things to harden
- Delete default admin user
- Disable unused services and whitelist IP’s
- Secure SSH
- DNS
Delete default admin user
Before deleting the default admin user, create your own user account.
/user/add name=MyUsername group=full password=mylongsecurepassword
Note: running /user/add will prompt you for the rest of the options.
Delete the default admin user with
/user remove admin
We want to delete the default admin user for two reasons. 1. There is no default password for this user. 2. It is a default username which means it will be targeted for brute force attacks.
Consider using the /users/groups for more granular control.
Disable unused services
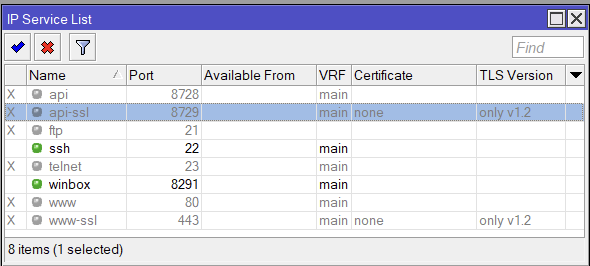
In the following, we disabled all services except SSH and Winbox. We also limit access to those services only from private “RFC 1918” IP addresses. Customize as needed.
/ip service
set telnet disabled=yes
set ftp disabled=yes
set www disabled=yes
set www-ssl tls-version=only-1.2
set ssh address="set winbox address="192.168.0.0/16,172.16.0.0/12,10.0.0.0/8"
set api disabled=yes
set winbox address="set winbox address="192.168.0.0/16,172.16.0.0/12,10.0.0.0/8"
set api-ssl disabled=yes tls-version=only-1.2
for www-ssl and api-ssl, tls-version is not a required argument, but you may consider using it if you need the API or Webfig.
Secure SSH
/ip/ssh/set strong-crypto=yes allow-none-crypto=no always-allow-password-login=no host-key-size=4096
And regenerate the SSH host key. It will prompt for a [y/N], hit y to regenerate.
/ip/ssh/regenerate-host-key
DNS
Unless your device is being used as a DNS resolver, it is best to disable the “Allow Remote Request”
ip dns/set allow-remote-requests=no
If you do need it enabled, then be sure to add some firewall rules to keep your router from being used in amplification attacks.
add action=drop chain=input dst-port=53 in-interface-list=WAN protocol=udp
You can configure interface lists in /interface/list or Interface -> Interface List in the gui
Or you can change to in-interface and specify the WAN interface directly. You could also set it to !LAN if you have a LAN interface list set up.