Remove AirControl provisioning from Ubiquiti radio via SSH

Short version

List AirControl server(s)

mca-provision-list

Remove from AirControl Server

mca-provision-rm http://server-address


Expanded Steps

First you’ll need to SSH into your radio

Example:

ssh ubnt@192.168.1.20

Next run “mca-provision-list” to list the connection(s) the radio has, or is trying to connect to.  If you have had the radio connected to multiple AirControl servers it will show more than one entry.

Example:

XM.v6.1.3# mca-provision-list
unknown @ http://192.168.0.1:9081/AC2/report -
XM.v6.1.3#

To remove, run “mca-provision-rm” with the AirControl address.  You can simple use the “http://server-ip”, shouldn’t have to worry about the port number/AC2/report.

Example:

XM.v6.1.3# mca-provision-rm http://192.168.0.1
Found 1 entries matching 'http://192.168.0.1':
Removing: unknown @ http://192.168.0.1:9081/AC2/report ...
Found Backup1 on[1] ...
Found Active on[2] ...
Storing Active[1] ... [%100]
Active->Backup[2] ... [%100]
done.
XM.v6.1.3#


LibreNMS Error: Missing dependencies! Run the following command to fix:

Received this error while trying to access LibreNMS in web browser.

Error: Missing dependencies! Run the following command to fix:

./scripts/composer_wrapper.php install –no-dev


Tried sshing into the LibreNMS server and running the script, but that didn’t fix the issue.

Ran ./validate.php and it came up with the some of the following errors.

[FAIL] Missing PHP extension: mbstring
[FIX] Please install mbstring
[FAIL] The poller (localhost.localdomain) has not completed within the last 5 minutes, check the cron job.
[WARN] Your install is over 24 hours out of date, last update: Thu, 7 May 2018 19:18:35 +0000
[FIX] Make sure your daily.sh cron is running and run ./daily.sh by hand to see if there are any errors.

Installed mbstring.  You may need to change the number if yum is complaining about package conflicts.  Use “yum search mbstring” to show all the versions available.

yum install php71w-mbstring

Ran ./validate.php again and it wanted this script run

./scripts/composer_wrapper.php install --no-dev

Restart Apache

systemctl restart httpd

Install Ubiquiti UNMS on Ubuntu

Ubiquiti UNMS installation instructions link

https://github.com/Ubiquiti-App/UNMS/wiki/Installation-%26-Update

Download and Install UNMS

curl -fsSL https://raw.githubusercontent.com/Ubiquiti-App/UNMS/master/install.sh > /tmp/unms_install.sh && sudo bash /tmp/unms_install.sh

Run the following commands as root.  Use sudo su if needed.

Set over commit to 1

echo "vm.overcommit_memory=1" >>/etc/sysctl.conf
sysctl -p

Disable Transparent HugePages

echo never > /sys/kernel/mm/transparent_hugepage/enabled

Add this to /etc/rc.local above the exit line

if test -f /sys/kernel/mm/transparent_hugepage/defrag; then
   echo never > /sys/kernel/mm/transparent_hugepage/defrag
fi

Finish the installation in your browser
https://unms_server_address

Install LibreNMS on CentOS

Install prerequisites

yum install -y epel-release 
rpm -Uvh https://mirror.webtatic.com/yum/el7/webtatic-release.rpm
yum install -y policycoreutils-python cronie fping git httpd ImageMagick jwhois mariadb mariadb-server mtr MySQL-python net-snmp net-snmp-utils nmap php71w php71w-cli php71w-common php71w-curl php71w-gd php71w-mcrypt php71w-mysql php71w-process php71w-snmp php71w-xml php71w-zip python-memcached rrdtool

Setup LibreNMS user

useradd librenms -d /opt/librenms -M -r
usermod -a -G librenms apache

Install LibreNMS

cd /opt
git clone https://github.com/librenms/librenms.git librenms

Configure MySQL

Start MySQL

systemctl start mariadb
mysql -u root

Create the Database and database user. Change password to a different password

CREATE DATABASE librenms CHARACTER SET utf8 COLLATE utf8_unicode_ci;
CREATE USER 'librenms'@'localhost' IDENTIFIED BY 'password';
GRANT ALL PRIVILEGES ON librenms.* TO 'librenms'@'localhost';
FLUSH PRIVILEGES;
exit

Disable MySQL strict mode

vi /etc/my.cnf

Add the following in the [mysqld] section

innodb_file_per_table=1
sql-mode=""
lower_case_table_names=0

Enable and restart mariadb i.e.(MySQL)

systemctl enable mariadb
systemctl restart mariadb

Configure PHP.  Set Timezone

You can go here to figure out which time zone you need.

vi  /etc/php.ini

Find the [Date] Section and change the timezone

Example:

date.timezone = America/New_York

Configure Apache

vi /etc/httpd/conf.d/librenms.conf

Add the following, change the server name.

<VirtualHost *:80>
  DocumentRoot /opt/librenms/html/
  ServerName  librenms.example.com

  AllowEncodedSlashes NoDecode
  <Directory "/opt/librenms/html/">
    Require all granted
    AllowOverride All
    Options FollowSymLinks MultiViews
  </Directory>
</VirtualHost>

Enable and restart apache

systemctl enable httpd
systemctl restart httpd

Allow fping

cd /opt/librenms
vi http_fping.tt

Add the following

module http_fping 1.0;

require {
type httpd_t;
class capability net_raw;
class rawip_socket { getopt create setopt write read };
}

#============= httpd_t ==============
allow httpd_t self:capability net_raw;
allow httpd_t self:rawip_socket { getopt create setopt write read };

Configure SELinux

You can disable SELinux completely in the /etc/selinux/config file or run these commands to make LibreNMS and SELinux play together.

semanage fcontext -a -t httpd_sys_content_t '/opt/librenms/logs(/.*)?'
semanage fcontext -a -t httpd_sys_rw_content_t '/opt/librenms/logs(/.*)?'
restorecon -RFvv /opt/librenms/logs/
semanage fcontext -a -t httpd_sys_content_t '/opt/librenms/rrd(/.*)?'
semanage fcontext -a -t httpd_sys_rw_content_t '/opt/librenms/rrd(/.*)?'
restorecon -RFvv /opt/librenms/rrd/
setsebool -P httpd_can_sendmail=1
checkmodule -M -m -o http_fping.mod http_fping.tt
semodule_package -o http_fping.pp -m http_fping.mod
semodule -i http_fping.pp

Configure Firewall

firewall-cmd --zone public --add-service http
firewall-cmd --permanent --zone public --add-service http
firewall-cmd --zone public --add-service https
firewall-cmd --permanent --zone public --add-service https

Configure snmpd

cp /opt/librenms/snmpd.conf.example /etc/snmp/snmpd.conf

Edit the snmpd file and change RANDOMSTRINGGOESHERE to your community string

vi /etc/snmp/snmpd.conf

Enable and restart snmpd

curl -o /usr/bin/distro https://raw.githubusercontent.com/librenms/librenms-agent/master/snmp/distro
chmod +x /usr/bin/distro
systemctl enable snmpd
systemctl restart snmpd

Setup Cron Job and Cycle logs

cp /opt/librenms/librenms.nonroot.cron /etc/cron.d/librenms
cp /opt/librenms/misc/librenms.logrotate /etc/logrotate.d/librenms

Set Permisions

chown -R librenms:librenms /opt/librenms
setfacl -d -m g::rwx /opt/librenms/rrd /opt/librenms/logs
setfacl -R -m g::rwx /opt/librenms/rrd /opt/librenms/logs

Finish Install

Finish the install by

http://your-server-ip/install.php

LibreNMS not able to ping device and can’t change device name

If your having issues in the LibreNMS web interface changing a devices IP address or you can’t add a new one because it says it can’t ping the device, it is probably because SELinux is causing issues.

As far as changing a devices ip address, it looks like SELinux is not allowing Apache write access to the /opt/librenms/rrd directory

Temporary fix is to run

setenforce 0

You can permenatly disable SElinux by opening up “/etc/selinux/config” and changing “SELINUX=enforcing” to “SELINUX=disabled” and rebooting.


Renaming of x.x.x.x failed . Does your web server have permission to modify the rrd files?

It looks like there may be a bug where you’ll try to change the IP of a device and get the above error.  It looks like the issue has something to do with the ip address.  If your trying to change the IP on a router that has multiple IP addresses, try a different address in LibreNMS.


Install LibreNMS on Ubuntu with HTTPS

The goal of this guide is to install LibreNMS on an Ubuntu Server with a self signed certificate.  Most of the steps are copied out of the LibreNMS Documentation found here.

Install required packages

sudo apt install apache2 composer fping git graphviz imagemagick libapache2-mod-php7.0 mariadb-client mariadb-server mtr-tiny nmap php7.0-cli php7.0-curl php7.0-gd php7.0-json php7.0-mcrypt php7.0-mysql php7.0-snmp php7.0-xml php7.0-zip python-memcache python-mysqldb rrdtool snmp snmpd whois

Create LibreNMS user

sudo useradd librenms -d /opt/librenms -M -r
sudo usermod -a -G librenms www-data

Install LibreNMS

cd /opt
sudo git clone https://github.com/librenms/librenms.git librenms

Configure MySQL

sudo systemctl restart mysql
sudo mysql -uroot -p

Run the following MySQL commands to create the LibreNMS user. Change password to your own password.

CREATE DATABASE librenms CHARACTER SET utf8 COLLATE utf8_unicode_ci;
CREATE USER 'librenms'@'localhost' IDENTIFIED BY 'password';
GRANT ALL PRIVILEGES ON librenms.* TO 'librenms'@'localhost';
FLUSH PRIVILEGES;
exit

Edit following file

sudo vi /etc/mysql/mariadb.conf.d/50-server.cnf

Add the following inside the [mysqld] section

innodb_file_per_table=1
sql-mode=""
lower_case_table_names=0

Restart MySQL

sudo systemctl restart mysql

Configure PHP

Edit the two files and set the time zone, date.timezone.  Example “America/New_York”

sudo vi /etc/php/7.0/apache2/php.ini
sudo vi /etc/php/7.0/cli/php.ini

Then run these commands

sudo a2enmod php7.0
sudo a2dismod mpm_event
sudo a2enmod mpm_prefork
sudo phpenmod mcrypt

Generate Self signed certificate

Enable ssl in apache

sudo a2enmod ssl

Generate Cert

sudo openssl req -x509 -nodes -days 365 -newkey rsa:2048 -keyout /etc/ssl/private/localhost.key -out /etc/ssl/certs/localhost.crt

Configure Apache

Edit the following config file

sudo vi /etc/apache2/sites-available/librenms.conf

Add the following

<VirtualHost *:443>
 DocumentRoot /opt/librenms/html/
 ServerName librenms.example.com
 SSLEngine on
 SSLCertificateFile /etc/ssl/certs/localhost.crt
 SSLCertificateKeyFile /etc/ssl/private/localhost.key
 CustomLog /opt/librenms/logs/access_log combined
 ErrorLog /opt/librenms/logs/error_log
 AllowEncodedSlashes NoDecode
 <Directory "/opt/librenms/html/">
 Require all granted
 AllowOverride All
 Options FollowSymLinks MultiViews
 </Directory>
</VirtualHost>

Run the following commands

sudo a2ensite librenms.conf
sudo a2enmod rewrite
sudo systemctl restart apache2

Configure snmpd

sudo cp /opt/librenms/snmpd.conf.example /etc/snmp/snmpd.conf

Set the SNMP community string in the following file

sudo vi /etc/snmp/snmpd.conf

Then run these commands

sudo curl -o /usr/bin/distro https://raw.githubusercontent.com/librenms/librenms-agent/master/snmp/distro
sudo chmod +x /usr/bin/distro
sudo systemctl restart snmpd

Setup Crontab

sudo cp /opt/librenms/librenms.nonroot.cron /etc/cron.d/librenms

Copy logrotate config

sudo cp /opt/librenms/misc/librenms.logrotate /etc/logrotate.d/librenms

Set permissions

mkdir -p /opt/librenms/rrd /opt/librenms/logs
sudo chown -R librenms:librenms /opt/librenms
sudo setfacl -d -m g::rwx /opt/librenms/rrd /opt/librenms/logs
sudo setfacl -R -m g::rwx /opt/librenms/rrd /opt/librenms/logs

Web Installer

Restart apache

sudo systemctl restart apache2

Finish the install by going to

https://your-server/install.php

Change “your-server” to your server’s ip address, or hostname.  Since we created a self signed certificate, you’ll need to accept the https error.

Validate

Back on the command line run the php validation script

sudo /opt/librenms/validate.php

Finally log into your new LibreNMS instance by going to

https://your-server

Change “your-server” to your server’s IP address or hostname.

Optimizations for LibreNMS

Optimizations for fping.  Add to the LibreNMS config in “/opt/librenms/config.php”

$config['fping_options']['retries'] = 5;
$config['fping_options']['timeout'] = 1000;
$config['fping_options']['count'] = 4;
$config['fping_options']['millisec'] = 1000;


Use sysname instead of ip.  Add to the LibreNMS config in “/opt/librenms/config.php”

$config['force_ip_to_sysname'] = true;


Add device name to alert message.  Add to the alert templates template to show device name in alert.

%sysName\r\n

How to Install Zenoss 5 on CentOS 7

Note:

  1. This is not a comprehensive guide, if you need more info, refer to the installation manual here.
  2. This assumes that all your partitions are going to be on one drive

Installing CentOS 7

Note: If you have issues installing CentOS via the default install interface, try using the Fallback graphics mode, found in the Grub boot menu under “trubbleshooting”.

Install CentOS like you normally would, just be sure to leave at least 60GB of free space for Docker/Zenoss

2

You can Select Automatic Partitioning, but you will need to make additional space available.  I just configured it manually.3

 Note that I have about 75GB of free space, this will be used for “/var/lib/docker” and “/opt/serviced/var/volumes”.  We’ll set these up later on.1

You don’t necessarily need to setup a user, but you can if you want to.  4

Once your finished reboot and login.5


Configuring CentOS for Zenoss

Setup network

You will need to setup your network settings.  Refer to this post to set a static IP address if needed.


Note: In CentOS 7 ifconfig is not installed by default.  If you need to check the IP address use the following command.

ip addr sh

After your connected to the internet you can install ifconfig with

yum install -y net-tools

Setup Hostname

Zenoss seems to have issues if you change the hostname after it is installed so be sure to set up the hostname before you start installing zenoss.

Check current hostname

hostname

Change the hostname.  Replace “newhostname” with your new hostname.

hostnamectl set-hostname newhostname

After you finish configuring the hostname, add it to “/etc/hosts” with the following command.  Change the IP address and the hostname “zenoss” to your systems IP address and hostname.

echo "192.168.56.101   zenoss" >> /etc/hosts

Update your system

yum update -y

Disable Firewall

systemctl stop firewalld && systemctl disable firewalld

Enable persistent log storage

mkdir -p /var/log/journal && systemctl restart systemd-journald

Create two Btrfs file systems

First create two normal linux partitions using your favorite disk utility.  I am using cfdisk.  Each partition should be over 30GB.

cfdisk /dev/sda

6

Create two Primary partitions and put them at the end and then write and exit.

7

Take note of the two new partitions names.  Mine are “sda4” and “sda3”.

After the above changes are made, it would be a good idea to reboot the machine so the partition table can be updated.

reboot

Now we will reformat the two partitions as Btrfs

Create mount point.

mkdir -p /var/lib/docker /opt/serviced/var/volumes

Change “/dev/sda3” and “/dev/sda4” to your partitions names if they are different.

DOCKER_PART=/dev/sda3
APP_PART=/dev/sda4
mkfs -t btrfs --nodiscard $DOCKER_PART
mkfs -t btrfs --nodiscard $APP_PART

Add the new file systems to fstab, so they automatically mount on boot.

APP_PATH="/opt/serviced/var/volumes"
echo "$DOCKER_PART /var/lib/docker btrfs rw,noatime,nodatacow 0 0" >> /etc/fstab
echo "$APP_PART $APP_PATH btrfs rw,noatime,nodatacow 0 0" >> /etc/fstab

Mount the new filesystems, and make sure that they mounted

mount -a
if [[ `mount | egrep 'docker|serviced'` ]]; then echo "Mounted" ; else echo "Not Mounted" ; fi

You can manually check by running the following command.

mount | egrep 'docker|serviced'

you should receive something like the following

/dev/sda3 on /var/lib/docker type btrfs (rw,noatime,seclabel,nodatasum,nodatacow,space_cache)
/dev/sda4 on /opt/serviced/var/volumes type btrfs (rw,noatime,seclabel,nodatasum,nodatacow,space_cache)

Disable SELinux

By default SELinux is installed and enabled.  To disable SELinux either edit the config file “/etc/selinux/config” and change “SELINUX=enforcing” to “SELINUX=disabled”, or you can run the following command.

EXT=$(date +"%j-%H%M%S")
sudo sed -i.${EXT} -e 's/^SELINUX=.*/SELINUX=disabled/g' \
/etc/selinux/config && \
grep '^SELINUX=' /etc/selinux/config

Enable Dnsmasq

systemctl enable dnsmasq && systemctl start dnsmasq

Install and Configure NTP

yum install -y ntp && systemctl enable ntpd

Have NTP start on system boot and then start NTP

echo "systemctl start ntpd" >> /etc/rc.d/rc.local
chmod +x /etc/rc.d/rc.local
systemctl start ntpd

Download and install the Zenoss repository

rpm -ivh http://get.zenoss.io/yum/zenoss-repo-1-1.x86_64.rpm
yum clean all

Final Reboot

reboot


Installing Zenoss


Once your logged back into the system start installing zenoss

Install the Zenoss-core service and start docker

yum --enablerepo=zenoss-stable install -y zenoss-core-service
systemctl start docker

Add the Btrfs and DNS flags to the Docker startup options

Identify ip for docker

ip addr | grep -A 2 'docker0:' | grep inet

Add the docker startup options.  Change the ip address if needed.  It should match the one from the previous command.

echo 'DOCKER_OPTS="-s btrfs --dns=172.17.42.1"' >> /etc/sysconfig/docker

Change the volume type for application data

You can manually edit the serviced file “/etc/default/serviced” and change the variable “SERVICED_FS_TYPE” from “rsync” to “btrfs” or run the following command.

EXT=$(date +"%j-%H%M%S")
 sudo sed -i.${EXT} \
 -e 's|^#[^S]*\(SERVICED_FS_TYPE=\).*$|\1btrfs|' \
 /etc/default/serviced

Restart docker

systemctl stop docker && systemctl start docker

Start the control center

systemctl start serviced

you can monitor the process with

journalctl -u serviced -f

Serviced has about 5-10 minutes worth of work to do before you’ll be able to login to the Control Center interface.  If the service fails to start, reboot the server.

Setting up name resolution

To setup name resolution on you local computer just add the following line to your “hosts” file.  On Linux and OS X this is located in “/etc/hosts” On Windows machines it is under “\Windows\Sytem32\Drivers\etc\hosts”

192.168.56.101 hostname zenoss5.hostname hbase.hostname opentsdb.hostname rabbitmq.hostname

Be sure to change the IP address and “hostname”  to the IP address and hostname of your server.  You also might need administrative privileges to edit the hosts file.

10

Logging into the Control Center.

Now open up a web browser and go the following URL.  Change the IP address to your servers IP.

https://192.168.56.101

Login with the Zenoss server root username and password.  If you want to setup a user other then root, please refer to the Zenoss Installation guide here.

11

Change the hostname to your Zenoss server hostname12

Select the check boxes in the next two steps.13 14
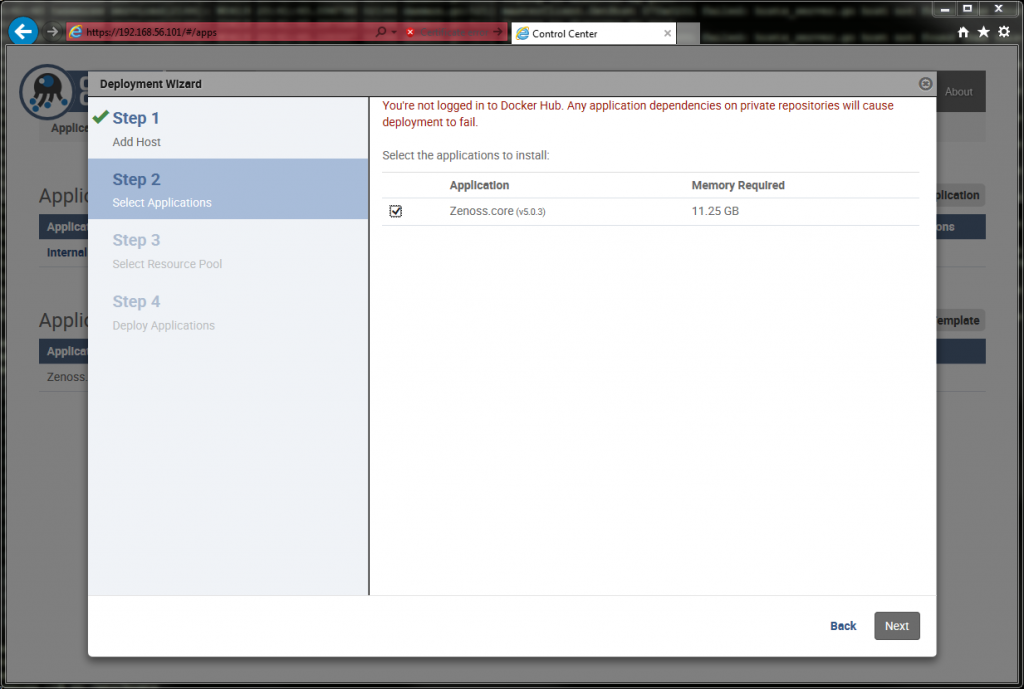
Give it a deployment id and deploy it.15 16
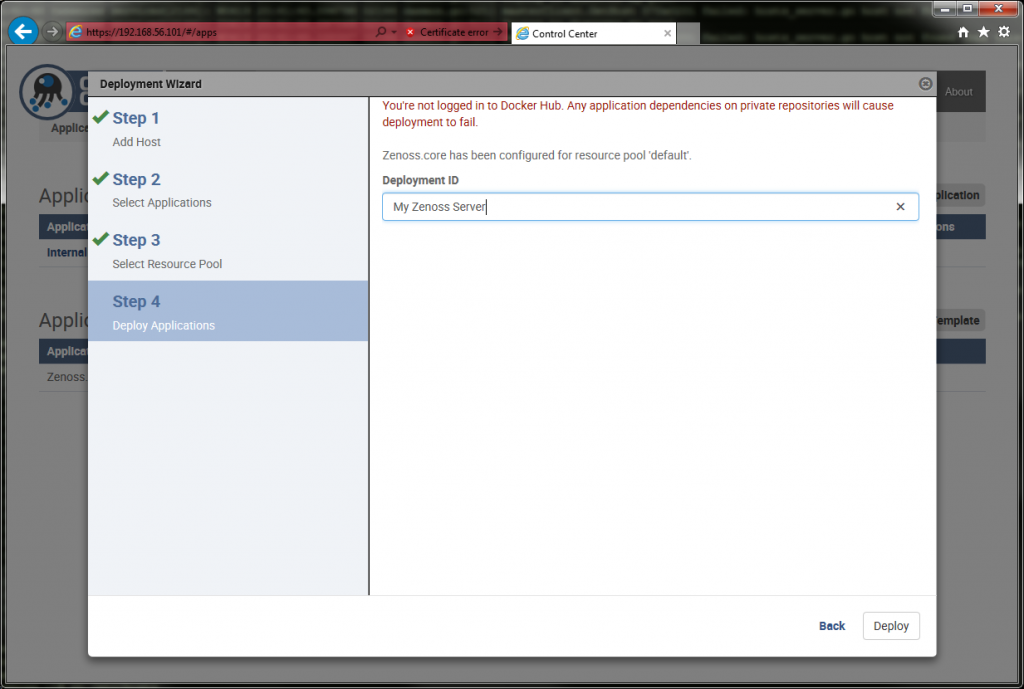
Once it is deployed Make sure that it is started.  Once it finishes go log into Zenoss.  It can take awhile for Zenoss to start up, depending on your hardware, so be patient.

The Direct URL for Zenoss is

https://zenoss5.hostname


Setup SNMP for Ubiquiti Radios

First lets install SNMP.

On Red Hat type systems such as Fedora and CentOS do the following

yum install -y net-snmp net-snmp-utils

If you are using a Debian based distro the you can use apt.

apt-get install snmp

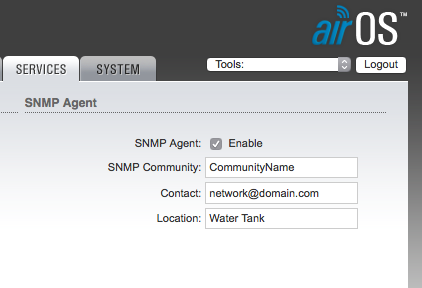
You will need to make sure that SNMP is turned on in the radio under the Services tab.

Be sure to remember the SNMP Community string as that is needed in the next step.

Now try to connect to the device with the following command.

snmpwalk -v1 -c comunityname 192.168.1.20

You should receive something like the following.

...
IF-MIB::ifSpecific.5 = OID: SNMPv2-SMI::zeroDotZero
SNMPv2-MIB::snmpInPkts.0 = Counter32: 484
SNMPv2-MIB::snmpOutPkts.0 = Counter32: 471
SNMPv2-MIB::snmpInBadVersions.0 = Counter32: 0
SNMPv2-MIB::snmpInBadCommunityNames.0 = Counter32: 12
SNMPv2-MIB::snmpInBadCommunityUses.0 = Counter32: 0
...

If you received

Timeout: No Response from 192.168.1.20

Then either the SNMP Community name is wrong or the ip address is unreachable.

The following command will list all the interfaces on the device.

snmpwalk -v1 -c comunityname 192.168.1.20 ifDescr
IF-MIB::ifDescr.1 = STRING: lo
IF-MIB::ifDescr.2 = STRING: eth0
IF-MIB::ifDescr.3 = STRING: eth1
IF-MIB::ifDescr.4 = STRING: wifi0
IF-MIB::ifDescr.5 = STRING: ath0
IF-MIB::ifDescr.6 = STRING: br0

Notice the number at the end of the ifDescr, That number identifies the interface.  You will need that for the next command.

Now lets check the signal. Note that the last number of the OID(the OID is the last string of numbers) is the interface number of ath0.  Yours could be different depending on how you have the radio setup.

snmpwalk -v1 -c communityname 192.168.1.20 1.3.6.1.4.1.14988.1.1.1.1.1.4.5

Here is a short list of OID’s.  To use them just run the above command but replace the OID with the one you want.

RxRate of 5'th interface (ath0) of the device (bps): 1.3.6.1.4.1.14988.1.1.1.1.1.3.5
TxRate of 5'th interface (ath0) of the device (bps): 1.3.6.1.4.1.14988.1.1.1.1.1.2.5
Channel: 1.3.6.1.4.1.14988.1.1.1.1.1.7.5
Firmware Version: 1.2.840.10036.3.1.2.1.4
Hostname: 1.3.6.1.4.1.14988.1.1.1.1.1.5
AP MAC: 1.3.6.1.4.1.14988.1.1.1.1.1.6
Station MAC: 1.2.840.10036.1.1.1.1
Signal 1.3.6.1.4.1.41112.1.4.5.1.5.1 (OID seems to vary a little bit, from nanoBeam to nanoStation)