If we take the following code, we call the Log function without the (). This calls the Log function every time the buttonObject is clicked.
// Find object id myButton
let buttonObject = document.getElementById('myButton')

// Add an event listener, and run Log function when clicked.
buttonObject.addEventListener('click', Log)
// If we call Log(), it will immediately trigger the function

function Log () {
  console.log("Hello World!")
}
But what if we want to pass in a variable to the Log function? We can’t run Log('some text') as the function will run before we click the object.
We can however wrap the Log function inside of an anonymous function like so
let buttonObject = document.getElementById('myButton')

// Now Log() function will be run with the variable getting passed.
buttonObject.addEventListener('click', () => {
  Log('Hello World!')
})

function Log (textVariable) {
  console.log(textVariable)
}
Our Log function gets triggered when the object is clicked, and the variable is passed properly. You can swap out thy arrow function with a nameless function ()
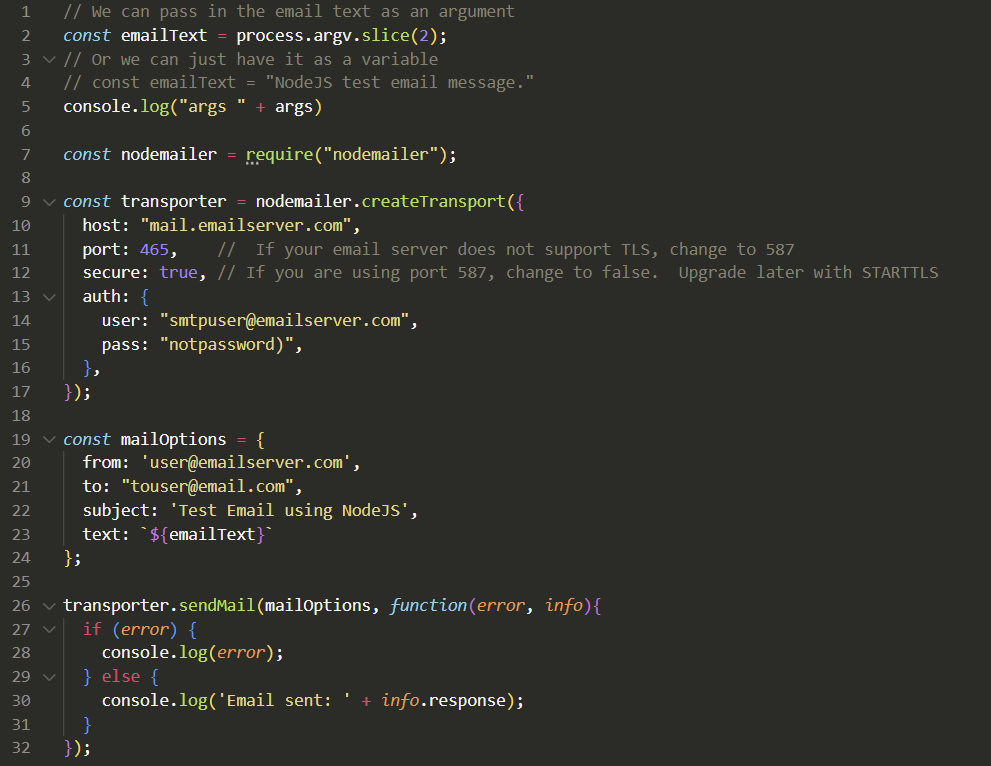
In this post, we will be using Node.JS and the nodemailer library to send email. We need to have an email account with an email provider to send email. Gmail or some other email provider should work.
Prerequisites
First lets install some tools
sudo apt install nodejs npm
Now lets install nodemailer
npm install nodemailer
Writing the Code to Send Email
Now that we have nodemailer installed, we can write or copy our code. Create a file called maill.js and make it look similar to the following.
// We can pass in the email text as an argument
const emailText = process.argv.slice(2);
// Or we can just have it as a variable
// const emailText = "NodeJS test email message."
console.log("args " + args)

const nodemailer = require("nodemailer");

const transporter = nodemailer.createTransport({
  host: "mail.emailserver.com",
  port: 465,    //  If your email server does not support TLS, change to 587
  secure: true, // If you are using port 587, change to false.  Upgrade later with STARTTLS
  auth: {
    user: "smtpuser@emailserver.com",
    pass: "notpassword)",
  },
});

const mailOptions = {
  from: 'user@emailserver.com',
  to: "touser@email.com",
  subject: 'Test Email using NodeJS',
  text: `${emailText}`
};

transporter.sendMail(mailOptions, function(error, info){
  if (error) {
    console.log(error);
  } else {
    console.log('Email sent: ' + info.response);
  }
});
Update the following variables
host: to your host email server
user: to the email user that is sending email. It should have an account on the email server
pass: password for your email user that is sending the email
from: email address that is sending the email
to: email account(s) you are sending email to
subject: subject of your email
Now we can proceed to send email
Sending Email
We can now run the code by saving our file and running it directly with NodeJS
nodejs ./mail.js "This is the body text for the email"
Hit Return and look for the email. If something went wrong, it should throw an error.
You can change the emailText variable if you would rather have the message body inside the code.
Code Explanation and Notes
A little explanation on the code.
The second line “const emailText = process.argv.slice(2);” is used to pass in a command line argument to use as the text for the body of the email. You can delete the line and uncomment line 4 if you would rather use a variable inside the code.
Your email server should support using SSL/TLS on port 465. If it does not, you may need to use STARTTLS which uses port 587, and then set secure to false. STARTTLS should upgrade the connection to be encrypted. But it’s opportunistic. You can read more about STARTTLS, SSL/TLS here https://mailtrap.io/blog/starttls-ssl-tls/
You can change the “to: ” in the mailOptions object to an array of email addresses to send the email to multiple people at once.
to: ["email1@email.com", "email2@email.com", "etc"],
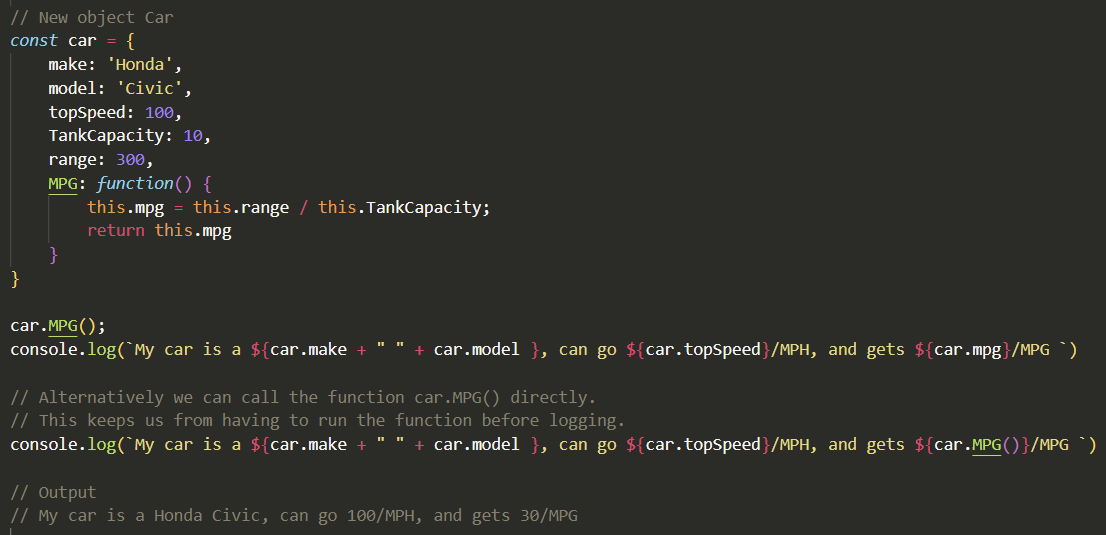
Below is a code example for creating a basic object and using a function to calculate the fuel economy.
// New object Car
const car = {
    make: 'Honda',
    model: 'Civic',
    topSpeed: 100,
    tankCapacity: 10,
    range: 300,
    MPG: function() {
        this.mpg = this.range / this.tankCapacity;
        return this.mpg
    }
}

car.MPG();  // We need to call this to calculate the MPG, otherwise we get undefined

console.log(`My car is a ${car.make + " " + car.model }, can go ${car.topSpeed}/MPH, and gets ${car.mpg}/MPG `)

// Alternatively we can call the function car.MPG() directly.
// This keeps us from having to run the function before logging.
console.log(`My car is a ${car.make + " " + car.model }, can go ${car.topSpeed}/MPH, and gets ${car.MPG()}/MPG `)
The problem is that the code in SettingsActivity is not tied to the settings_activity.xml file. So it is using the activity_main.xml instead. It does in fact switch activities, the header at the top shows that it is in the Settings, but it shows the same information on the Main Activity. Problem showed up after copying and pasting code.
Check the following line under the initial onCreate function
override fun onCreate(savedInstanceState: Bundle?) {
        super.onCreate(savedInstanceState)
        setContentView(R.layout.activity_main)  // <-- Should be R.layout.settings_activity
The setContentView line should reflect the Layout XML file under res -> layout -> settings_activity.xml
Change “website.toredirect.com” to the website you would like to redirect to. Put the code in a index.html or index.php file. If you stick it in the root website directory it’ll redirect automatically get called when you hit the website.
#!/bin/bash
array=(one two three)
echo "Printing first object in array."  #Replace 0 with the place number of the array item
echo ${array[0]}

echo ""

echo "Whole array"
echo ${array[*]}

echo ""

echo "Array indexes"
echo ${!array[*]}
Output
Printing first object in array.
one

Whole array
one two three

Array indexes
0 1 2
Some notes and issues when trying to clamp the rotation of a camera in Unity. All the code was put on a script assigned to a controller that controlled the camera view. Used the Simple Touch Controller from the asset store.
Problem trying to clamp EulerAngles
It appears that the following code does not work as EulerAngles expects a value from 0-365.
You have to do some math to take the value from 0-365, then translate it to -90 – 90 so it can be clamped properly
// Put these with the rest of your public variables.  These should show up in the Unity Inspector and allow you to modify the values
public float speedProgressiveLook;
public float clampXRotationUp;
// The following lines allow the script to Clamp the camera X rotation and should go in the Update functionfloat playerRotation = transform.localEulerAngles.x - rightController.GetTouchPosition.y * Time.deltaTime * speedContinuousLook; if (playerRotation > 180) { playerRotation = playerRotation - 360 ; // Sets our working numbers between -180 - 180 } playerRotation = Mathf.Clamp(playerRotation, clampXRotationDown, clampXRotationUp);Vector3 newRotation;newRotation.x = playerRotation;newRotation.y = transform.localEulerAngles.y + rightController.GetTouchPosition.x * Time.deltaTime * speedContinuousLook;newRotation.z = 0;transform.localEulerAngles = newRotation;