Log into the VM through ssh or XenCenter. Next remove xs-tools with yum
yum remove -y `rpm -qa | grep xe-guest`
reboot the machine.
reboot
XenServer tools should now be removed.

Log into the VM through ssh or XenCenter. Next remove xs-tools with yum
yum remove -y `rpm -qa | grep xe-guest`
reboot the machine.
reboot
XenServer tools should now be removed.
Before you start, make sure that you have SNMP V3 already setup on your device. You can refer to this post if you need to set it up.
Add the device to Zenoss, and then edit the devices Configuration Properties, you’ll need to configure the following settings.
Zenoss setting name Options
zSnmpSecurityName [user]
zSnmpPrivType (AES or DES)
zSnmpPrivPassword PASSPHRASE
zSnmpAuthType (MD5 or SHA)
zSnmpAuthPassword PASSPHRASE
zSnmpVer v3
After all the above changes are made, Zenoss should start graphing the device.
The chart below shows which snmpwalk options match which Zenoss Configuration Properties.
snmpwalk Zenoss Configuration snmpd.conf
-v zSnmpVers n/a
-u zSnmpSecurityName createUser [user]
-x zSnmpPrivType (AES or DES)
-X zSnmpPrivPassword PASSPHRASE
-a zSnmpAuthType (MD5 or SHA)
-A zSnmpAuthPassword PASSPHRASE
You can refer to the Zenoss wiki for more info.
Install SNMP.
yum install net-snmp net-snmp-utils
Configure the SNMP V3 user by running the following command and then following the prompts it gives you.
net-snmp-create-v3-user
Example: The username is “snmpadmin” and the password is”r123456″
[root@localhost ~]# net-snmp-create-v3-user
Enter a SNMPv3 user name to create:
snmpadmin
Enter authentication pass-phrase:
r123456
Enter encryption pass-phrase:
  [press return to reuse the authentication pass-phrase]

adding the following line to /var/lib/net-snmp/snmpd.conf:
   createUser snmpadmin MD5 "r123456" DES
adding the following line to /etc/snmp/snmpd.conf:
   rwuser snmpadmin
[root@localhost ~]#
Change the syslocation and syscontact in the /etc/snmp/snmpd.conf file.
vi /etc/snmp/snmpd.conf
Start snmpd service
service snmpd start
Configure snmp to start on system boot.
chkconfig snmpd on
Test and make sure snmp is working
replace “password” and “username” with the ones you setup when you created the SNMP V3 user.
snmpwalk -v3 -a MD5 -A password -x DES -X password -l authPriv -u privuser localhost
If you receive something like “snmpwalk: Timeout” then something is not working correctly. Check to make sure the service is started, and make sure that your firewall is not blocking SNMP.
If you are running a firewall, run the following commands to allow it through.
firewall-cmd --zone=public --add-port=161/udp --permanent
semanage port -a -t snmp_port_t -p udp 161
firewall-cmd --reload
On iptables you should be able to do
iptables -A INPUT -p tcp -m state --state NEW -m tcp --dport 161 -j ACCEPT
or add it to /etc/sysconfig/iptables and then restart iptables
To increase a Windows VM disk size you’ll first need to shut down the VM and then increase the disk size from XenCenter. When you boot back up into the VM, the extra space shows up as unallocated. All that needs to be done is the main partition needs to be extended.
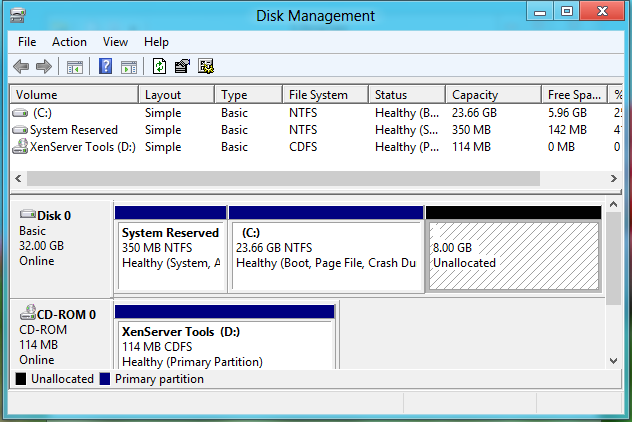
Open up the Windows Disk Management Utility. You can do this by clicking on the start button, typing in disk management and hit enter. This will bring up the Disk Management program.
In disk manager, you should see the Unallocated space at the end of Disk 0, i.e. your main drive. Right click on your main partition (C:) and click Extend Volume. You will be presented with a wizard that will walk you through extending your disk.
Example:
Before increasing the VM’s disk size.
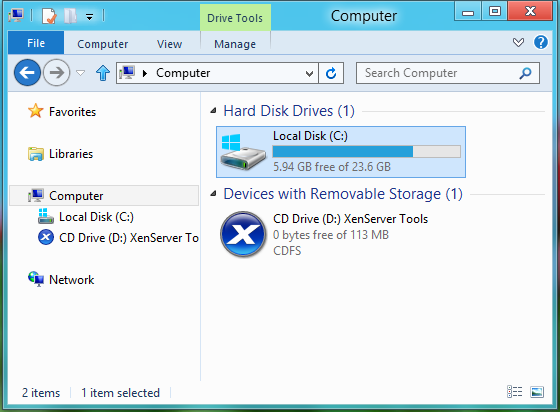
The unallocated space is the extra space that we added via XenCenter. Right click on the middle partition (C:), and click extend.
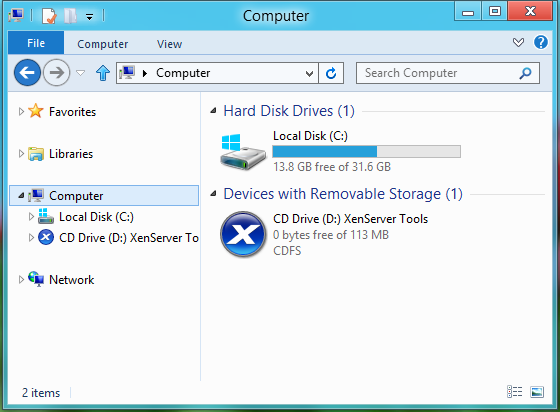
After were are finished extending the partition, we see that our main partition is about 8GB larger.
Prerequisite:
Installing Planets3 Alpha
Installing Planets3 Alpha is easy to do. Run the installer and follow the prompts. The server gets installed when you install the Planets3 Alpha, you just have to launch the server file to run the server.
Setting up Firewall
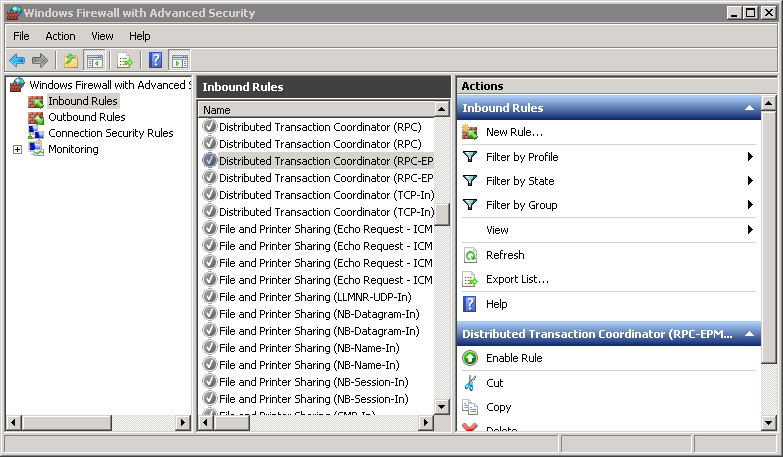
Click on the Start button type in firewall and hit enter. This should start up the Windows Firewall application.
What we need to do is create a new inbound rule to allow UDP port 7777 (the Planets3 server port) so we can connect to the server.
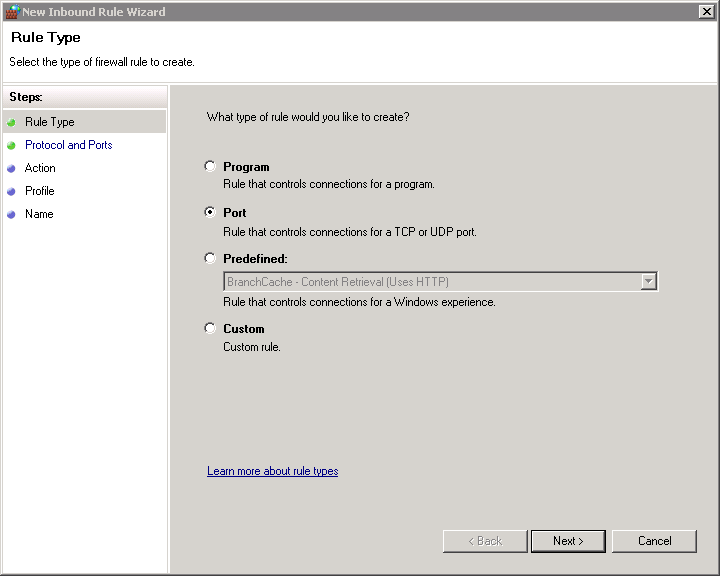
Click on Inbound Rules, and then Create a New Rule…
Select Port.
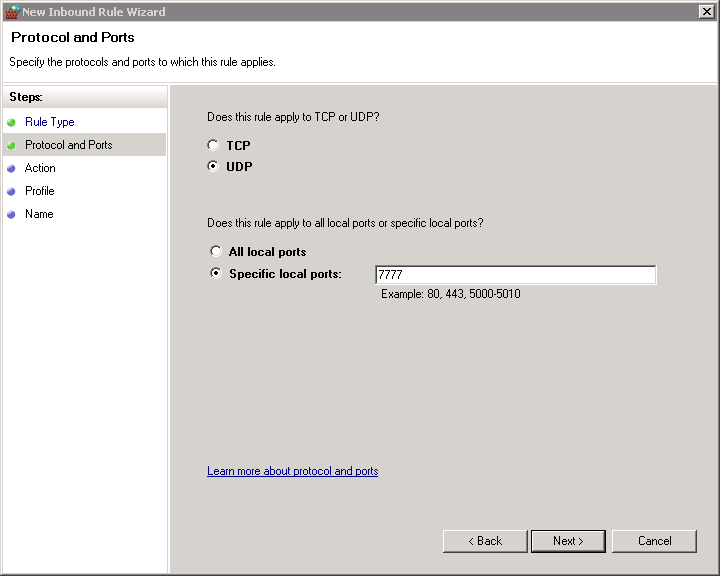
Select “UDP” and “Specific local ports:” The port number is 7777
Give the New Rule a Name and Description. 
And finally click Finish.
Configure Planets3Alpha to Start on System Log In
You can manually launch the server by double clicking on the “start_server” file under “C:\Program Files (x86)\Planets3Alpha\”
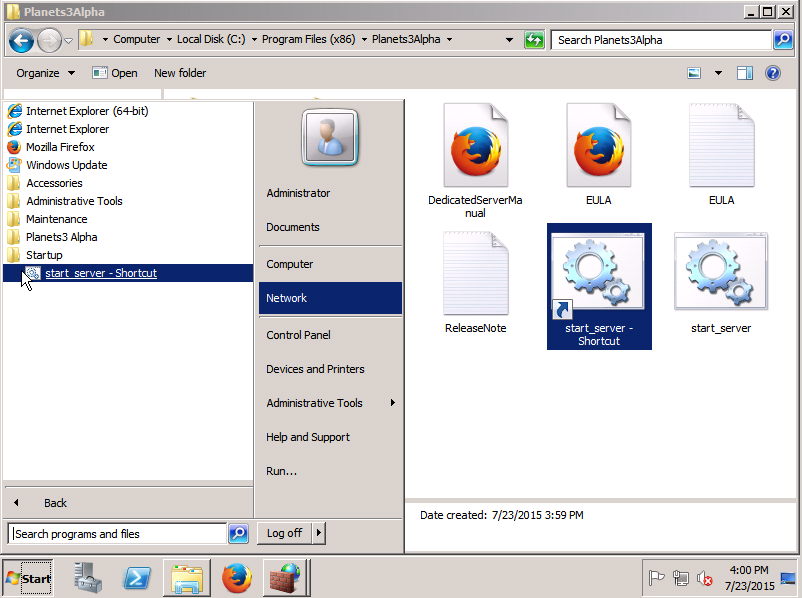
If you want to have Planets3 Startup on system log in, do the following.
Open up the Planets3 install directory in Windows Explorer, it should be under “C:\Program Files (x86)\Planets3Alpha\”. Create a shortcut by right clicking on “start_server” then Create shortcut. Now drag the shortcut to the Startup folder found under All Programs in the start menu.
That’s it. You should be able to reboot, log in, and have Planets3 Alpha multiplayer server start automatically. All that is left is for you to connect to your new server.
Before we start you will need to do the following in XenCenter
Before starting any of the following, it is a good idea to backup any data you would not want to lose. You should not lose any data following these steps, but there is always the possibility for something to go wrong.
What is going to happen
The path to the disk is “/dev/xvda” the LVM path/name is “/dev/VolGroup/lv_root” The goal is to increase lv_root’s size from about 8GB to about 12GB. If for some reason your drive is not “xvda” or your LVM name is different, change the commands accordingly.
Here are the commands in a nutshell.
fdisk /dev/xvda                        <-- Edit the Partition Table
reboot                                 <-- Reboot to apply the partition table updates
pvdisplay                              <-- Display Physical Volume info
pvresize /dev/xvda2                    <-- Resize Physical Volume
lvresize /dev/xvda2 -l +100%FREE       <-- Resize Logical Volume
resize2fs /dev/VolGroup/lv_root        <-- Resize File System
Example:
You may be able to substitute all the fdisk commands with
`parted /dev/xvda resizepart 2 100%`
Change 2 for the actual partition you need to resize.
All the keys and command that were hit and executed are in bold.
[root@localhost ~]# fdisk /dev/xvda

WARNING: DOS-compatible mode is deprecated. It's strongly recommended to
         switch off the mode (command 'c') and change display units to
         sectors (command 'u').

Command (m for help): p

Disk /dev/xvda: 12.9 GB, 12884901888 bytes
255 heads, 63 sectors/track, 1566 cylinders
Units = cylinders of 16065 * 512 = 8225280 bytes
Sector size (logical/physical): 512 bytes / 512 bytes
I/O size (minimum/optimal): 512 bytes / 512 bytes
Disk identifier: 0x00066ace

    Device Boot      Start         End      Blocks   Id  System
/dev/xvda1   *           1          64      512000   83  Linux
Partition 1 does not end on cylinder boundary.
/dev/xvda2              64        1045     7875584   8e  Linux LVM
Command (m for help): d
Partition number (1-4): 2

Command (m for help): p

Disk /dev/xvda: 12.9 GB, 12884901888 bytes
255 heads, 63 sectors/track, 1566 cylinders
Units = cylinders of 16065 * 512 = 8225280 bytes
Sector size (logical/physical): 512 bytes / 512 bytes
I/O size (minimum/optimal): 512 bytes / 512 bytes
Disk identifier: 0x00066ace

    Device Boot      Start         End      Blocks   Id  System
/dev/xvda1   *           1          64      512000   83  Linux
Partition 1 does not end on cylinder boundary.

Command (m for help): n
Command action
   e   extended
   p   primary partition (1-4)
p
Partition number (1-4): 2
First cylinder (64-1566, default 64):
Command (m for help): p

Disk /dev/xvda: 12.9 GB, 12884901888 bytes
255 heads, 63 sectors/track, 1566 cylinders
Units = cylinders of 16065 * 512 = 8225280 bytes
Sector size (logical/physical): 512 bytes / 512 bytes
I/O size (minimum/optimal): 512 bytes / 512 bytes
Disk identifier: 0x00066ace

    Device Boot      Start         End      Blocks   Id  System
/dev/xvda1   *           1          64      512000   83  Linux
Partition 1 does not end on cylinder boundary.
/dev/xvda2              64        1566    12065871   83  Linux

Command (m for help): wq
The partition table has been altered!

Calling ioctl() to re-read partition table.

WARNING: Re-reading the partition table failed with error 16: Device or resource busy.
The kernel still uses the old table. The new table will be used at
the next reboot or after you run partprobe(8) or kpartx(8)
Syncing disks.
[root@localhost ~]# reboot
Show the current size of the Physical Volume
pvdisplay
[root@localhost ~]# pvdisplay
  --- Physical volume ---
  PV Name               /dev/xvda2
  VG Name               VolGroup
  PV Size               7.51 GiB / not usable 3.00 MiB
  Allocatable           yes (but full)
  PE Size               4.00 MiB
  Total PE              1922
  Free PE               0
  Allocated PE          1922
  PV UUID               zKmGEt-Uf0A-I14h-NDYc-53rf-micT-VxNqsP

[root@localhost ~]#
Resize the Physical Volume
pvresize /dev/xvda2
[root@localhost ~]# pvresize /dev/xvda2
  Physical volume "/dev/xvda2" changed
  1 physical volume(s) resized / 0 physical volume(s) not resized
[root@localhost ~]#
Run pvdisplay again. You should see more space under PV Size.
[root@localhost ~]# pvdisplay
  --- Physical volume ---
  PV Name               /dev/xvda2
  VG Name               VolGroup
  PV Size               11.51 GiB / not usable 2.08 MiB
  Allocatable           yes
  PE Size               4.00 MiB
  Total PE              2945
  Free PE               1023
  Allocated PE          1922
  PV UUID               zKmGEt-Uf0A-I14h-NDYc-53rf-micT-VxNqsP

[root@localhost ~]#
Notice the “Free PE” section above. If it says 0 then you won’t be able to run the next command.
Resize LVM
the “+100%FREE” part of the command tells it to uses up all of the free space available
lvresize /dev/VolGroup/lv_root -l +100%FREE
[root@localhost ~]# lvresize /dev/VolGroup/lv_root -l +100%FREE
  Extending logical volume lv_root to 10.71 GiB
  Logical volume lv_root successfully resized
[root@localhost ~]#
Resize the File System
resize2fs /dev/VolGroup/lv_root
[root@localhost ~]# lvresize /dev/VolGroup/lv_root -l +100%FREE
  Extending logical volume lv_root to 10.71 GiB
  Logical volume lv_root successfully resized
[root@localhost ~]#
And that is it. Check out the extra space.
[root@localhost ~]# df -h /
Filesystem                    Size  Used Avail Use% Mounted on
/dev/mapper/VolGroup-lv_root   11G  733M  9.3G   8% /
[root@localhost ~]# exit
Open up disk utility and format your thumb drive as “Mac OS Extended (Journaled)”
Open up a terminal, and run the following command. Change “USBdrive” to your USB Drives name.
sudo /Path/to/Yosemite.app/Contents/Resources/createinstallmedia --volume /Volumes/USBdrive --applicationpath /Path/to/Yosemite.app --nointeraction
Enter in your password and let it run.
Example:
sudo /Applications/Yosemite.app/Contents/Resources/createinstallmedia --volume /Volumes/OSXInstaller --applicationpath /Applications/Yosemite.app --nointeraction
Recovery Mode can be helpful if you need to do certain task like operate on the VM with the disk unmounted or you need to reset a root password.
All of the following is done through XenCenter
To boot the VM into recovery mode all you have to do is
When the VM boots up it will boot off of whatever is in DVD Drive 1.
Backup
backup the UniFi directory
tar zcvf unifi-backup.tgz /usr/UniFi/
Move the tar archive off site.
Restore
Upload the backup file to the server.
Note: You will need to have the UniFi controller install already.
Copy the archive to the root directory and then extract it.
mv unifi-backup.tgz /
cd /
tar zxvf unifi-backup.tgz
Reboot the server and login to the UniFi controller.
reboot