MAC Address Look up
Reply

You’ll need a touch screen to test this out. Easiest way is to use the Unity Remote 5 app. It allows you to use your Android device as a touch screen input.
Start by creating a new empty C# script named “TouchScript” and paste in the following code.
using System.Collections;
using System.Collections.Generic;
using UnityEngine;
public class TouchScript : MonoBehaviour {
public GameObject bullet;
void Start () {
}
void Update () {
Touch myTouch = Input.GetTouch (0);
for(int i =0; i < Input.touchCount; i++)
if (myTouch.phase == TouchPhase.Began) {
{
Debug.Log ("Touch Position" + myTouch.position);
SpawnBullet (myTouch);
}
}
}
void SpawnBullet(Touch fireTouch) {
Vector3 touchPos = Camera.main.ScreenToWorldPoint (fireTouch.position);
touchPos.z = 1; // Puts the z coordinates at 1 so it is visible to the camera.
Debug.Log("Vector3 Pos" + touchPos);
Instantiate (bullet, touchPos, Quaternion.identity);
}
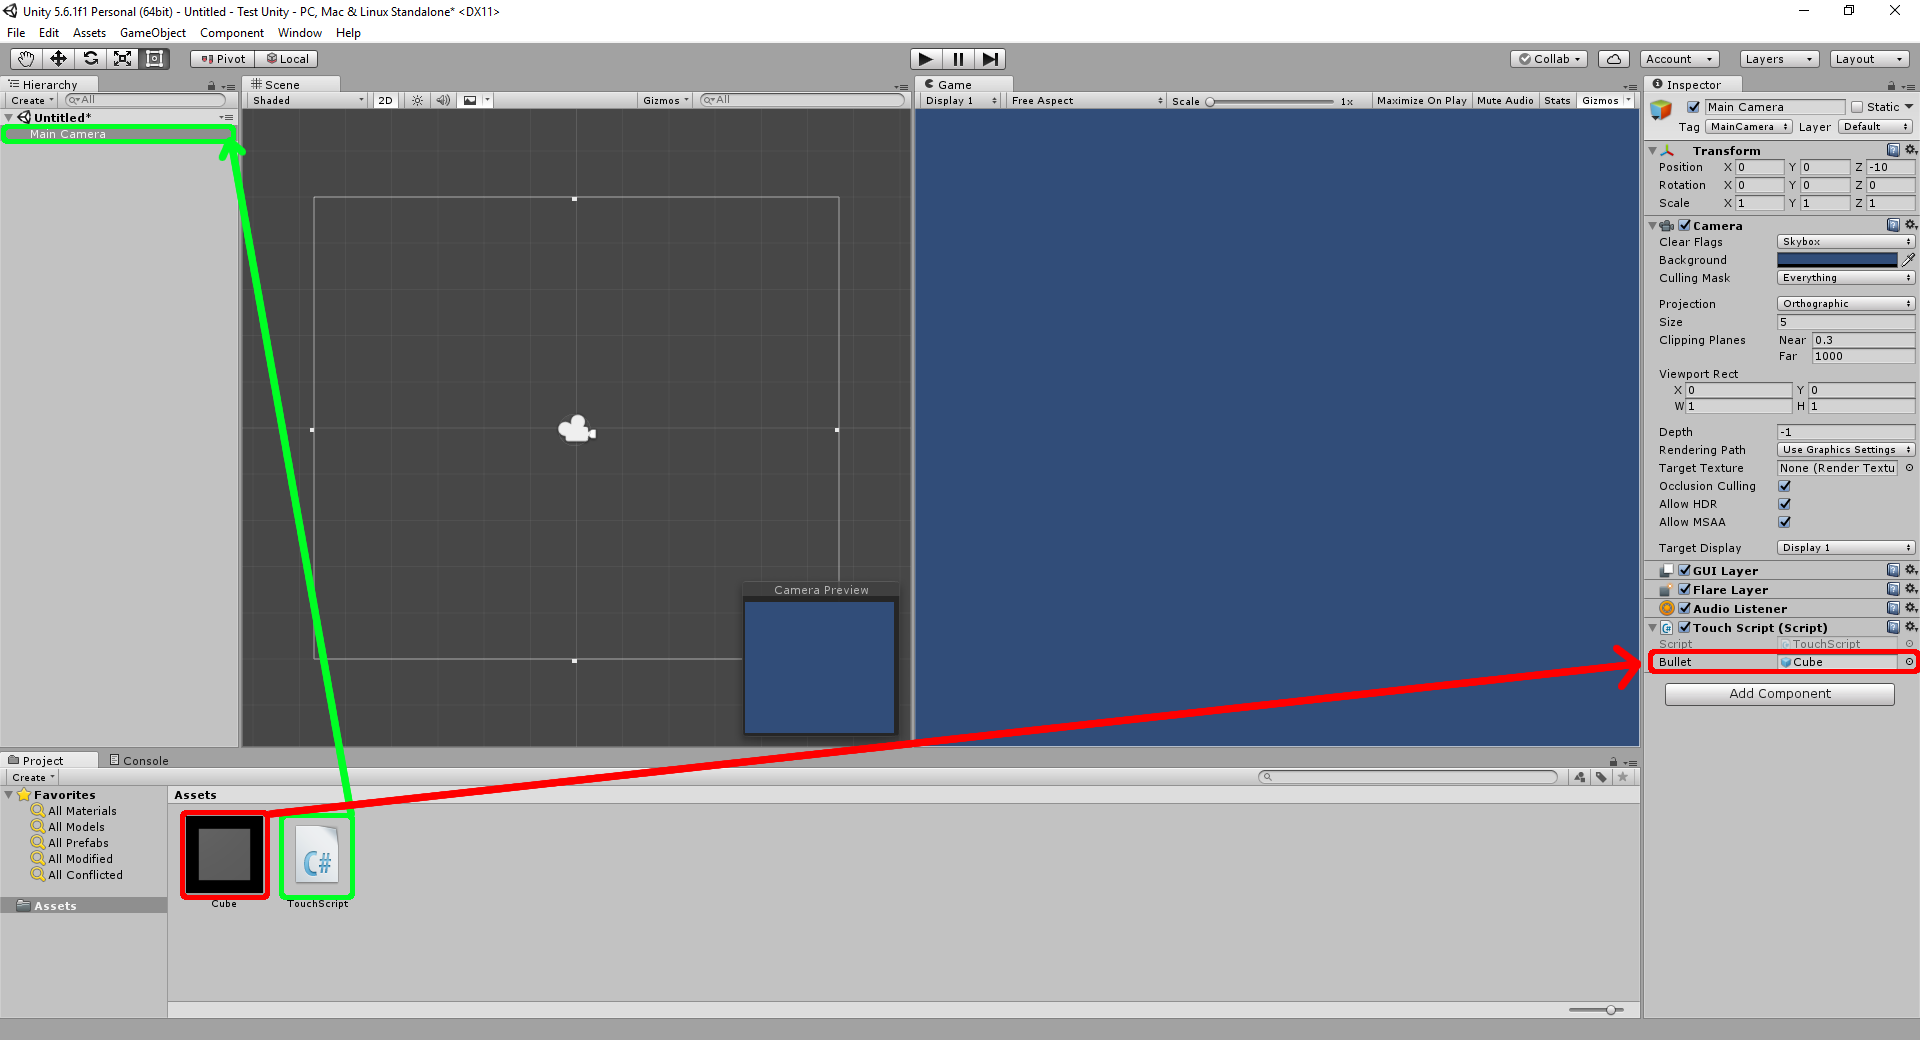
}Now you’ll need to put your script on a game object. You should be able to drag and drop it on any game object, in this case the Main Camera “green”.
Next drag and drop the game object prefab to the script “red”. This tells the script which game object to spawn or instantiate when you touch the screen.
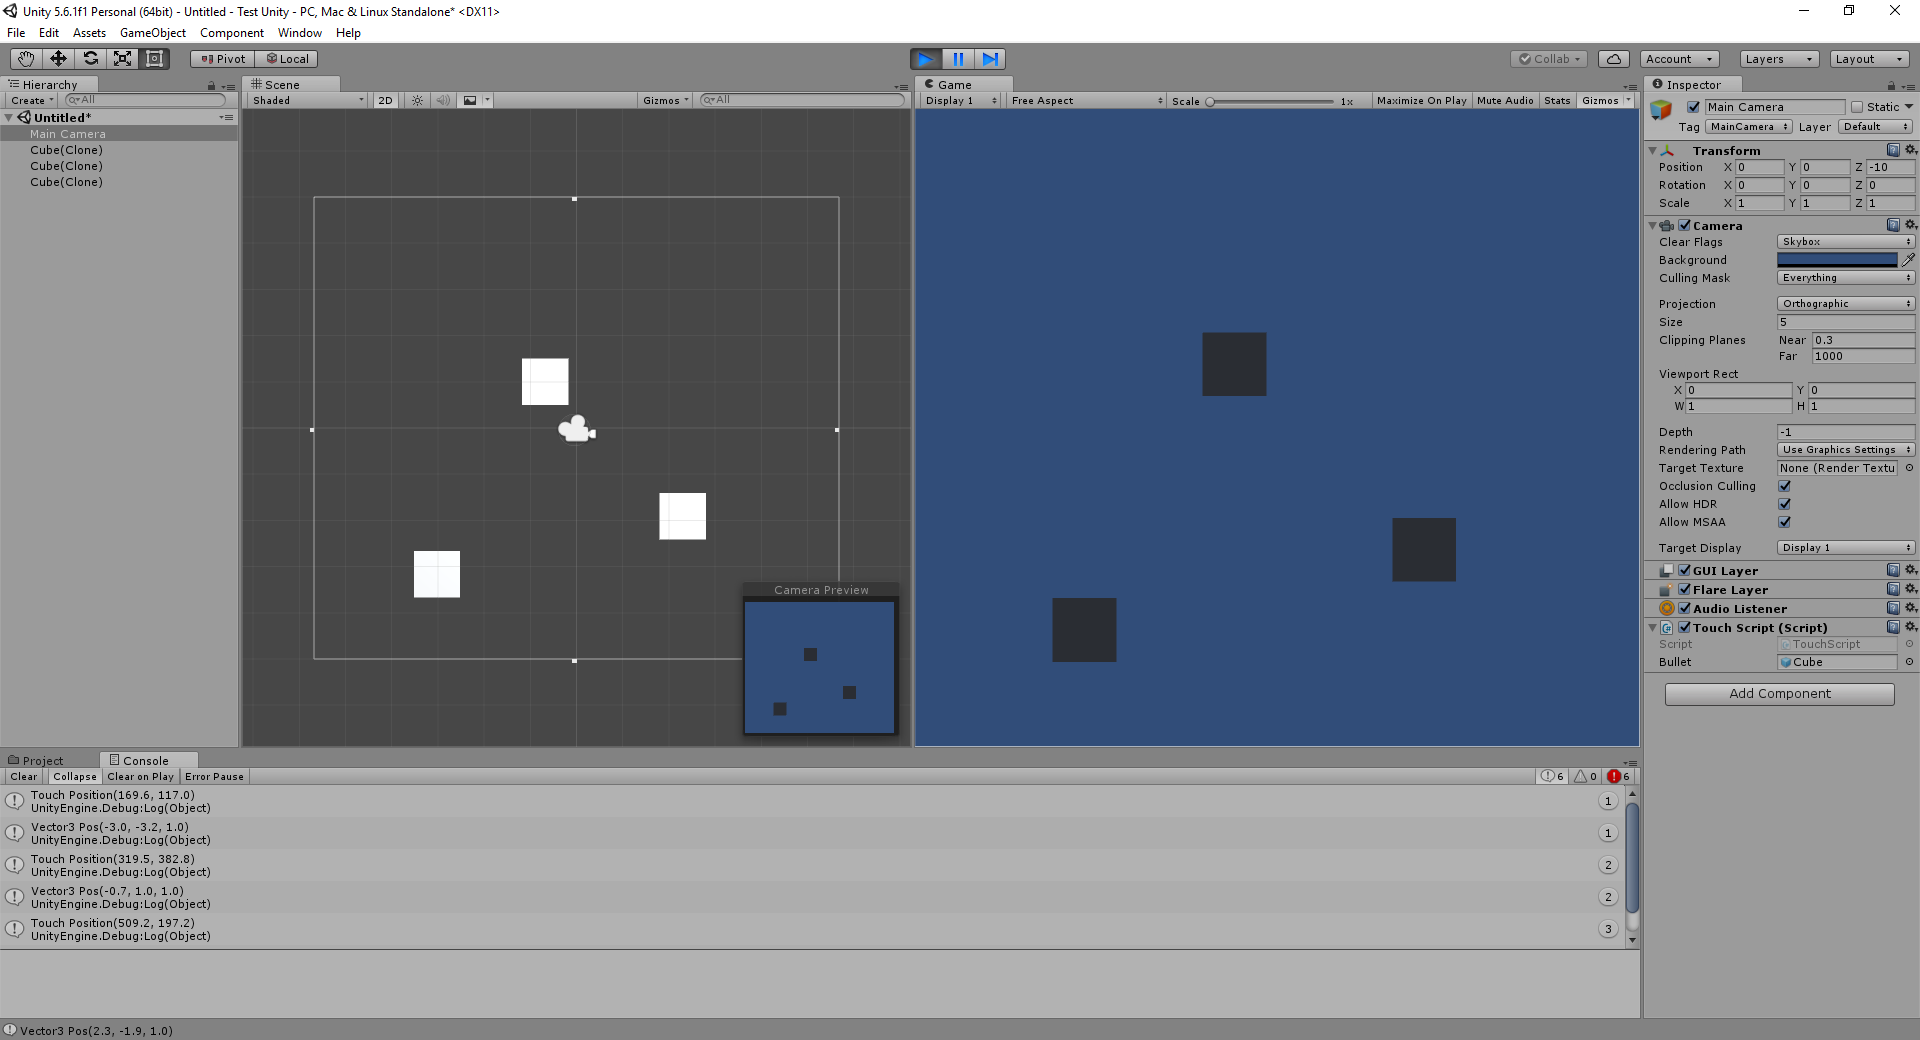
Run the scene. It should now create a game object where you touch on the screen.
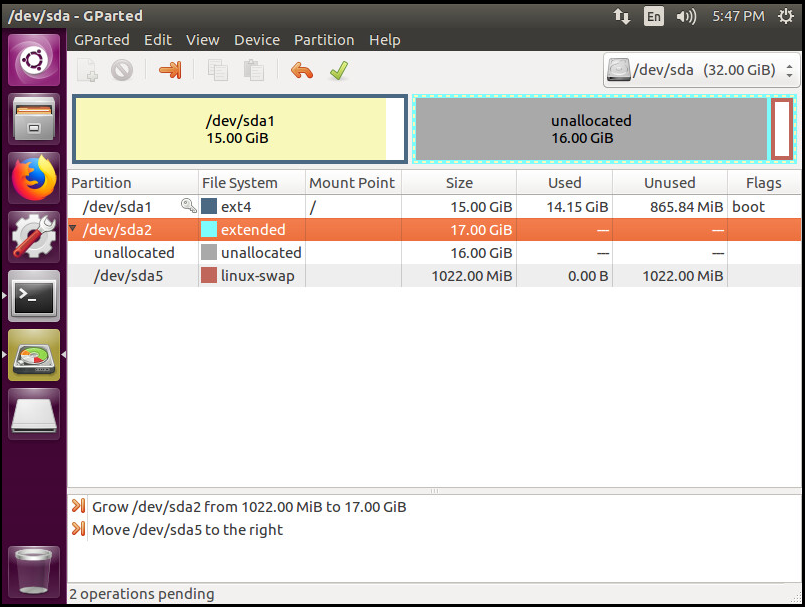
This is for extending a regular Ubuntu Linux partition, if you need to resize, expand a LVM partition refer to this guide. I am using Gparted as I ran into some issues using parted for moving the partitions around.
Shut the VM down,
sudo shutdown -h now
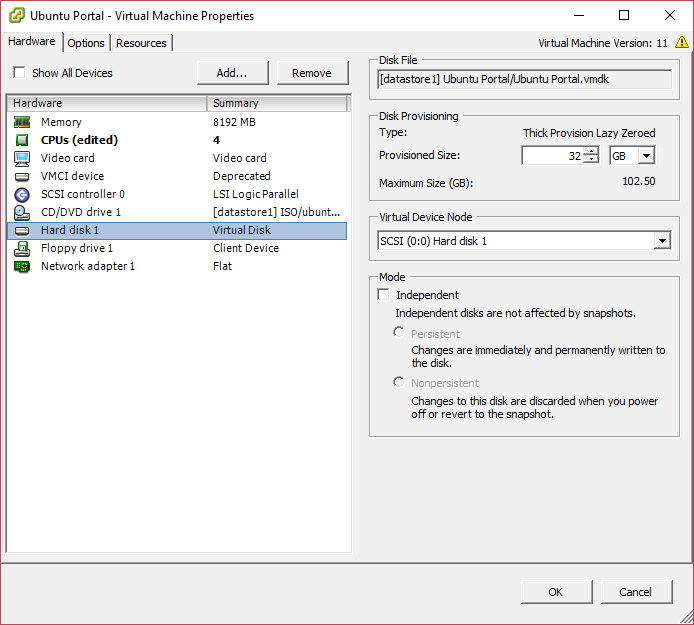
It is a good idea to take a snapshot of the VM before resizing the disk, so if you run into an issue you have something to revert back to. In the vSphere Client, right click on the VM -> Snapshot -> Take Snapshot.
Change VM Disk size by right clicking on the VM and going to Edit Settings
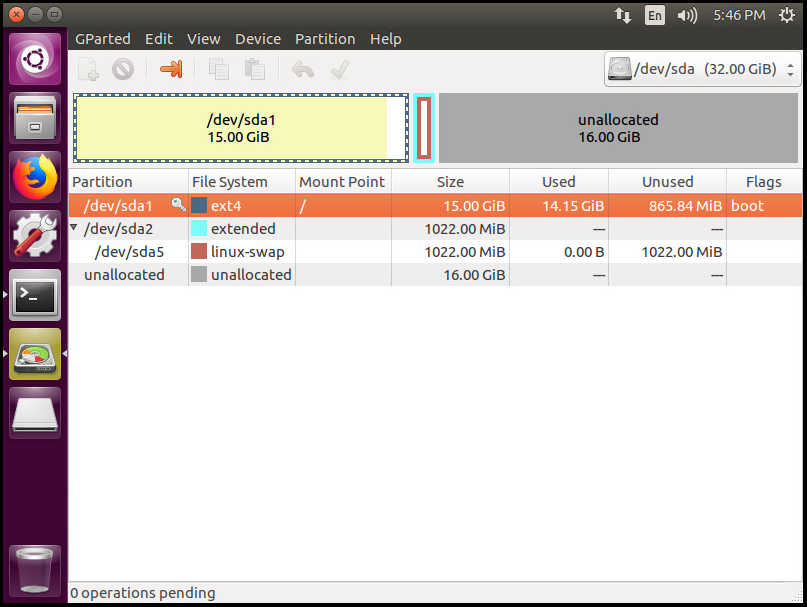
You can now boot up the VM. Fire up GParted and it should show some unallocated space at the end of your drive.
Now in the next two images we are moving the Extended partition, which contains the Swap Partition to the end of the drive, so the unallocated space is adjacent to our root partition.
Hit Apply and write the changes to the disk then
It should now look like this
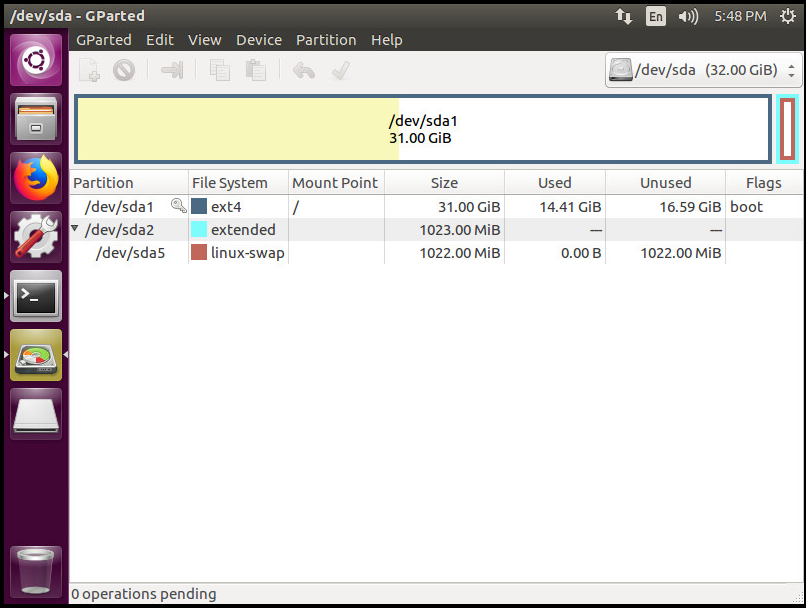
Hit apply, then right click on the linux-swap and turn Swapon.
Enjoy the extra space.
Launch parted with the following command. Specify the disk you want to modify. In this case /dev/sda.
sudo parted /dev/sda
Print partition and available free space. If you just run print, it will not show you the available free space.
(parted) print free
You can resize, or rather extend a partition using the “resizepart” command inside parted. Command syntax is as follows
(parted) resizepart PartitionNumber End
Example: Resize partition 1 to 30GB. Note you’ll need to specify the end part with the GB, otherwise, you’ll be shrinking the partition or making a mess… You can see what space is available with the “print free” command above
(parted) resizepart 1 30GB
After you have run the resizepart in parted, you’ll need to grow the filesystem, so run one of the following commands from the local shell.
resize2fs /dev/sda1
Or for XFS partitions
xfs_growfs /dev/sda1
You can check the partition size with
df -h
or
sudo fdisk -l /dev/sda
Setup SFTP Server
When finished you’ll have a SFTP server setup that is configured so the users are in a chroot environment, and can not ssh, or telnet to the server.
Install SSH server if it is not already
yum install openssh-server openssh-client
Create group that is limited to sftp so they can’t ssh, scp etc.
groupadd sftpusers
Add chroot settings to /etc/ssh/sshd_config. The %u is a variable, which is the users username.
Match Group sftpusers
ChrootDirectory /sftp/%u
ForceCommand internal-sftp
Make ftp directory
mkdir /sftp
Add SFTP user
useradd -g sftpusers -d /sftp -s /sbin/nologin newsftpuser
Create password for new user
passwd newsftpuser
Create directory for user
mkdir /sftp/newsftpuser
Create directory to put ftp files
mkdir /sftp/newsftpuser/files
Change permissions
chown newsftpuser:sftpusers /sftp/newsftpuser/files/
Restart sshd
systemctl restart sshd
Should be good to go. Test it by logging in with your favorite FTP client.
Western Digital My Passport. Part Number: WDBKXH5000ARD
There are not any screws holding it together. The top and the bottom snap together.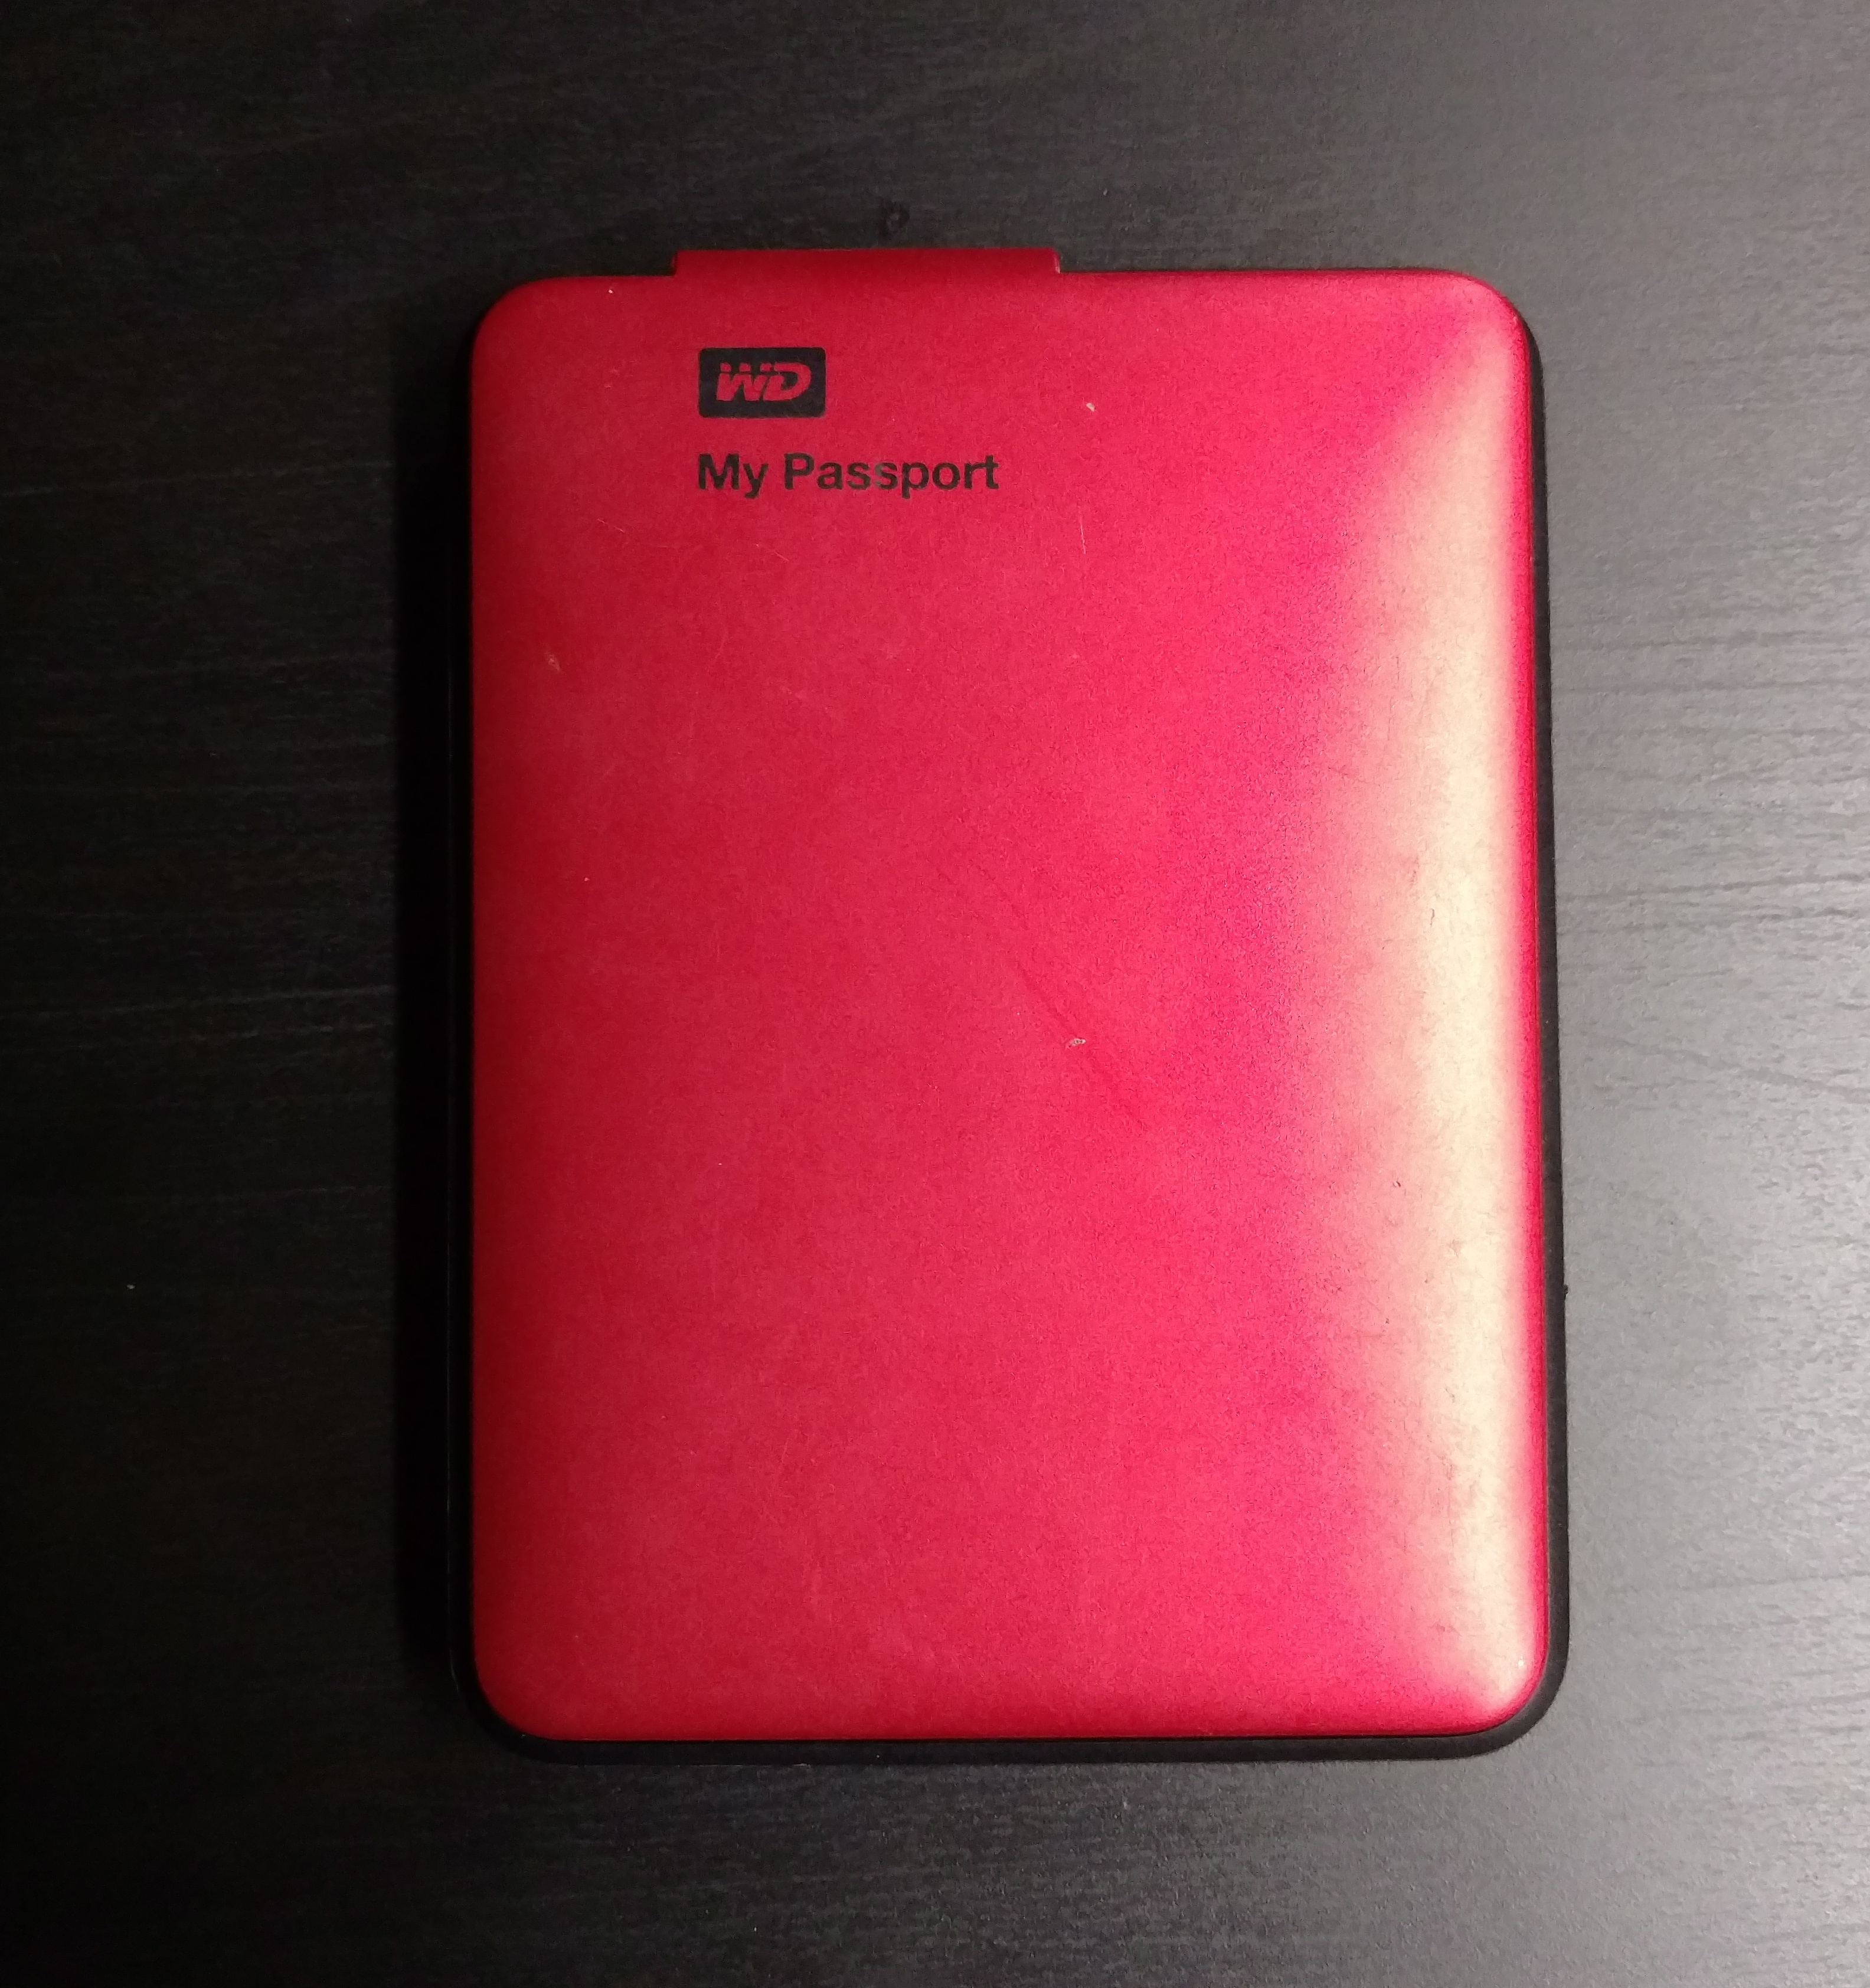
You can start taking it apart around the USB port.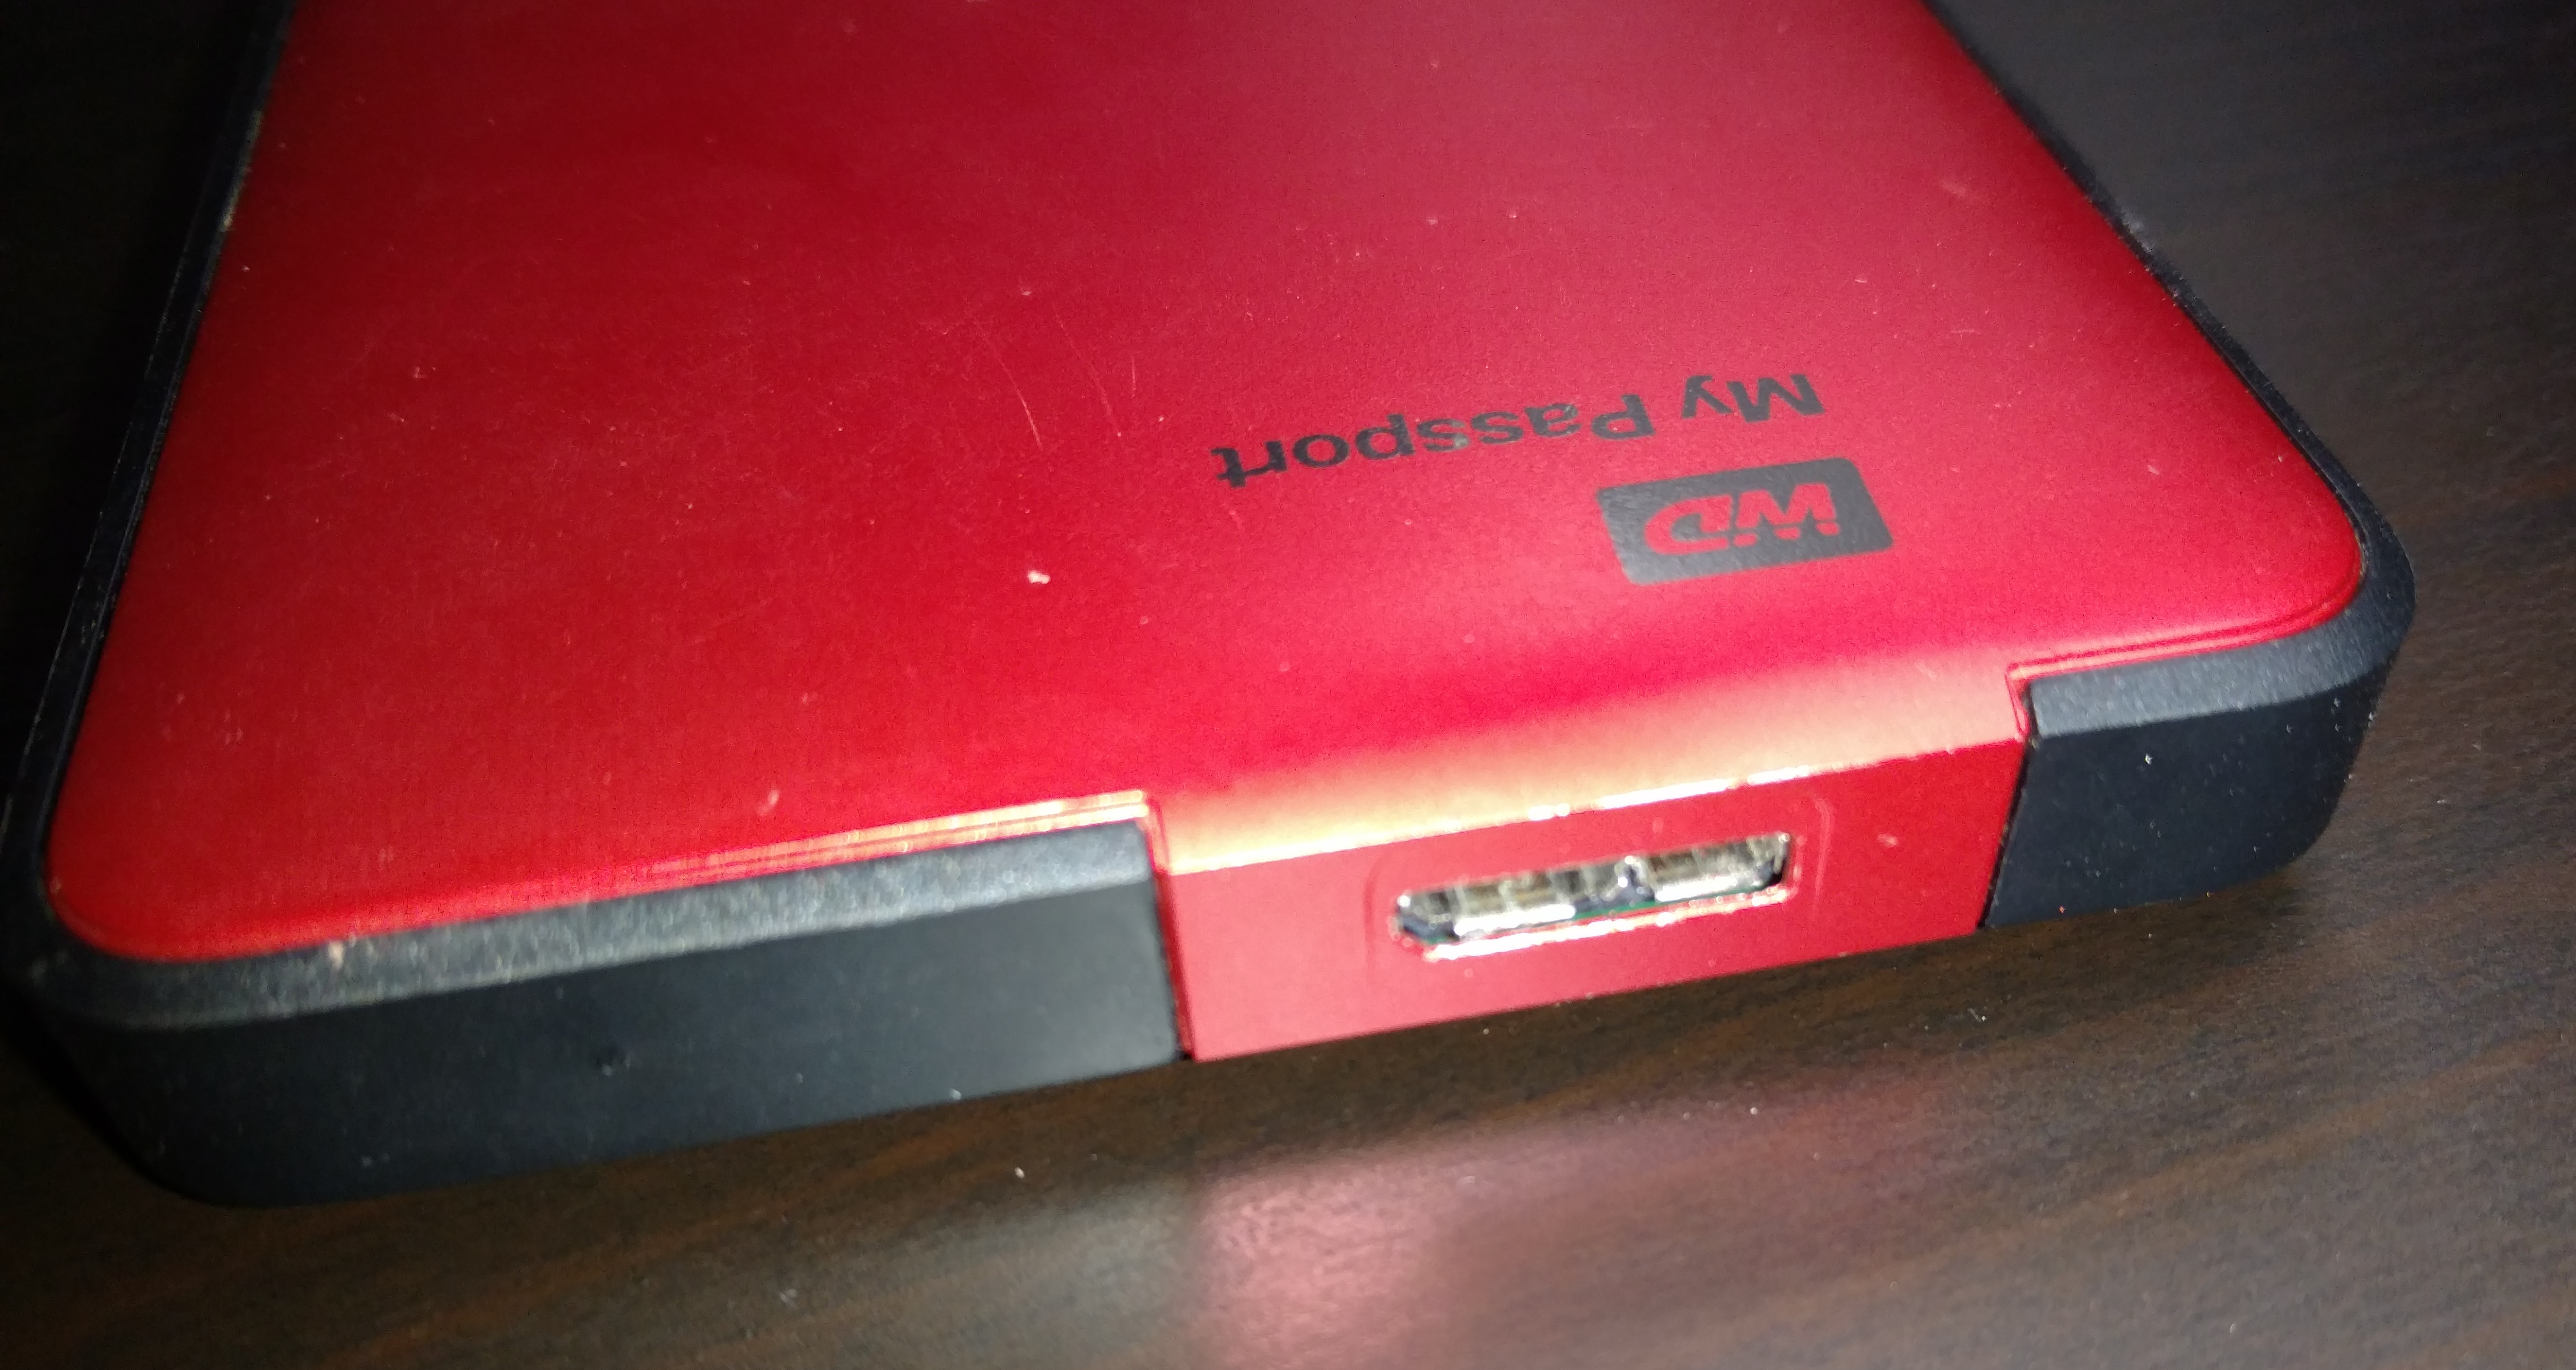
With the top taken off.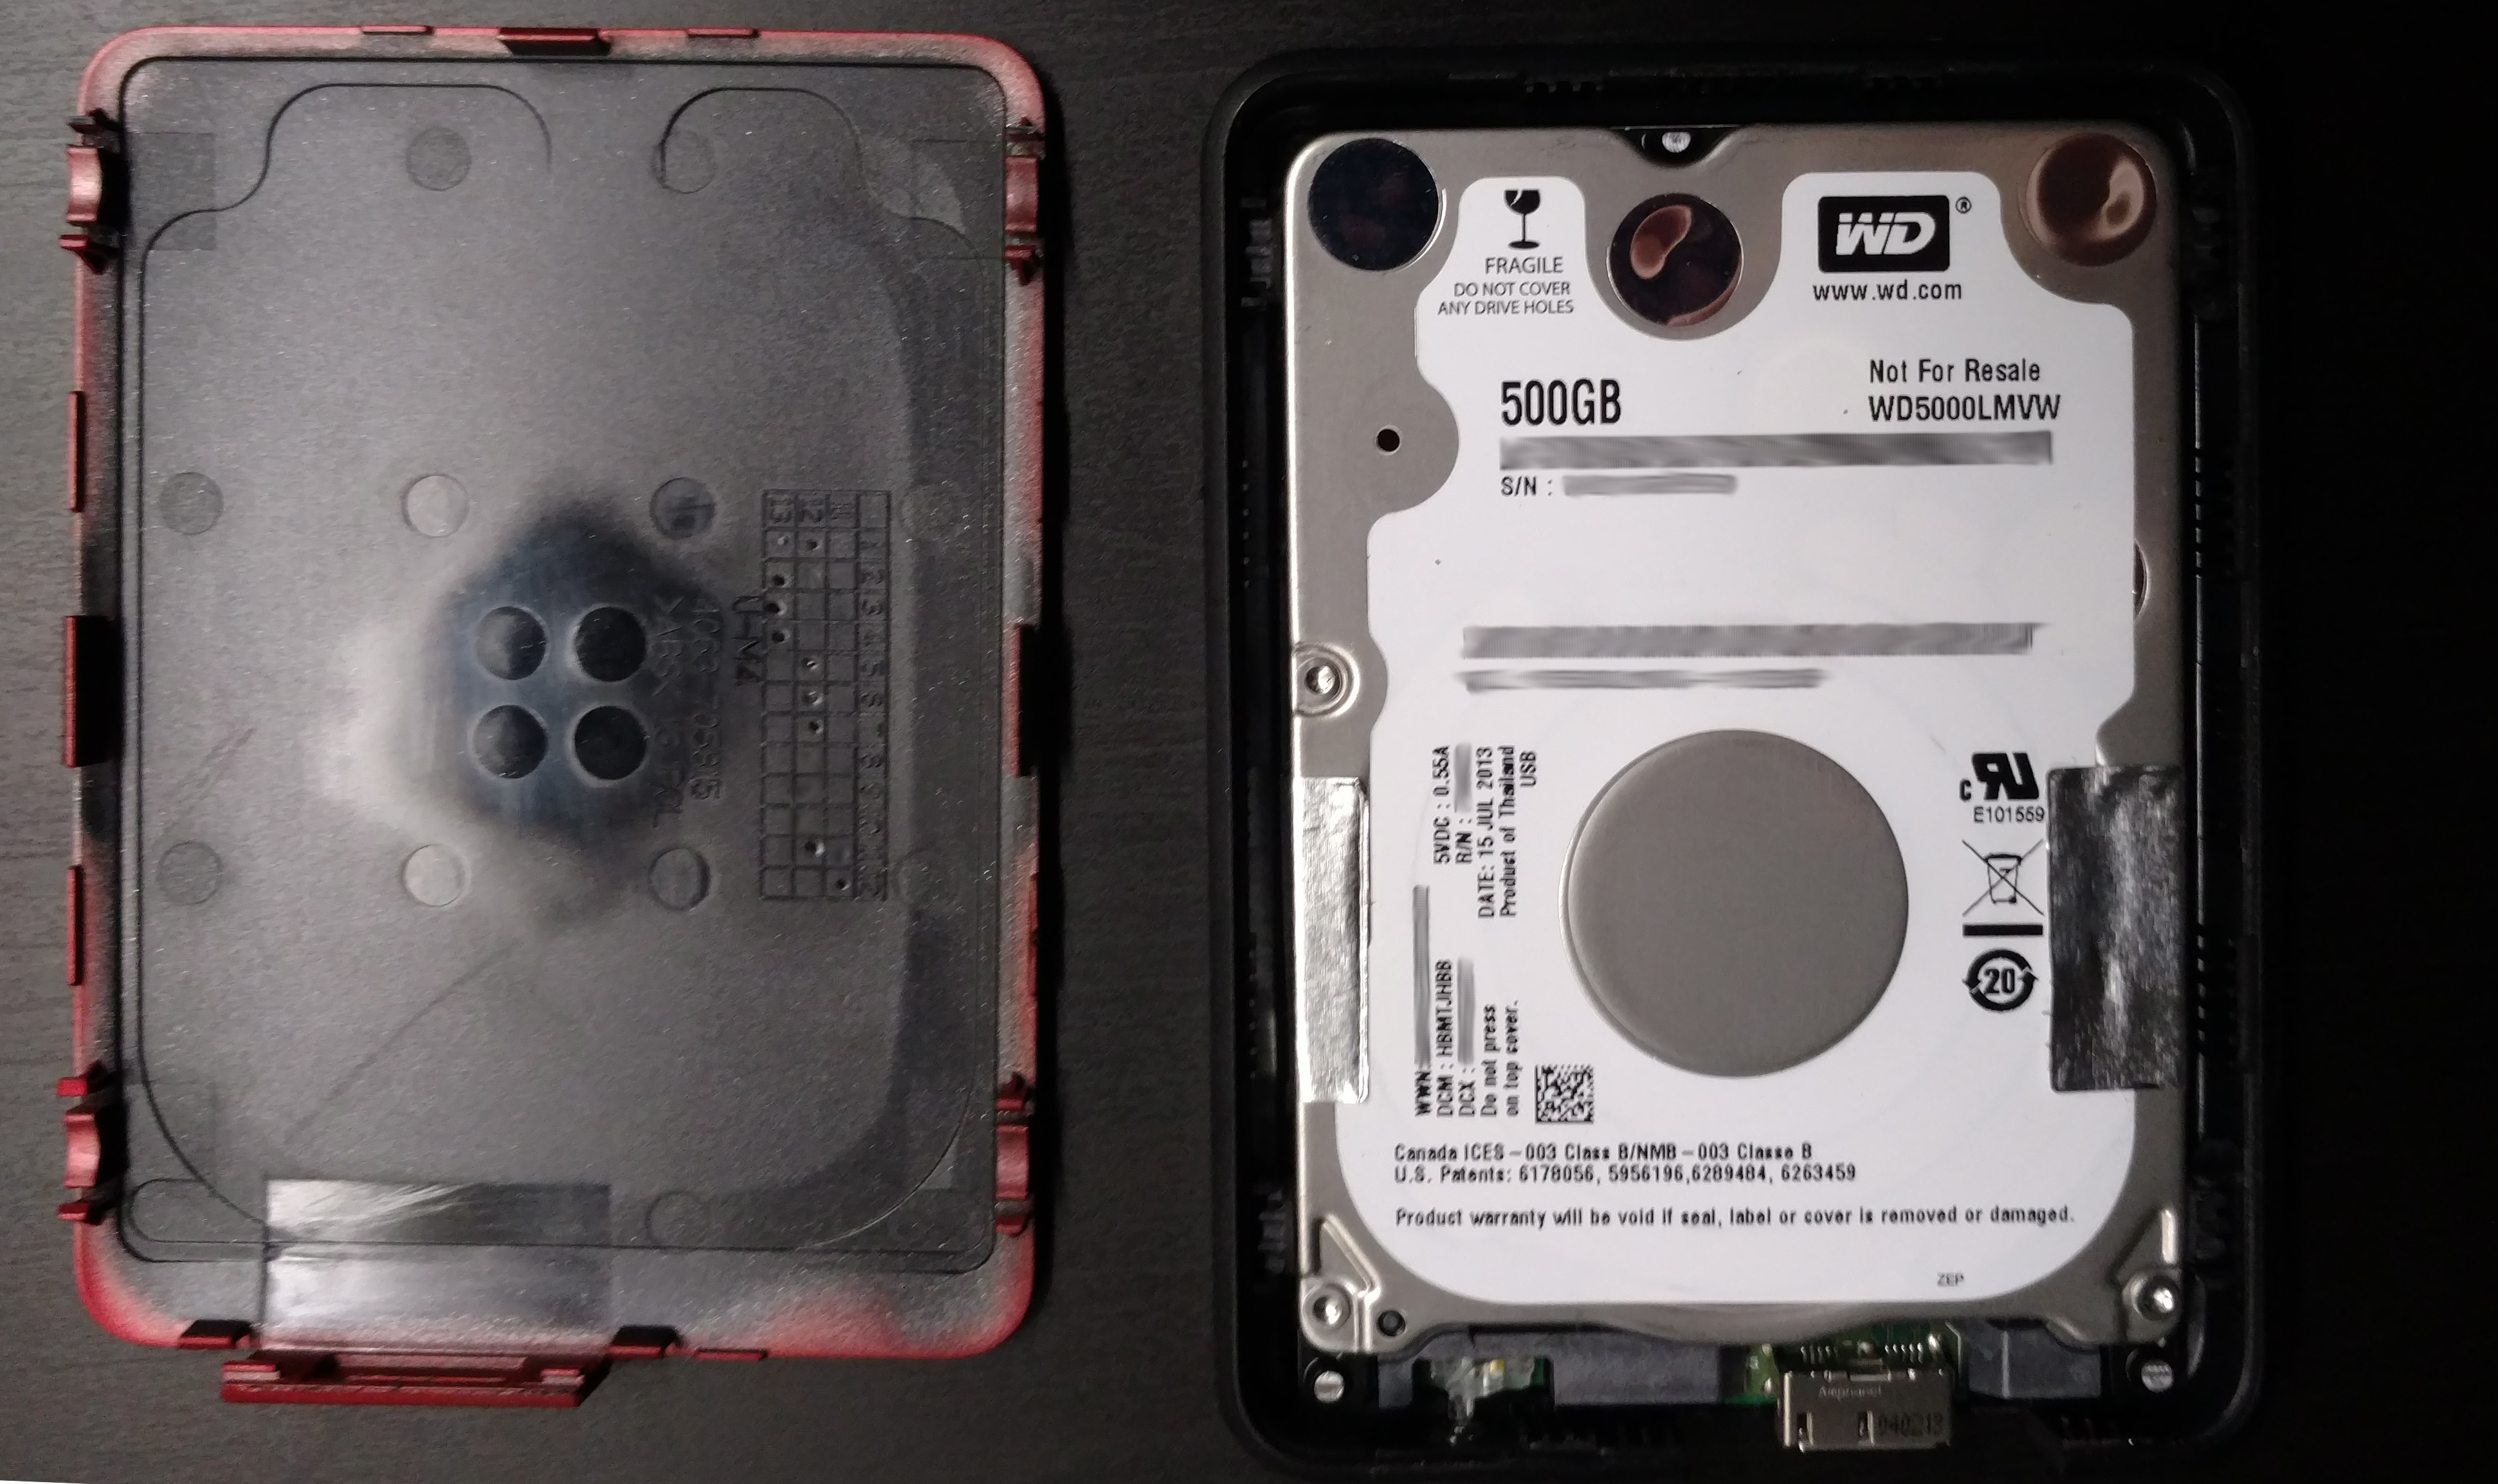
No SATA connector on the drive. 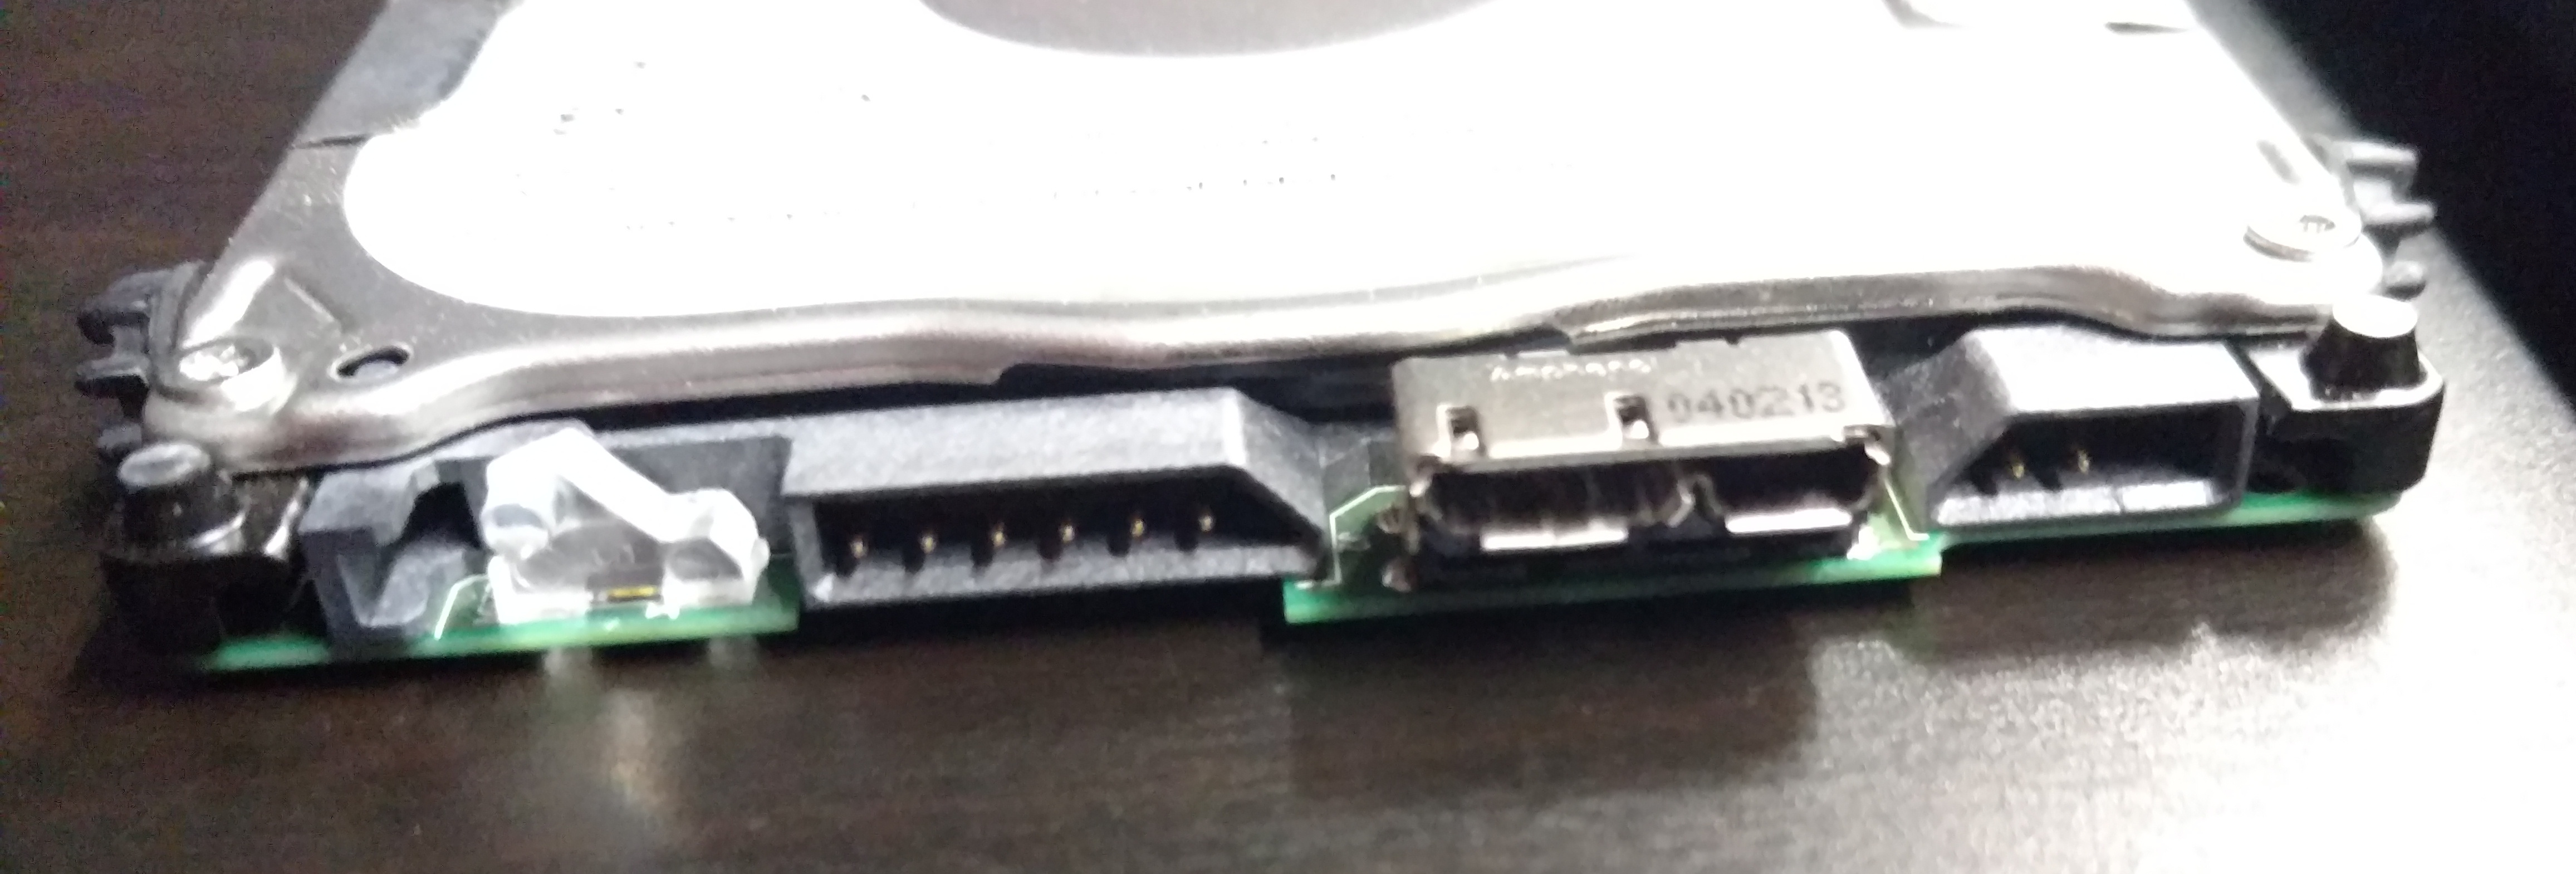
The rubber pieces on the side keep the drive snug in the base.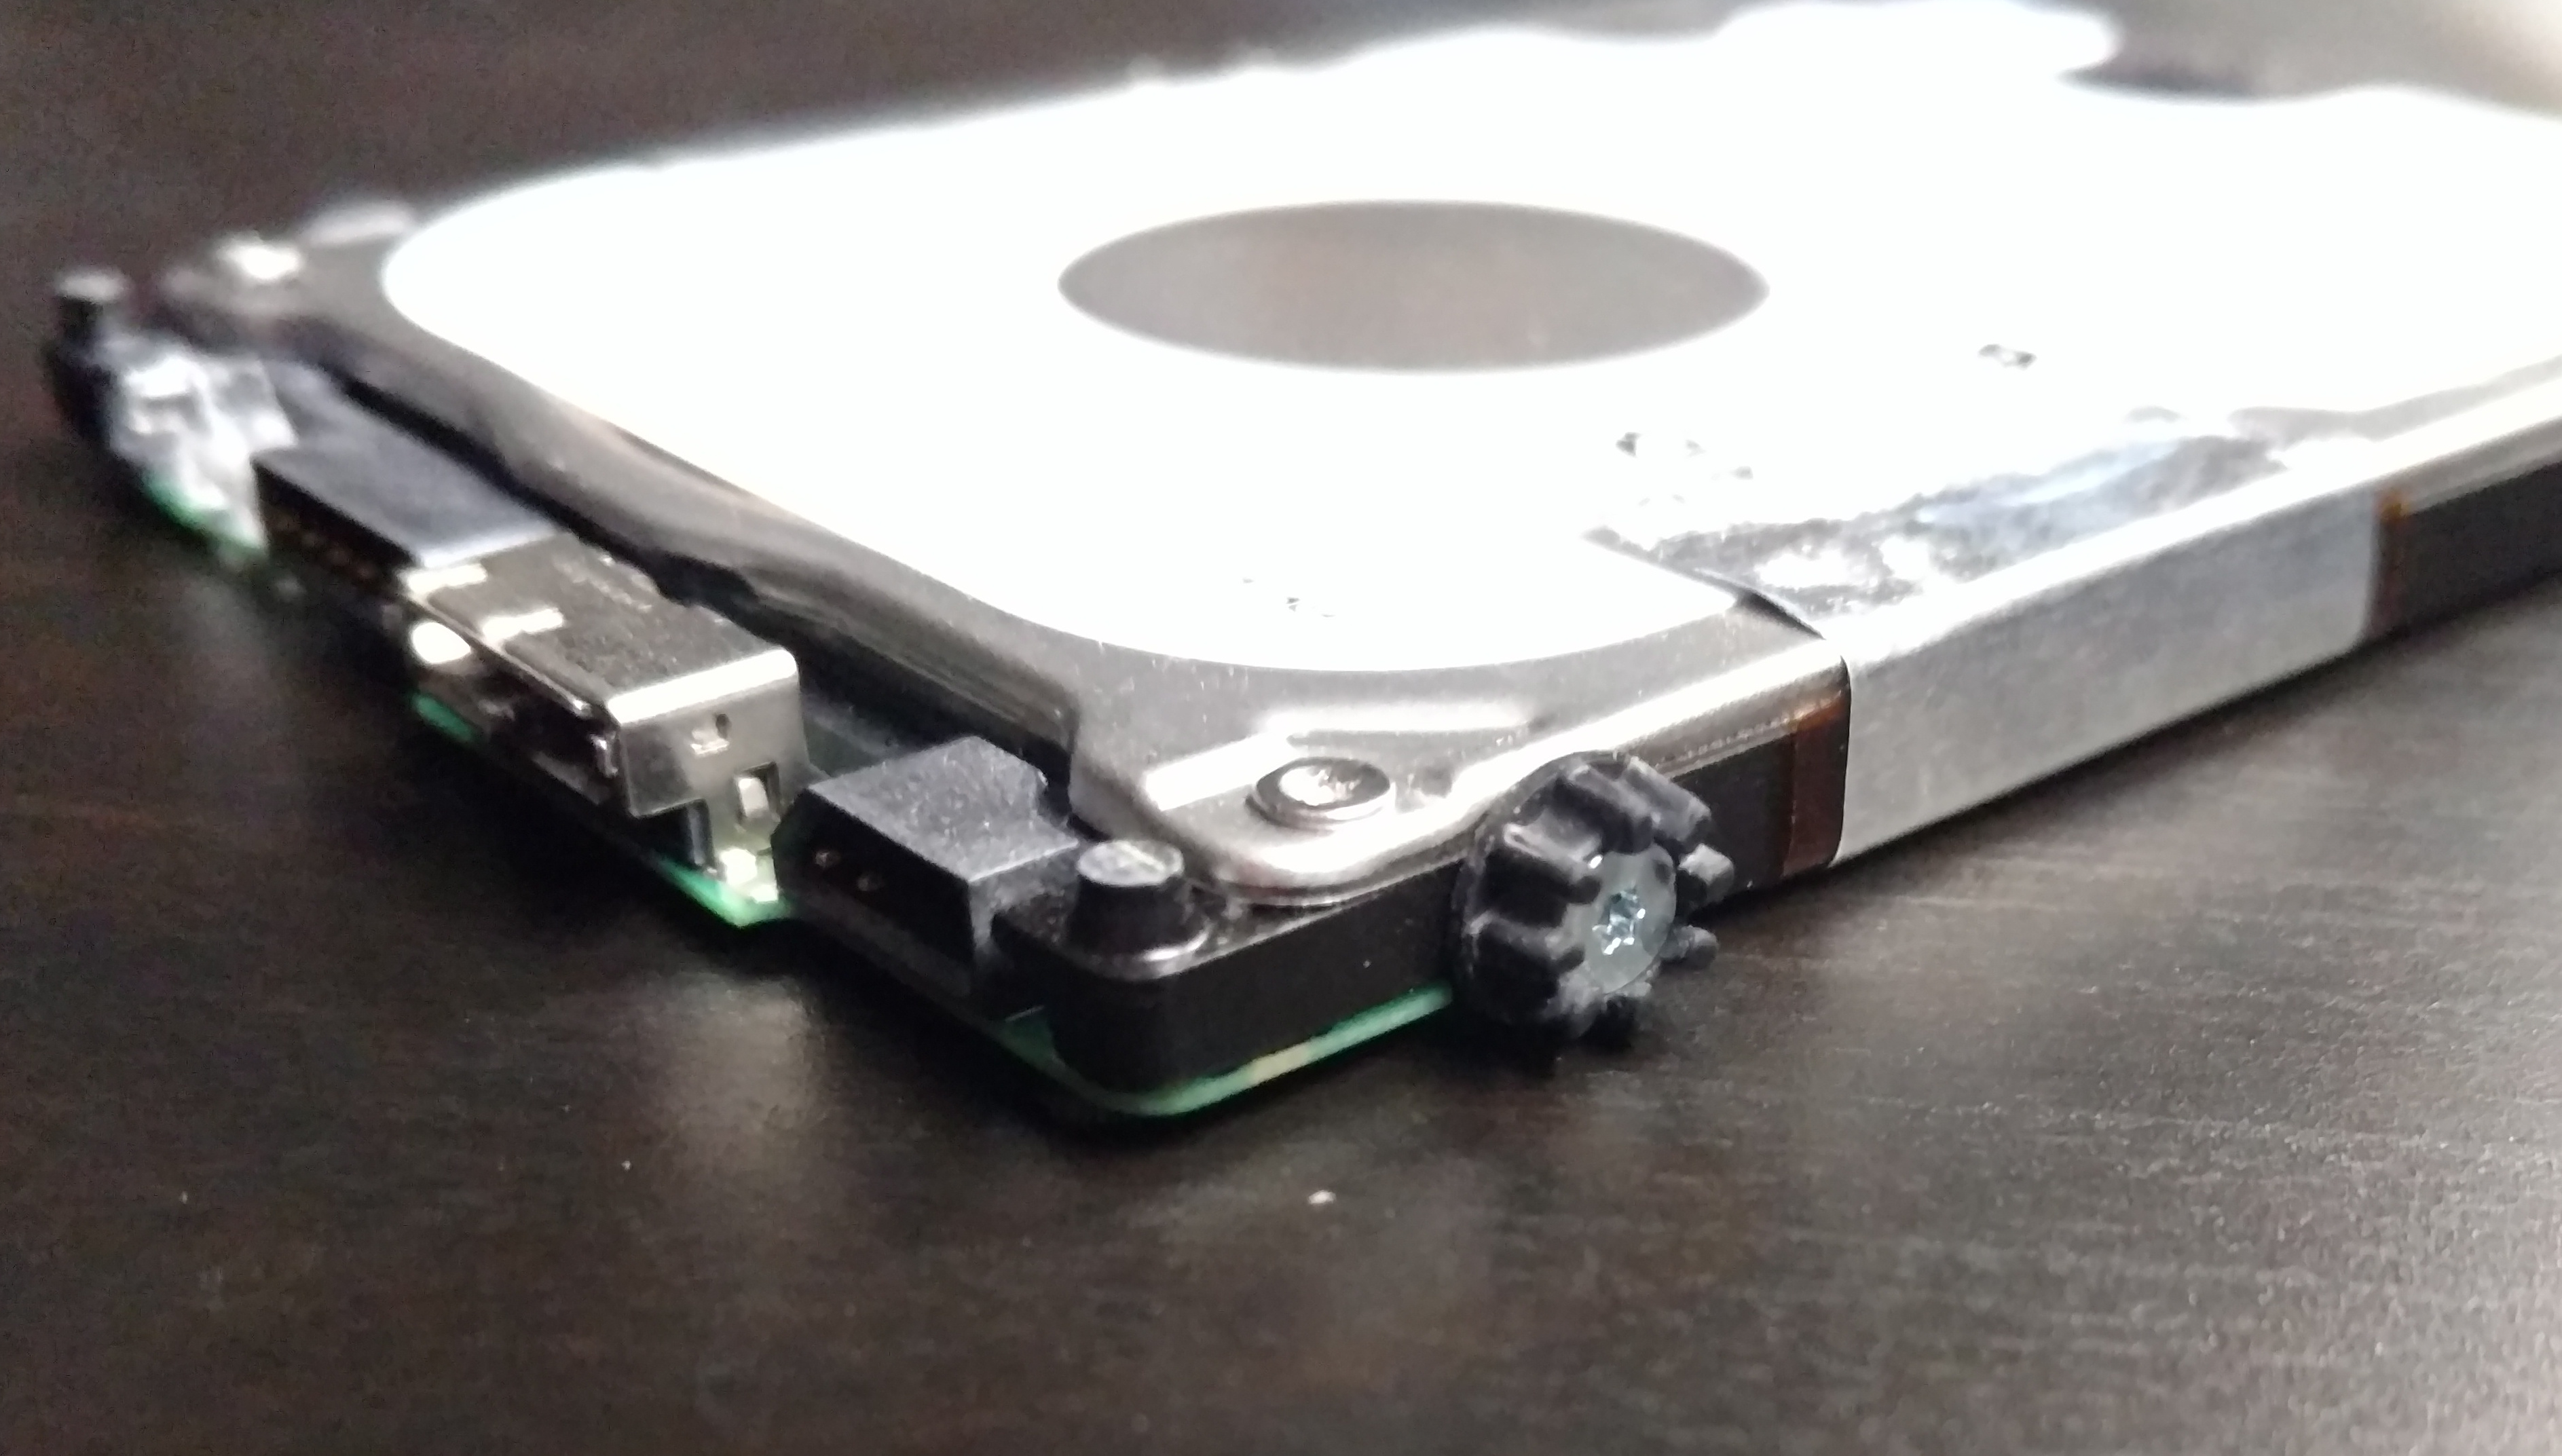
All the pieces. Hard drive, bottom, and top.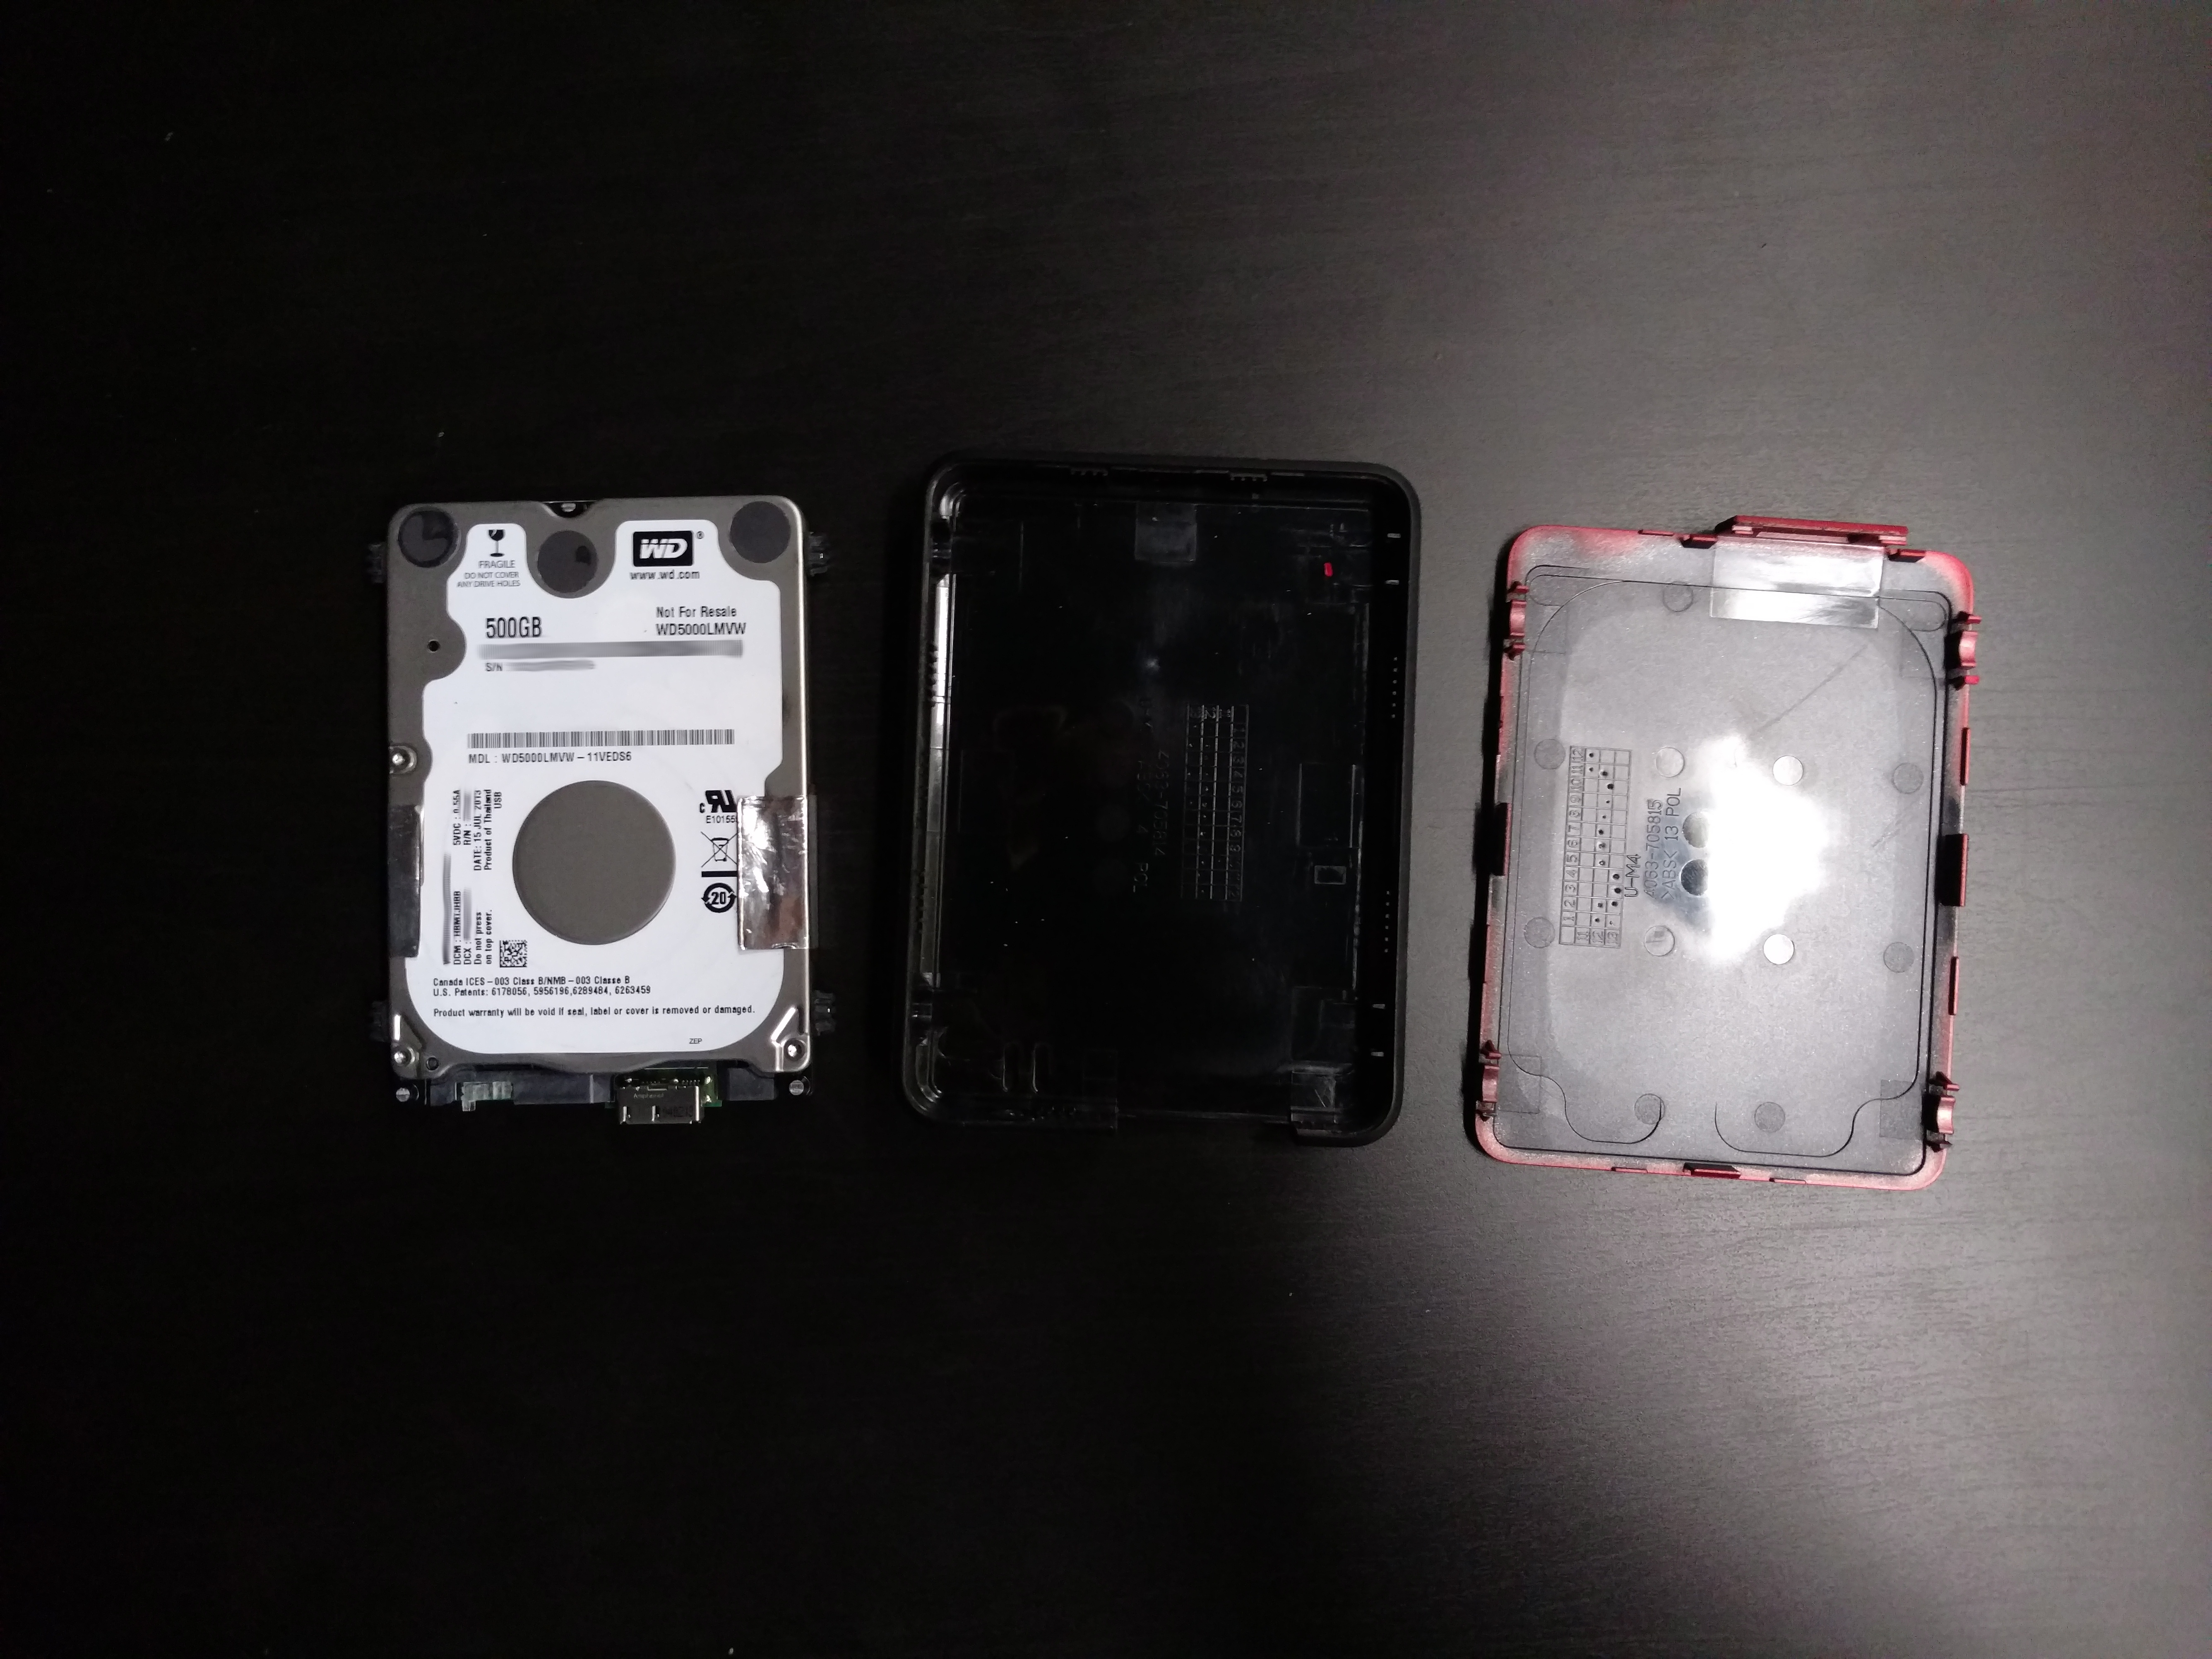
Install mod_ssl
yum install mod_ssl -y
Create Directory for SSL key.
mkdir /etc/ssl/key
chmod 700 /etc/ssl/key
Create certificate.
openssl req -x509 -nodes -days 365 -newkey rsa:2048 -keyout /etc/pki/tls/private/localhost.key -out /etc/pki/tls/certs/localhost.crt
Fill out the info or what is applicable.
Now edit the LibreNMS Apache config file /etc/httpd/conf.d/librenms.conf
All you have to do is add the following three lines under the VirtualHost and change *:80 to *:443.
SSLEngine on
SSLCertificateFile /etc/pki/tls/certs/localhost.crt
SSL CertificateKeyFile /etc/pki/tls/private/localhost.key
So when your finished the file should look like this.
<VirtualHost *:443>
 DocumentRoot /opt/librenms/html/
 ServerName server_hostname_or_IP
 SSLEngine on
 SSLCertificateFile /etc/pki/tls/certs/localhost.crt
 SSLCertificateKeyFile /etc/pki/tls/private/localhost.key
 CustomLog /opt/librenms/logs/access_log combined
 ErrorLog /opt/librenms/logs/error_log
 AllowEncodedSlashes NoDecode
 <Directory "/opt/librenms/html/">
 Require all granted
 AllowOverride All
 Options FollowSymLinks MultiViews
 </Directory>
</VirtualHost>
Don’t forget to allow https/port 443 traffic through the firewall. Guide here
If you have any issues, you may need to chmod the key and crt file.
chmod 644 /etc/pki/tls/certs/localhost.crt
chmod 644 /etc/pki/tls/private/localhost.key
You should now be able to access LibreNMS using https. Note, you’ll need to allow an exception in your browser for your self signed certificate.
https://LibreNMS_IP_Address
Had a LibreNMS instance crash, or the VM crashed, not bootable anymore. Was able to boot it up on a CentOS iso with rescue mode, which gave me access to the files. So the idea is to manually copy off the LibreNMS files and LibreNMS database and import them to a new LibreNMS instance
Issues
Steps
There can be a couple of ways to gain access to a crashed XenServer VM. One of the easiest ways is to boot up in recovery mode and go through the installers rescue mode. Guide to boot up XenServer VM in recovery mode here.
The installer rescue mode should detect the OS and mount everything. If not you should be able to mount the root partition manually.
Once booted up, you’ll need to enable network access if your going to use sftp or scp to copy files. There are a few different ways to do this
3.Copy LibreNMS Mysql Database
Backup the LibreNMS MySQL database directory
tar czvf librenms_mysql.tgz /var/lib/mysql
Use scp or sftp to copy it to the new LibreNMS instance
scp librenms_mysql.tgz user@new_LibreNMS_ip
Now on the new LibreNMS instance we need to run the following few commands
systemctl stop mariadb
rm -rf /var/lib/mysql/*
tar xzvf librenms_mysql.tgz -C /
chown -R mysql:mysql /var/lib/mysql
4. Copy LibreNMS directory
Backup the LibreNMS directory
tar czvf librenms.tgz /opt/librenms
Use scp or sftp to copy it to the new LibreNMS instance
scp librenms.tgz user@new_LibreNMS_ip
Now on the new LibreNMS instance we need to run the following few commands
rm -rf /opt/librenms/*
tar xzvf librenms.tgz -C /
chown -R librenms:librenms /opt/librenms
5. Clean up
Disable SELinux if you have not already. Guide here
Restart apache, and start mysql. If your on Ubuntu, the services are named apache2 and mysql
systemctl restart httpd
systemctl restart mariadb
That should get it working, if not try a reboot.
Special notes
The whole MySQL directory needs to be copied, there are innodb files that will keep MySQL from starting if they are not copied.
There is some good info here
https://stackoverflow.com/questions/1795176/how-to-change-mysql-data-directory
ssh: connect to host 192.168.1.158 port 22: Connection refused
Wrong SSH port. Check /etc/ssh/sshd_config on linux, or in RouterOS IP->services->SSH
ssh_exchange_identification: Connection closed by remote host
Check the hosts.allow and hosts.deny files. If your getting this error connecting to a Mikrotik check the IP services and the “Available From” addresses.
Chrooting can be super useful for changing things like the root password, repairing grub bootloader etc., things that require the system to be mounted. Typically if your chrooting into an OS drive you can boot up on a Live Linux distro, or use the Rescue feature on some Linux installers.
Mount main drive
Change sdb2 to the root partition of your drive.
mount /dev/sdb2 /mnt
Mount other stuff
mount -t proc none /mnt/proc
mount -o bind /dev /mnt/dev
mount -o bind /sys /mnt/sys
mount -o bind /run /mnt/run
If you want to, you can mount the boot partition. Change sdb1 if your boot partition is something else. For efi, you may need to mount the boot partition then mount the efi partition inside /boot/efi.
mount /dev/sdb1 /mnt/boot
Chroot
chroot /mnt
You should now be inside the chroot environment. To exit the chroot, hit control+d or type exit.
If your having issues resolving DNS refer to this post.