Add UniFi Protect Self Sign Certificate to Windows

Manually adding the UniFi Protect self signed certificate can be helpful if you are accessing the controller over the local network. It has the benefit of letting your browser remember the password if wanted and not having to verify the certificate.

First we need to acquire the certificate.

Acquire UniFi Protect Certificate

In a Chrome based web browser, go to the IP address of the UniFi Protect NVR

Click in the URL bar where is says “Not secure” -> Certificate -> Details -> Copy to file

Follow the export Wizard. You can use the default settings.
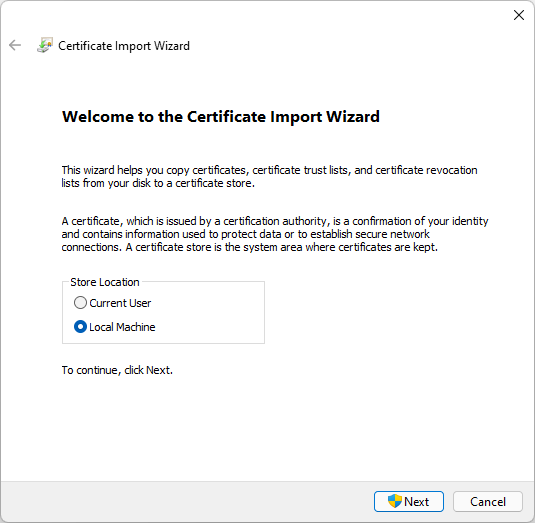
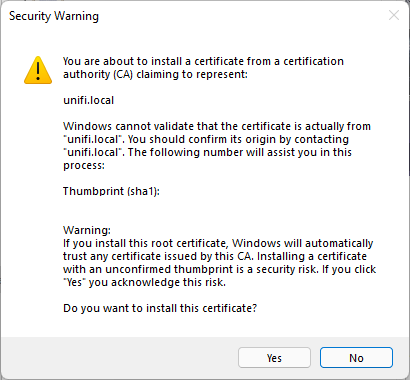
Import Certificate

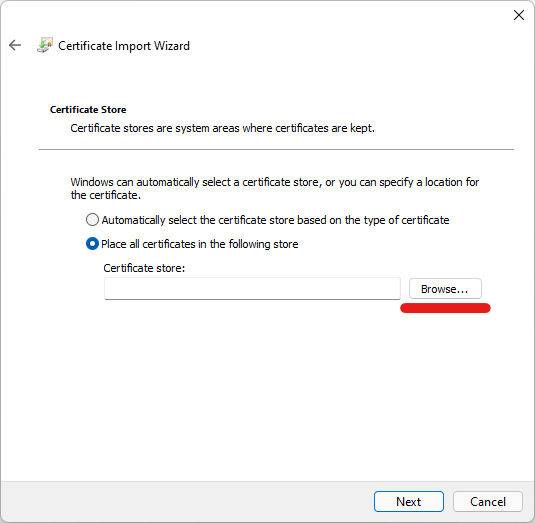
You can now import the certificate by double clicking on the cert.

Importing unifi.local cert

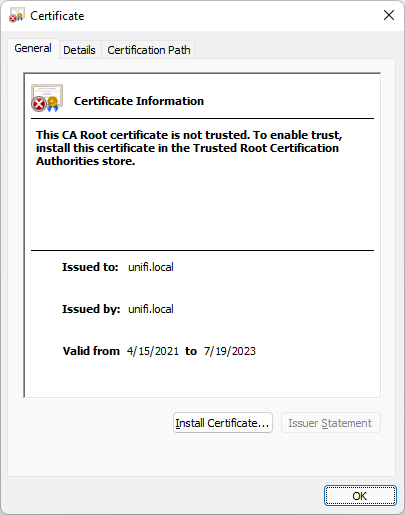
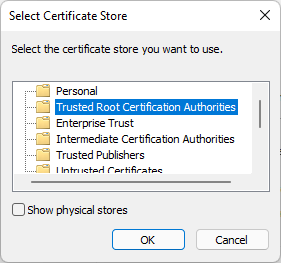
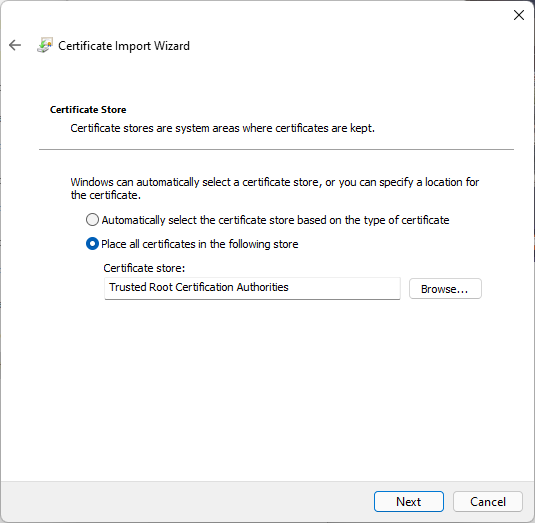
Note that it says to install the cert in the “Trusted Root Certification Authorities” store

Import unifi.local cert select Local Machine
Browse for Certificate Store
Select Trusted Root Certification Authorities
Importing unifi.local to the Trusted Root Certification Authorities
Confirm unifi.local certificate import

Now we can move on to Configuring the hosts file.

Add unifi.local to system hosts file

We need to add an entry for unifi.local as the cert if for unifi.local hostname and not the controllers IP address.

We’ll essentially be following the same steps outlined in the following post.

Add local DNS entry for unifi protect
  • Launch notepad as administrator
  • Open the hosts file in
C:\Windows\System32\drivers\etc\
Open Windows hosts file
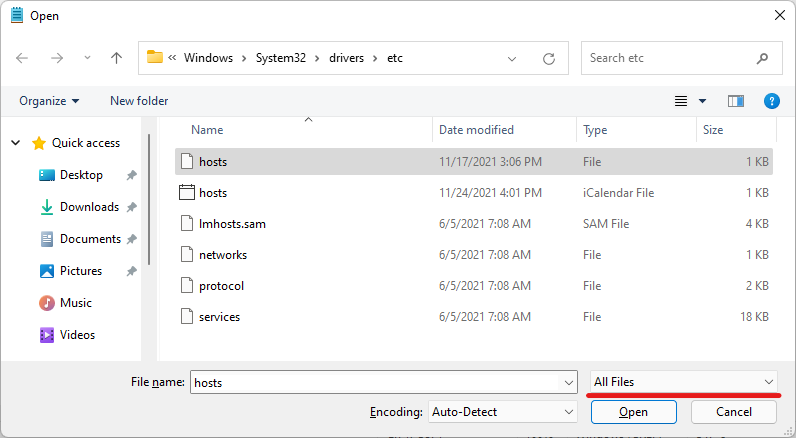
  • Add the following line to the bottom of your hosts file. Change the IP address to the IP of your controller.
192.168.1.20 unifi.local
  • Save the file.

You should now be set. Open a browser and got to https://unifi.local to access the UniFi Protect Controller.

Extract UniFi .unf backup file

In this post we are going to extract the contents of a UniFi .unf backup.

This is helpful if we need to do any sort of recovery, or need to look through the database to find system information.

  1. Acquire backup
  2. Decrypt and extract backup
  3. Dump database to JSON file

Acquire Backup

This is easy to do. Log into the web interface go to Settings -> System -> Maintenance -> Backup and Restore

Scroll down to Available Backups and download.

Download Backup in UniFi Controller

You can also get the file via scp or sftp. Manual backups are located in

/usr/lib/unifi/data/backup

and auto backups are in

/usr/lib/unifi/data/backup/autobackup

Decrypt and Extract Backup

We’ll be getting the following decrypt script from here. https://github.com/zhangyoufu/unifi-backup-decrypt More notes on it below.

We’ll need to make sure that openssl and zip are installed

sudo apt install openssl zip

Download the script with wget

wget https://raw.githubusercontent.com/zhangyoufu/unifi-backup-decrypt/master/decrypt.sh

Make it executable

sudo chmod u+x decrypt.sh

And now we can convert the UniFi .unf backup file to a .zip

sudo ./decrypt.sh autobackup_6.2.33.unf autobackup_6.2.33.zip

Now we can extract the zip archive. You can do this on Windows, macOS, or Linux through the GUI or you can extract with

sudo unzip autobackup_6.2.33.zip -d unifi

This will extract all the files and folders to a directory named unifi.

cd unifi

Dump database to JSON

You should now see the db.gz file. This is a compressed archive of the database in BSON (Binary JSON) format. We can use the mongo-tools to convert this to a more human readable JSON format.

sudo apt install mongo-tools

Now we can extract the archive and pipe it through bsondump.

gunzip -c db.gz | bsondump

You can run it through grep to filter out what you need.

You can also dump the db to a json file with

bsondump --bsonFile=db --outFile=db.json

More notes on the decrypt script.

The decrypt script is really simple. It looks like it uses a key to decrypt the UniFi backup and then puts all the contents into a zip file. There is also an encryption script. Theoretically you can decrypt, make changes to the config and then reencrypt and restore to a server.

#!/bin/sh

# Authors:
# 2017-2019 Youfu Zhang
# 2019 Balint Reczey <balint.reczey@canonical.com>

set -e

usage() {
    echo "Usage: $0 <input .unf file> <output .zip file>"
}

if [ -z "$2" -o ! -f "$1" ]; then
    usage
    exit 1
fi

INPUT_UNF=$1
OUTPUT_ZIP=$2

TMP_FILE=$(mktemp)
trap "rm -f ${TMP_FILE}" EXIT

openssl enc -d -in "${INPUT_UNF}" -out "${TMP_FILE}" -aes-128-cbc -K 626379616e676b6d6c756f686d617273 -iv 75626e74656e74657270726973656170 -nopad
yes | zip -FF "${TMP_FILE}" --out "${OUTPUT_ZIP}" > /dev/null 2>&1

UniFi-Video Service failing to Start

Do note that the UniFi-Video software is no longer supported should be migrated to the UniFi Protect systems.

Running “systemctl status unifi-video” gives the following error.

(unifi-video) checking for system.properties and truststore files…
…fail!

It appears that the error is due to an unsupported version of Java. Installing an older version of Java resolves the issue.

You can check which versions of Java are available with

apt-cache show openjdk-8-jre

The versions that showed up for me were

8u282-b08-0ubuntu1
8u252-b09-1ubuntu1 

Installing the last one fixed the issue for now.

sudo apt-get install openjdk-8-jre-headless=8u252-b09-1ubuntu1

https://old.reddit.com/r/Ubiquiti/comments/l30jm5/unifi_video_31013_not_compatible_with_openjdk_180/

Configuring UFW Firewall on Ubuntu for UniFi and UniFi-Video

You should be able to copy and paste all the following commands in. You can check the status of the commands after with

sudo ufw status

Allowing access to UniFi ports

sudo ufw allow 3478/UDP
sudo ufw allow 5514/UDP
sudo ufw allow 8080/TCP
sudo ufw allow 8443/TCP
sudo ufw allow 8880/TCP
sudo ufw allow 8843/TCP
sudo ufw allow 6789/TCP
sudo ufw allow 27117/TCP
sudo ufw allow 10001/UDP
sudo ufw allow 1900/UDP

UniFI Video ports

sudo ufw allow 7080/TCP
sudo ufw allow 7443/TCP
sudo ufw allow 7445/TCP
sudo ufw allow 7446/TCP
sudo ufw allow 7447/TCP
sudo ufw allow 10001/UDP
sudo ufw allow 6666/TCP
sudo ufw allow 7004/UDP
sudo ufw allow 7442/TCP

Helpful links

https://help.ui.com/hc/en-us/articles/217875218-UniFi-Video-Ports-Used
https://help.ui.com/hc/en-us/articles/218506997-UniFi-Ports-Used

Reset UniFi to Factory Defaults – Command Line

SSH into the UniFi. Note that the UniFi username and password get updated from the controller. Refer to here to find username and password.

ssh ubnt@192.168.1.20

run the syswrapper.sh script with the restore-default option

syswrapper.sh restore-default

Once the device is reset, log in over ssh and reconfigure.

Note that the username and password will now be ubnt/ubnt

Install UniFi 5.6.42 in Docker

Pull UniFi 5.6.42 docker image

sudo docker pull jacobalberty/unifi:5.6.42

Install image

sudo docker run -d --init --restart=unless-stopped --name=unifi-controller --net=host --volume=/docker/unifi:/var/lib/unifi -p 8080:8080/tcp -p 8081:8081/tcp -p 8443:8443/tcp -p 8843:8843/tcp -p 8880:8880/tcp -p 8883:8883/tcp -p 3478:3478/udp jacobalberty/unifi:5.6.42

Access and setup the unifi controller from a browser.

https://ip-address:8443

MongoDB – dpkg-deb: error: paste subprocess was killed by signal (Broken pipe)

Ran into an issue when trying to figure out some problems with UniFi and UniFi-Video. Upgrading both to the latest version was causing problems, because they both needed different versions of MongoDB.

Was getting the following error when trying to install MongoDB. Think I was trying to install Mongo following the instructions on their site and then it caused issues with apt.

dpkg: error processing archive /var/cache/apt/archives/mongodb-org-server_4.2.5_amd64.deb (--unpack):
trying to overwrite '/usr/bin/mongod', which is also in package mongodb-server-core 1:3.6.3-0ubuntu1.1
dpkg-deb: error: paste subprocess was killed by signal (Broken pipe)

Removed the following file

rm /etc/apt/sources.list.d/mongodb-org-4.2.list

and was able to use apt again to install MongoDB. Didn’t end up solving my problem because I technically needed two versions, but at least apt was being nice again. Ended up installing the UniFi controller docker container and can run both on the same server that way.

Auto renew SSL Cert with UniFi running in Docker

Setting up the SSL cert for UniFi service when running in docker is fairly easy to do. All you have to do is modify the UniFi SSL renew script to use the UniFi Docker directory and change the start and stop service to start and stop the Docker container. The script below should be ready to go.

Download, chmod +x it, and run, drop it in cron to auto renew.

In the below script, change (unifiDir=”/docker/unifi”) to your UniFi directory.

Note: this triggers calling the teams.sh script that will send an update to Microsoft Teams to let you know that the certs should be renewed. Check here for more info.

#!/usr/bin/env bash
# Added support to do UniFi and UniFi controllers at the same time using the same cert.
# Original script from https://git.sosdg.org/brielle/lets-encrypt-scripts/raw/branch/master/gen-unifi-cert.sh
# More info here https://www.reddit.com/r/Ubiquiti/comments/43v23u/using_letsencrypt_with_the_unifi_controller/ 
# And here https://www.reddit.com/r/Ubiquiti/comments/43v23u/using_letsencrypt_with_the_unifi_controller/
# Modified script from here: https://github.com/FarsetLabs/letsencrypt-helper-scripts/blob/master/letsencrypt-unifi.sh
# Modified by: Brielle Bruns <bruns@2mbit.com>
# Download URL: https://source.sosdg.org/brielle/lets-encrypt-scripts
# Version: 1.7
# Last Changed: 04/10/2020
# 04/10/2020: Changed directories and commands to work with a UniFi Docker install
# 02/02/2016: Fixed some errors with key export/import, removed lame docker requirements
# 02/27/2016: More verbose progress report
# 03/08/2016: Add renew option, reformat code, command line options
# 03/24/2016: More sanity checking, embedding cert
# 10/23/2017: Apparently don't need the ace.jar parts, so disable them
# 02/04/2018: LE disabled tls-sni-01, so switch to just tls-sni, as certbot 0.22 and later automatically fall back to http/80 for auth
# 05/29/2018: Integrate patch from Donald Webster <fryfrog[at]gmail.com> to cleanup and improve tests
# 09/26/2018: Change from TLS to HTTP authenticator

# Location of LetsEncrypt binary we use.  Leave unset if you want to let it find automatically
# LEBINARY="/usr/src/letsencrypt/certbot-auto"

# Change to your UniFi Docker directory
unifiDir="/docker/unifi"

PATH="/usr/local/sbin:/usr/local/bin:/usr/sbin:/usr/bin:/sbin:/bin"

function usage() {
  echo "Usage: $0 -d <domain> [-e <email>] [-r] [-i]"
  echo "  -d <domain>: The domain name to use."
  echo "  -e <email>: Email address to use for certificate."
  echo "  -r: Renew domain."
  echo "  -i: Insert only, use to force insertion of certificate."
}

while getopts "hird:e:" opt; do
  case $opt in
    i) onlyinsert="yes";;
    r) renew="yes";;
    d) domains+=("$OPTARG");;
    e) email="$OPTARG";;
    h) usage
       exit;;
  esac
done

DEFAULTLEBINARY="/usr/bin/certbot /usr/bin/letsencrypt /usr/sbin/certbot
  /usr/sbin/letsencrypt /usr/local/bin/certbot /usr/local/sbin/certbot
  /usr/local/bin/letsencrypt /usr/local/sbin/letsencrypt
  /usr/src/letsencrypt/certbot-auto /usr/src/letsencrypt/letsencrypt-auto
  /usr/src/certbot/certbot-auto /usr/src/certbot/letsencrypt-auto
  /usr/src/certbot-master/certbot-auto /usr/src/certbot-master/letsencrypt-auto"

if [[ ! -v LEBINARY ]]; then
  for i in ${DEFAULTLEBINARY}; do
    if [[ -x ${i} ]]; then
      LEBINARY=${i}
      echo "Found LetsEncrypt/Certbot binary at ${LEBINARY}"
      break
    fi
  done
fi

# Command line options depending on New or Renew.
NEWCERT="--renew-by-default certonly"
RENEWCERT="-n renew"

# Check for required binaries
if [[ ! -x ${LEBINARY} ]]; then
  echo "Error: LetsEncrypt binary not found in ${LEBINARY} !"
  echo "You'll need to do one of the following:"
  echo "1) Change LEBINARY variable in this script"
  echo "2) Install LE manually or via your package manager and do #1"
  echo "3) Use the included get-letsencrypt.sh script to install it"
  exit 1
fi

if [[ ! -x $( which keytool ) ]]; then
  echo "Error: Java keytool binary not found."
  exit 1
fi

if [[ ! -x $( which openssl ) ]]; then
  echo "Error: OpenSSL binary not found."
  exit 1
fi

if [[ ! -z ${email} ]]; then
  email="--email ${email}"
else
  email=""
fi

shift $((OPTIND -1))
for val in "${domains[@]}"; do
        DOMAINS="${DOMAINS} -d ${val} "
done

MAINDOMAIN=${domains[0]}

if [[ -z ${MAINDOMAIN} ]]; then
  echo "Error: At least one -d argument is required"
  usage
  exit 1
fi

if [[ ${renew} == "yes" ]]; then
  LEOPTIONS="${RENEWCERT}"
else
  LEOPTIONS="${email} ${DOMAINS} ${NEWCERT}"
fi

if [[ ${onlyinsert} != "yes" ]]; then
  echo "Firing up standalone authenticator on TCP port 80 and requesting cert..."
  ${LEBINARY} --server https://acme-v01.api.letsencrypt.org/directory \
              --agree-tos --standalone --preferred-challenges http ${LEOPTIONS}
fi

if [[ ${onlyinsert} != "yes" ]] && md5sum -c "/etc/letsencrypt/live/${MAINDOMAIN}/cert.pem.md5" &>/dev/null; then
  echo "Cert has not changed, not updating controller."
  exit 0
else
  echo "Cert has changed or -i option was used, updating controller..."
  TEMPFILE=$(mktemp)
  CATEMPFILE=$(mktemp)

  # Identrust cross-signed CA cert needed by the java keystore for import.
  # Can get original here: https://www.identrust.com/certificates/trustid/root-download-x3.html
  cat > "${CATEMPFILE}" <<'_EOF'
-----BEGIN CERTIFICATE-----
MIIDSjCCAjKgAwIBAgIQRK+wgNajJ7qJMDmGLvhAazANBgkqhkiG9w0BAQUFADA/
MSQwIgYDVQQKExtEaWdpdGFsIFNpZ25hdHVyZSBUcnVzdCBDby4xFzAVBgNVBAMT
DkRTVCBSb290IENBIFgzMB4XDTAwMDkzMDIxMTIxOVoXDTIxMDkzMDE0MDExNVow
PzEkMCIGA1UEChMbRGlnaXRhbCBTaWduYXR1cmUgVHJ1c3QgQ28uMRcwFQYDVQQD
Ew5EU1QgUm9vdCBDQSBYMzCCASIwDQYJKoZIhvcNAQEBBQADggEPADCCAQoCggEB
AN+v6ZdQCINXtMxiZfaQguzH0yxrMMpb7NnDfcdAwRgUi+DoM3ZJKuM/IUmTrE4O
rz5Iy2Xu/NMhD2XSKtkyj4zl93ewEnu1lcCJo6m67XMuegwGMoOifooUMM0RoOEq
OLl5CjH9UL2AZd+3UWODyOKIYepLYYHsUmu5ouJLGiifSKOeDNoJjj4XLh7dIN9b
xiqKqy69cK3FCxolkHRyxXtqqzTWMIn/5WgTe1QLyNau7Fqckh49ZLOMxt+/yUFw
7BZy1SbsOFU5Q9D8/RhcQPGX69Wam40dutolucbY38EVAjqr2m7xPi71XAicPNaD
aeQQmxkqtilX4+U9m5/wAl0CAwEAAaNCMEAwDwYDVR0TAQH/BAUwAwEB/zAOBgNV
HQ8BAf8EBAMCAQYwHQYDVR0OBBYEFMSnsaR7LHH62+FLkHX/xBVghYkQMA0GCSqG
SIb3DQEBBQUAA4IBAQCjGiybFwBcqR7uKGY3Or+Dxz9LwwmglSBd49lZRNI+DT69
ikugdB/OEIKcdBodfpga3csTS7MgROSR6cz8faXbauX+5v3gTt23ADq1cEmv8uXr
AvHRAosZy5Q6XkjEGB5YGV8eAlrwDPGxrancWYaLbumR9YbK+rlmM6pZW87ipxZz
R8srzJmwN0jP41ZL9c8PDHIyh8bwRLtTcm1D9SZImlJnt1ir/md2cXjbDaJWFBM5
JDGFoqgCWjBH4d1QB7wCCZAA62RjYJsWvIjJEubSfZGL+T0yjWW06XyxV3bqxbYo
Ob8VZRzI9neWagqNdwvYkQsEjgfbKbYK7p2CNTUQ
-----END CERTIFICATE-----
_EOF

  md5sum "/etc/letsencrypt/live/${MAINDOMAIN}/cert.pem" > "/etc/letsencrypt/live/${MAINDOMAIN}/cert.pem.md5"
  echo "Using openssl to prepare certificate..."
  cat "/etc/letsencrypt/live/${MAINDOMAIN}/chain.pem" >> "${CATEMPFILE}"
  openssl pkcs12 -export  -passout pass:aircontrolenterprise \
          -in "/etc/letsencrypt/live/${MAINDOMAIN}/cert.pem" \
          -inkey "/etc/letsencrypt/live/${MAINDOMAIN}/privkey.pem" \
          -out "${TEMPFILE}" -name unifi \
          -CAfile "${CATEMPFILE}" -caname root

  docker container stop ${dockerContainerId}
  sleep 10
  dockerContainerId=$(sudo docker container list | grep unifi-controller | awk '{print $1}')
  echo "Removing existing certificate from Unifi protected keystore..."
  keytool -delete -alias unifi -keystore ${unifiDir}/keystore -deststorepass aircontrolenterprise

  echo "Inserting certificate into Unifi keystore..."
  keytool -trustcacerts -importkeystore \
          -deststorepass aircontrolenterprise \
          -destkeypass aircontrolenterprise \
          -destkeystore ${unifiDir}/keystore \
          -srckeystore "${TEMPFILE}" -srcstoretype PKCS12 \
          -srcstorepass aircontrolenterprise \
          -alias unifi

  sleep 2
  echo "Starting Unifi controllers..."
  docker container start ${dockerContainerId}
  ./teams.sh -b "$(hostname) - UniFi service is restarting, ssl cert should be renewed."

  echo "Done!"
fi

Installing UniFi controller in Docker Container

Instructions followed from here. Some changes were made
Commands work on Ubuntu 16.04

Install Docker

sudo apt install -y docker docker.io
systemctl enable docker
systemctl start docker

Install UniFi

sudo docker pull jacobalberty/unifi:latest

Setup Docker Image

The following command sets up a container which we can later manipulate to start and stop the “service”
You can specify where you want the UniFi files to reside if desired.

sudo docker run -d --init --restart=unless-stopped --name=unifi-controller --net=host --volume=/docker/unifi:/var/lib/unifi -p 8080:8080/tcp -p 8081:8081/tcp -p 8443:8443/tcp -p 8843:8843/tcp -p 8880:8880/tcp -p 8883:8883/tcp -p 3478:3478/udp jacobalberty/unifi:latest

Docker commands

List docker containers

sudo docker container list
367c7a1465ec        jacobalberty/unifi:latest   "/usr/loca/bin/dock…" 15 minutes ago      Up 14 minutes (healthy) unifi-controller

List docker images on system

sudo docker images
jacobalberty/unifi latest baebbe301633 9 days ago 711MB

Stop container. Also stops the UniFi service. Change the ID to your container ID.

sudo docker stop 367c7a1465ec

Other notes

When setting up the Docker image, the directory specified was “/docker/unifi” so all the UniFi files are in there and it looks like if you manipulate the files, it makes the changes fine. At least for setting up the SSL certificates.