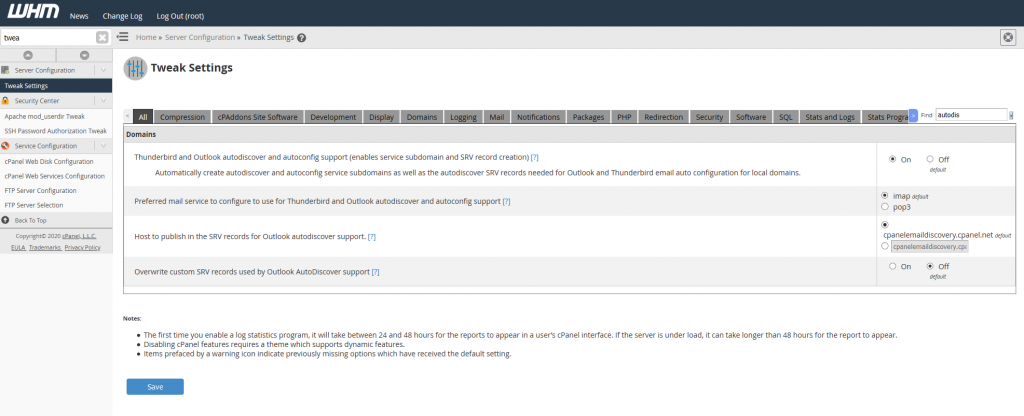
- Log into WHM
- Search for Tweak Settings
- Search for autodiscover
- Turn On
- Save Settings
Done! Your autodiscovery should now work.

Done! Your autodiscovery should now work.
Had a weird issue where a certain address was unable to access the cpanel server, but it was intermittent with it working some times, but failing at other times.
Ended up being the firewall on the WHM server blocking that particular IP address due to failed log in attempts.
Check the status of LFD (Login Failure Daemon)
systemctl status lfd
Check the logs, dmesg or tail /var/log/messages
[1122639.674605] Firewall: UDP_IN Blocked IN=eth0 OUT= MAC=8e:23:f5:16:a6:b1:cc:51:54:6a:2e:ea:14:00 SRC=72.211.105.113 DST=192.168.1.12 LEN=64 TOS=0x00 PREC=0x00 TTL=246 ID=40014 PROTO=UDP SPT=9307 DPT=161 LEN=44
[1122646.728510] Firewall: TCP_IN Blocked IN=eth0 OUT= MAC=8e:23:f5:16:a6:b1:cc:51:54:6a:2e:ea:14:00 SRC=198.199.98.83 DST=192.168.1.12 LEN=40 TOS=0x00 PREC=0x00 TTL=244 ID=54321 PROTO=TCP SPT=57522 DPT=15672 WINDOW=65535 RES=0x00 SYN URGP=0
CSF keeps a file with addresses to deny in “/etc/csf/csf.deny” Also nice that if gives you a little bit of info on why it was blocked.
# grep -r "192.168.1.21" /etc/csf/csf.deny
192.168.1.21 # lfd: (pop3d) Failed POP3 login from 192.168.1.21 (US/United States/-): 10 in the last 3600 secs - Tue Jun 20 11:36:15 2020
You can also dump all of the rule in iptables with
iptables --list | egrep "192.168.1.21"
Change 192.168.1.21 with the IP you are looking for
Open up /etc/csf/csf.allow with a text editor and add the IP to the bottom of the file.
or add the IP address to the end of the file with the following command. Replace 192.168.1.21 with the IP address you want to whitelist.
echo "192.168.1.21" >> /etc/csf/csf.allow
You can also do all of this from the WHM web interface “Plugins -> ConfigServer Security & Firewall”
Further reading
https://documentation.cpanel.net/display/CKB/How+to+Configure+Your+Firewall+for+cPanel+Services
Vim highlight search, when enabled, will highlight all the positive results with yellow. This can make it easy to see where all the results are on a page.
To turn on
:set hlsearch
To turn off
:nohlsearch
https://vim.fandom.com/wiki/Highlight_all_search_pattern_matches
exim -bp | grep "string" -A1 | awk {'print $3'}
Replace string with the email address, or domain you want to search for and delete.
Note that -A1 may not be needed. Grep will just search for string and 1 line after it. I had a problem with the string I was wanting to use was on the line below it
You can install the default-jre to get the default Java package installed
sudo apt install -y default-jre
You’ll need to install and setup adb and then run the following commands. Change ipaddress to the ip address of the device running Android Things
adb connect ipaddress
adb root
adb remount
adb push bootanimation.zip /system/media/
adb reboot
bootanimation.zip will either need to be in the same directory as adb, or you can specify the path. For example if it is located on your Desktop you can use
For Windows
adb push \Users\username\Desktop\bootanimation.zip /system/media/
on Linux or MacOS
adb push ~/Desktop/bootanimation.zip /system/media/
You can use the -a option to resolve an address to a hostname.
-a Resolve addresses to hostnames.Example from Windows command prompt
C:\Users\Bob>ping google.com -a
Pinging google.com [64.233.185.138] with 32 bytes of data:
Reply from 64.233.185.138: bytes=32 time=8ms TTL=44
You can view an email message in Exim with the following command and options.
exim -Mvh email-id
Example output
# exim -Mvh 1jTAsw-0101m5-TH
mailnull 47 12
<>
1591431138 0
-received_time_usec .007773
-ident mailnull
-received_protocol local
-body_linecount 109
-max_received_linelength 98
-allow_unqualified_recipient
-allow_unqualified_sender
-localerror
XX
1
larry@incredigeek.com
155P Received: from mailnull by cpanel.server.co with local (Exim 4.93)
id 1jTAsw-0101m5-TH
for larry@incredigeek.com; Sat, 06 Jun 2020 03:12:18 -0500
045 X-Failed-Recipients: bob@incredigeek.com
029 Auto-Submitted: auto-replied
068F From: Mail Delivery System Mailer-Daemon@cpanel.server.co
025T To: larry@incredigeek.com
064 References: 0.0.7.15D.1D63BD03648840.0@slot0.cn-sinosure.com
098 Content-Type: multipart/report; report-type=delivery-status; boundary=1121689138-eximdsn-67139566
018 MIME-Version: 1.0
059 Subject: Mail delivery failed: returning message to sender
057I Message-Id: E3ghaTA-001qN5-Hn@cpanel.host.com
038 Date: Sat, 06 Jun 2020 03:12:18 -0500
You can view the message body with the -b option
exim -Mvb email-id
Example
exim -Mvb email-id 1jTAsw-0101m5-TH
--1231463132-eximdsn-21535482
email message
--1231463132-eximdsn-21535482--
https://developer.android.com/things/hardware/raspberrypi
Download the Console Tools from the following link. You will need to sign into your Google account.
https://partner.android.com/things/console/#/tools
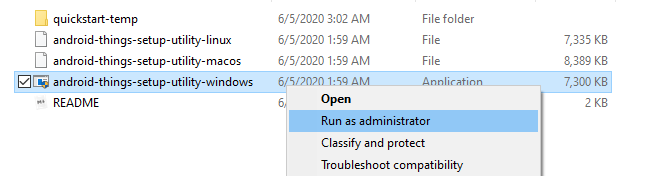
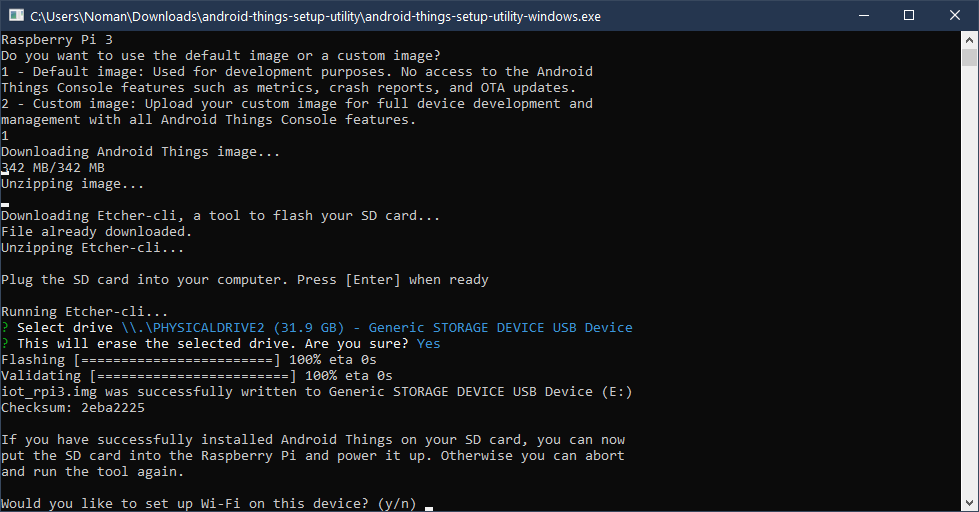
Unzip the file and Launch the correct utility for your OS.
On Windows you will need to launch as administrator by right clicking on the Windows Application and Run as administrator.
The program is easy to follow along with and automatically downloads and creates the SD card for the Pi.
After you are finished, put the card in the Pi and boot it up.
Open up the following file, change eth0 to your primary ethernet adapter. More info here.
vi /etc/sysconfig/network-scripts/ifcfg-eth0
and under IPADDR set it to the new IP. Update netmask and gateway if needed.
Save file and restart network
systemctl restart network
You may need to run the following to update the license on the server.
/usr/local/cpanel/cpkeyclt
You may need to migrate IP’s to the new address.
If you are keeping the old address on the server, then you may need to readd it through the IP Functions.