Mikrotik hAP – Change SSID via command line

Problem – Need 2.4 Ghz network enabled and SSID set to WiFi. Wireless router is behind a NAT, using UNMS to ssh into the radio, and from the radio ssh into hAP. Enter/Return key not working to run commands, so running the commands over ssh from the radio.

WA.v8.4.2# ssh admin@192.168.88.2  'interface wireless print'
admin@192.168.88.2's password: 
Flags: X - disabled, R - running 
 0    name="wlan1" mtu=1500 l2mtu=1600 mac-address=74:4D:28:0F:69:B3 
      arp=enabled interface-type=Atheros AR9300 mode=station ssid="MikroTik" 
      frequency=2412 band=2ghz-b/g channel-width=20mhz secondary-channel="" 
      scan-list=default wireless-protocol=any vlan-mode=no-tag vlan-id=1 
      wds-mode=disabled wds-default-bridge=none wds-ignore-ssid=no 
      bridge-mode=enabled default-authentication=yes default-forwarding=yes 
      default-ap-tx-limit=0 default-client-tx-limit=0 hide-ssid=no 
      security-profile=default compression=no 

 1  R name="wlan2" mtu=1500 l2mtu=1600 mac-address=74:4D:28:0F:69:B2 
      arp=enabled interface-type=Atheros AR9888 mode=ap-bridge ssid="WiFi" 
      frequency=5180 band=5ghz-n/ac channel-width=20mhz secondary-channel="" 
      scan-list=default wireless-protocol=802.11 vlan-mode=no-tag vlan-id=1 
      wds-mode=disabled wds-default-bridge=none wds-ignore-ssid=no 
      bridge-mode=enabled default-authentication=yes default-forwarding=yes 
      default-ap-tx-limit=0 default-client-tx-limit=0 hide-ssid=no 
      security-profile=default compression=no 

WA.v8.4.2# ssh admin@192.168.88.2  'interface wireless set disabled=no ssid=WiFi wlan1'
admin@192.168.88.2's password: 
WA.v8.4.2# ssh admin@192.168.88.2  'interface wireless print'
admin@192.168.88.2's password: 
Flags: X - disabled, R - running 
 0    name="wlan1" mtu=1500 l2mtu=1600 mac-address=74:4D:28:0F:69:B3 
      arp=enabled interface-type=Atheros AR9300 mode=station ssid="WiFi" 
      frequency=2412 band=2ghz-b/g channel-width=20mhz secondary-channel="" 
      scan-list=default wireless-protocol=any vlan-mode=no-tag vlan-id=1 
      wds-mode=disabled wds-default-bridge=none wds-ignore-ssid=no 
      bridge-mode=enabled default-authentication=yes default-forwarding=yes 
      default-ap-tx-limit=0 default-client-tx-limit=0 hide-ssid=no 
      security-profile=default compression=no 

 1  R name="wlan2" mtu=1500 l2mtu=1600 mac-address=74:4D:28:0F:69:B2 
      arp=enabled interface-type=Atheros AR9888 mode=ap-bridge ssid="WiFi" 
      frequency=5180 band=5ghz-n/ac channel-width=20mhz secondary-channel="" 
      scan-list=default wireless-protocol=802.11 vlan-mode=no-tag vlan-id=1 
      wds-mode=disabled wds-default-bridge=none wds-ignore-ssid=no 
      bridge-mode=enabled default-authentication=yes default-forwarding=yes 
      default-ap-tx-limit=0 default-client-tx-limit=0 hide-ssid=no 
      security-profile=default compression=no 

WA.v8.4.2# ssh admin@192.168.88.2  'interface wireless registration-table print'
admin@192.168.88.2's password: 
 # INTERFACE           RADIO-NAME       MAC-ADDRESS       AP  SIGNAL... TX-RATE
 0 wlan2                                A7:32:54:EE:E4:35 no  -77dBm... 18Mbps 
 1 wlan2                                34:7A:F4:43:AD:81 no  -69dBm... 6Mbps  

WA.v8.4.2# exit

Mikrotik Safe Mode

Safe Mode is a configuration fail safe for Mikrotik routers. If enabled and you make a change that disconnects your session to the router, whatever changes were made will be rolled back, which should let you get back in the router.

If your in WinBox you can hit the Safe Mode button at the top left

If your in a telnet or ssh session just hit

ctrl + x

You should see the following to let you know that safe mode is active

[Safe Mode taken]

Hit ctrl + x again to release Safe Mode

Mikrotik RouterOS view and set Simple Queue speeds

list all simple queues

queue simple print 

Print queue that matches part of name

queue simple print where name~"John"

Example results

Flags: X - disabled, I - invalid, D - dynamic 
0 name="John Smith" target=192.168.1.3/32 parent=none packet-marks="" priority=8/8 queue=sfq-up/sfq-down limit-at=0/0
max-limit=1M/10M burst-limit=0/0 burst-threshold=0/0 burst-time=0s/0s bucket-size=0.1/0.1 total-queue=default

Change max speed on queue for client name. The Upload is specified first.

queue simple set max-limit=10M/100M "John Smith"

Setup SNMPv3 on Mikrotik Router

Setting up SNMP via WinBox is straight forward, the following commands are how to set it up from the command line with some troubleshooting info at the end.

Setup SNMPv3

Setup Community (Change v3Private,encpass, and authpass to their respective names or passwords)

snmp community add name=v3Private encryption-protocol=AES encryption-password=encpass authentication-protocol=SHA1 authentication-password=authpass security=private

Enable and set SNMP community (Trap Community needs to match the above command.  Change contact and the location as needed.)

snmp set contact=admin@incredigeek.com location=DeviceLocation trap-community=V3Private

Troubleshooting

Sometimes, for no apparent reason it seems, routerOS will have issues using the default community.  Work around is to create and use a new community.

Cannot connect with AES encryption

AES doesn’t always seem to work reliably.  Seems to work on some and not other.  Work around is to use DES.

Note that DES is deprecated on newer systems.  For example, you will not be able to read the SNMP details on a router that uses DES from a machine running AlmaLinux 9.  AES seems to be working fine now in 2023.

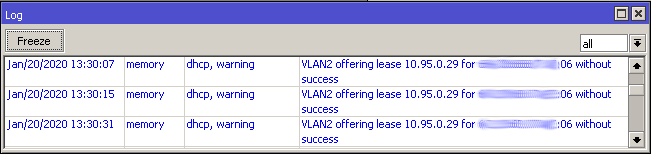
Log shows Permission Denied

Double check the allowed from addresses, user, and passwords

Add multiple IP bindings to Mikrotik Hotspot – Bash Script

Copy and paste the following into a file named mtbypass.sh and then “chmod +x mtbypass.sh”  Or download from this direct link.  Be sure to change the username and password

#!bin/bash
filelist="bypasslist.txt"
username="admin"
password="password!"
ip="$1"

for i in `cat ${filelist}`
do
address=`echo $i | cut -d= -f1`
mac=`echo $i | cut -d= -f2`
sshpass -p ${password} ssh ${username}@${ip} "ip hotspot ip-binding add address=${address} mac-address=${mac} type=bypassed"
done

Now create a file named bypasslist.txt and put all the addresses you want bypassed.  You’ll need the Mac Address and the IP Address.

Example file

192.168.88.2=4C:5E:0C:B8:4E:01
192.168.88.3=3E:AA:A1:2D:8B:2C
192.168.88.5=DE:D1:39:65:91:4E

Usage of script is

./mtbypass.sh MikrotikIP

Example:

./mtbypass.sh 192.168.88.1