.Open a new tab and go to about:preferences.
Search for “Check your spelling as you type” and make sure it is enabled.
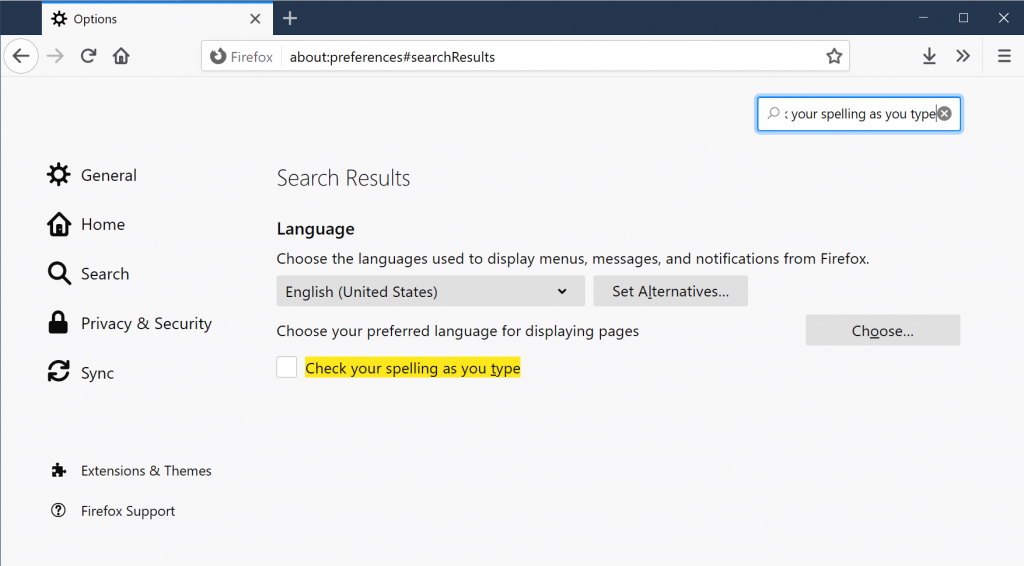
You will need to refresh any open web pages to start spell checking on that page.

.Open a new tab and go to about:preferences.
Search for “Check your spelling as you type” and make sure it is enabled.
You will need to refresh any open web pages to start spell checking on that page.
https://github.com/SeeedDocument/Seeed-WiKi/blob/master/docs/Grove-Gas_Sensor-O2.md
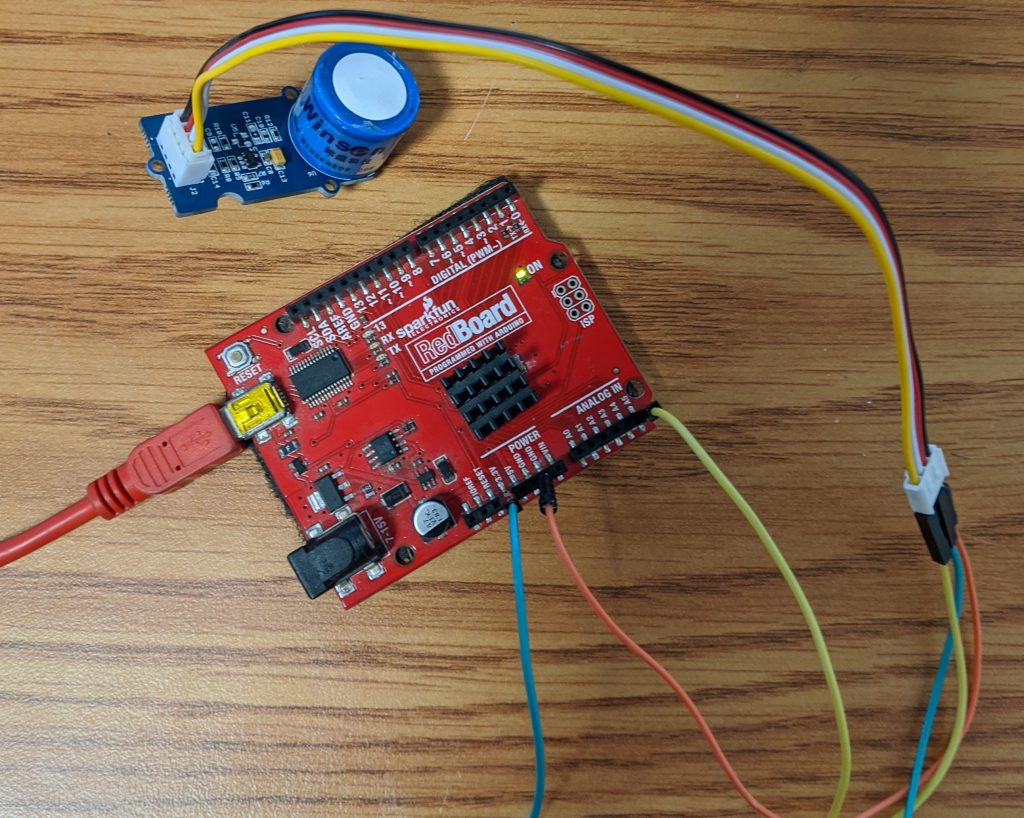
The Seeed Studio O2 sensor is a nice Oxygen sensor. It works up to 25% Oxygen concentration and is easy to use in an Arduino project.
http://wiki.seeedstudio.com/Grove-Gas_Sensor-O2/
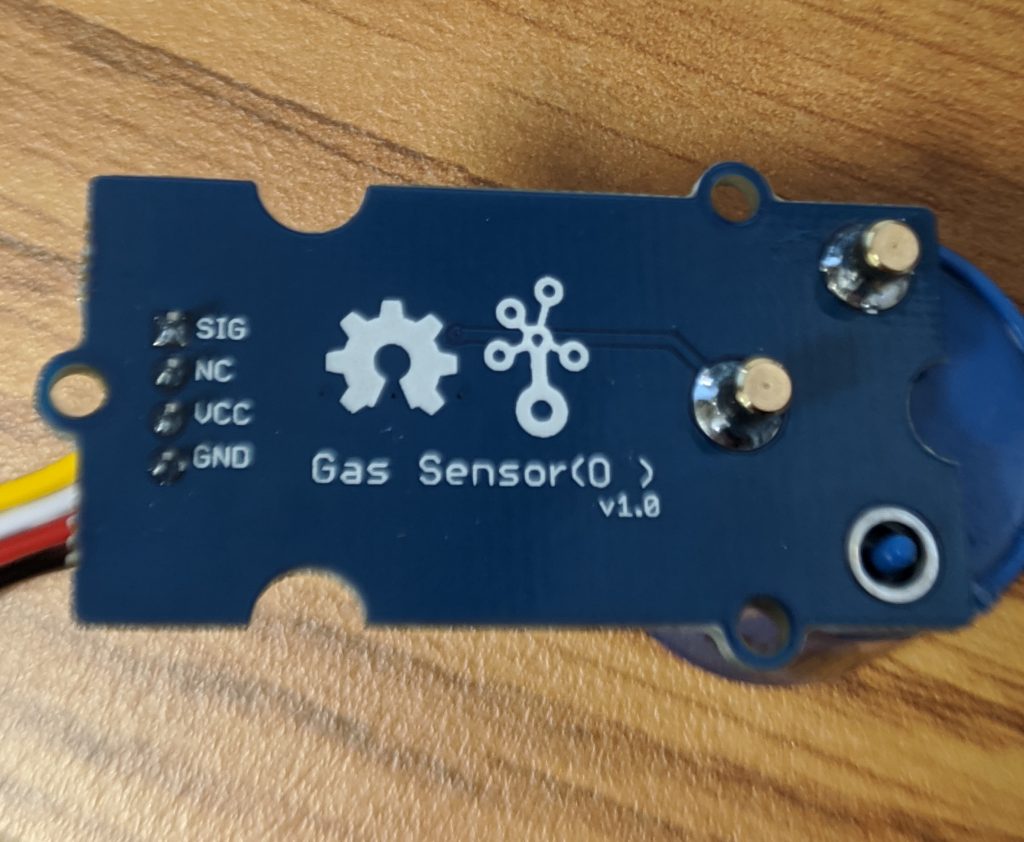
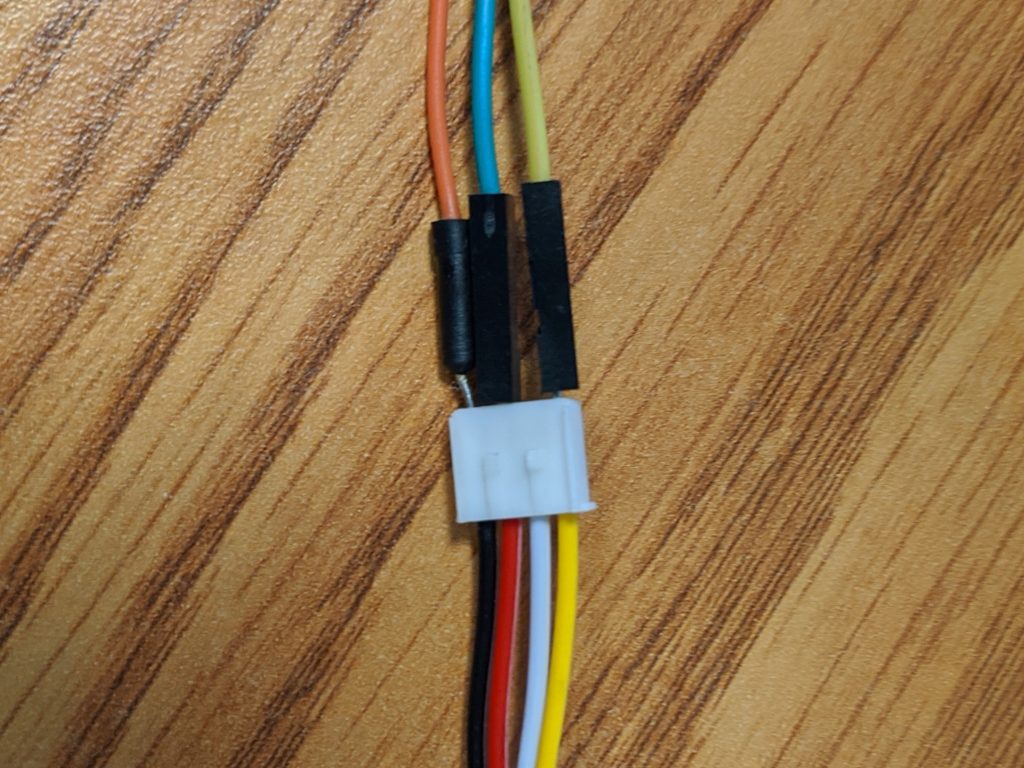
If you look on the back of the sensor there are only 3 wires used. VCC, GND, and a SIG. The NC pin is “Not Connected”
Wire the
GND -> Arduino ground
VCC -> Arduino 3.3V (Looks like it may also accept 5V)
SIG -> A5 (Analog 5)
Copy and paste the following code into the Arduino IDE
// Grove - Gas Sensor(O2) test code
// Note:
// 1. It need about about 5-10 minutes to preheat the sensor
// 2. modify VRefer if needed

const float VRefer = 3.3;       // voltage of adc reference

const int pinAdc   = A5;

void setup()
{
    // put your setup code here, to run once:
    Serial.begin(9600);
    Serial.println("Grove - Gas Sensor Test Code...");
}

void loop()
{
    // put your main code here, to run repeatedly:
    float Vout =0;
    Serial.print("Vout =");

    Vout = readO2Vout();
    Serial.print(Vout);
    Serial.print(" V, Concentration of O2 is ");
    Serial.println(readConcentration());
    delay(500);
}

float readO2Vout()
{
    long sum = 0;
    for(int i=0; i<32; i++)
    {
        sum += analogRead(pinAdc);
    }

    sum >>= 5;

    float MeasuredVout = sum * (VRefer / 1023.0);
    return MeasuredVout;
}

float readConcentration()
{
    // Vout samples are with reference to 3.3V
    float MeasuredVout = readO2Vout();

    //float Concentration = FmultiMap(MeasuredVout, VoutArray,O2ConArray, 6);
    //when its output voltage is 2.0V,
    float Concentration = MeasuredVout * 0.21 / 2.0;
    float Concentration_Percentage=Concentration*100;
    return Concentration_Percentage;
}
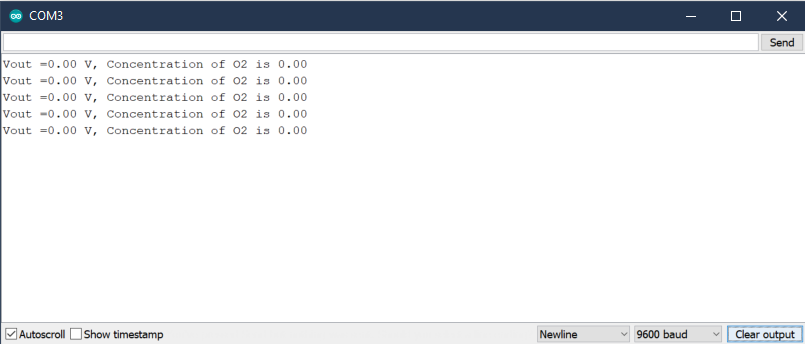
Upload and Launch the Serial Monitor
Tools -> Serial Monitor
or
Ctrl + Shift + M
Need to Specify the serial input
Start the serial connection
Print input to log
// Set analog pin variable
const int aPin = A0;

void setup() {
  // Start Serial connection
  Serial.begin(9600);
}

void loop() {
  // Print analog input to Serial Monitor
  Serial.println(analogRead(aPin));
}https://arduino.stackexchange.com/questions/601/grove-sensors-without-a-grove-shield
Using an O2 Sensor which has the following connections
SSH into the UniFi. Note that the UniFi username and password get updated from the controller. Refer to here to find username and password.
ssh ubnt@192.168.1.20
run the syswrapper.sh script with the restore-default option.
syswrapper.sh restore-default &
set-default &
Note that this changed. Used to, you could just run syswrapper.sh restore-default and it would reset. Now if you do that, it won’t reset, you’ll be able to ping the device, but you can’t ssh into it meaning you will need to physically reboot it.
Once the device is reset, log in over ssh and reconfigure.
Note that the username and password will now be ubnt/ubnt
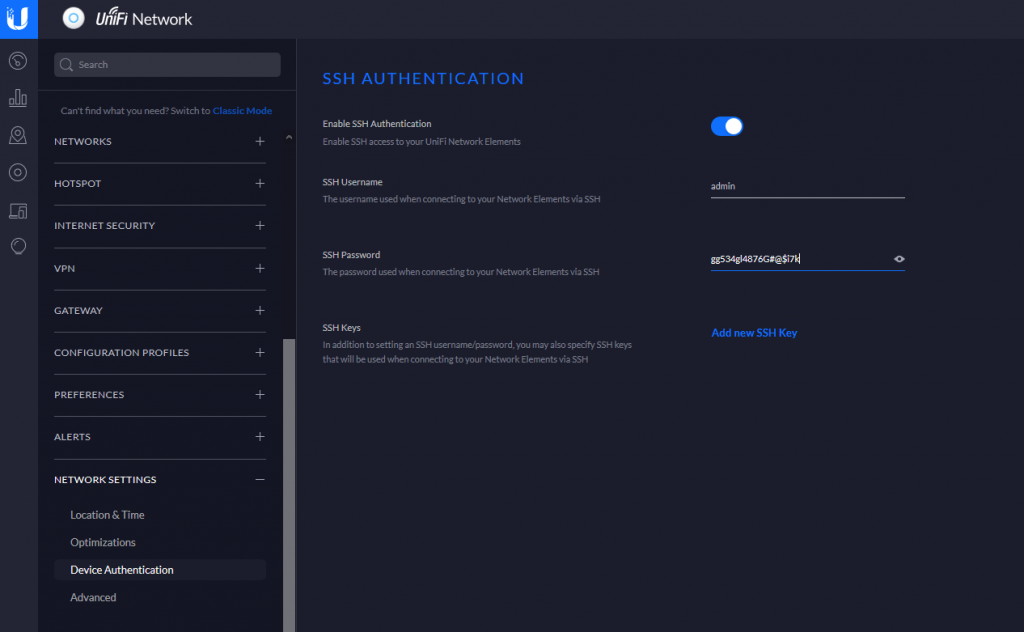
In the newer controller versions, you should be able to go to
Settings -> NETWORK SETTINGS -> Device Authentication
To view the SSH credentials.
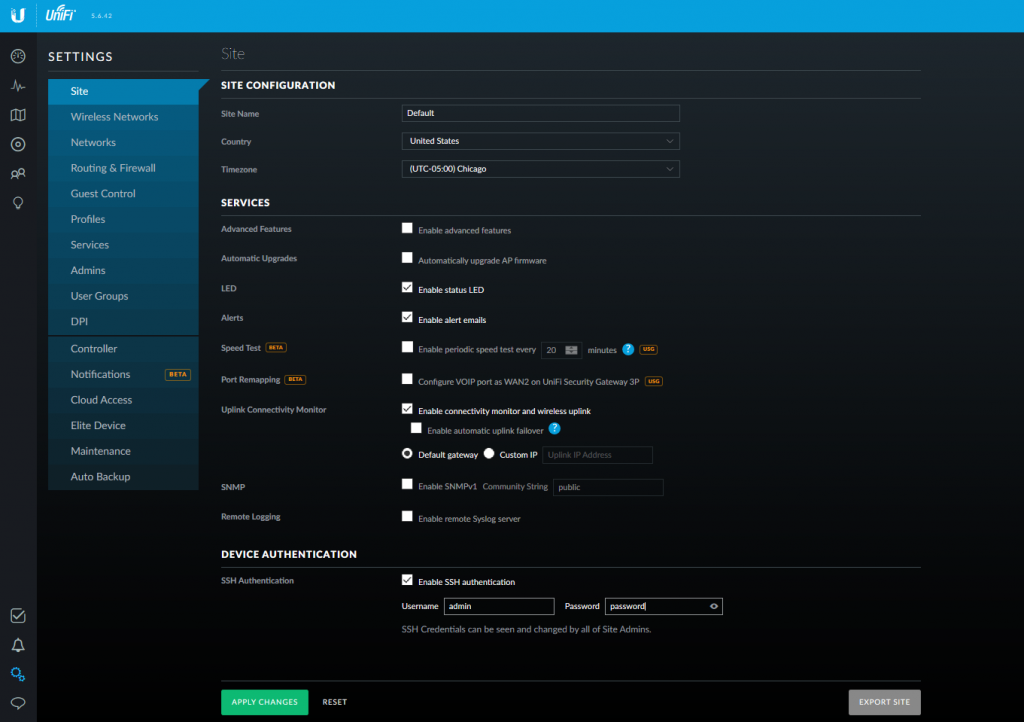
Go to Settings -> Site -> DEVICE AUTHENTICATION
Pull UniFi 5.6.42 docker image
sudo docker pull jacobalberty/unifi:5.6.42
Install image
sudo docker run -d --init --restart=unless-stopped --name=unifi-controller --net=host --volume=/docker/unifi:/var/lib/unifi -p 8080:8080/tcp -p 8081:8081/tcp -p 8443:8443/tcp -p 8843:8843/tcp -p 8880:8880/tcp -p 8883:8883/tcp -p 3478:3478/udp jacobalberty/unifi:5.6.42
Access and setup the unifi controller from a browser.
https://ip-address:8443

Log files are located in /home/unms/data/logs
larry@localhost:~$ sudo tail -f /home/unms/data/logs/unms.b5a3713b02f71e06fb3a84a3a9a75c558.log
{"msg":"setting permissions on /home/app/unms/data/control","name":"unknown","hostname":"unknown","pid":0,"v":0,"level":30,"tag":"unms","time":"2020-04-17T16:28:35+00:00"}
{"msg":"Linking /home/app/unms/public/site-images -> /home/app/unms/data/images","name":"unknown","hostname":"unknown","pid":0,"v":0,"level":30,"tag":"unms","time":"2020-04-17T16:28:35+00:00"}
{"msg":"Linking /home/app/unms/public/firmwares -> /home/app/unms/data/firmwares","name":"unknown","hostname":"unknown","pid":0,"v":0,"level":30,"tag":"unms","time":"2020-04-17T16:28:35+00:00"}
{"msg":"Stepping down from root: su-exec \"/usr/local/bin/docker-entrypoint.sh\" \"index.js\"","name":"unknown","hostname":"unknown","pid":0,"v":0,"level":30,"tag":"unms","time":"2020-04-17T16:28:35+00:00"}
{"msg":"Running docker-entrypoint index.js","name":"unknown","hostname":"unknown","pid":0,"v":0,"level":30,"tag":"unms","time":"2020-04-17T16:28:35+00:00"}
{"msg":"Version: 1.1.6+e6ec4747d.2020-03-13T10:52:14+01:00","name":"unknown","hostname":"unknown","pid":0,"v":0,"level":30,"tag":"unms","time":"2020-04-17T16:28:35+00:00"}
{"msg":"Waiting for database containers","name":"unknown","hostname":"unknown","pid":0,"v":0,"level":30,"tag":"unms","time":"2020-04-17T16:28:35+00:00"}
{"msg":"psql: fe_sendauth: no password supplied","name":"unknown","hostname":"unknown","pid":0,"v":0,"level":30,"tag":"unms","time":"2020-04-17T16:28:35+00:00"}
{"msg":"nc: bad address 'unms-redis'","name":"unknown","hostname":"unknown","pid":0,"v":0,"level":30,"tag":"unms","time":"2020-04-17T16:28:35+00:00"}
sudo ~unms/app/unms-cli stop
sudo ~unms/app/unms-cli start
sudo ~unms/app/unms-cli fix-redis-aof
Running the above command resolved the problem and let UNMS start working.
larry@localhost:~$ sudo ~unms/app/unms-cli stop
larry@localhost:~$ sudo ~unms/app/unms-cli fix-redis-aof
Creating network "unms_internal" with the default driver
Creating network "unms_public" with the default driver
Creating unms-fluentd
The AOF appears to start with an RDB preamble.
Checking the RDB preamble to start:
[offset 0] Checking RDB file --fix
[offset 26] AUX FIELD redis-ver = '5.0.5'
[offset 40] AUX FIELD redis-bits = '64'
[offset 52] AUX FIELD ctime = '1587130996'
[offset 67] AUX FIELD used-mem = '276217328'
[offset 83] AUX FIELD aof-preamble = '1'
[offset 85] Selecting DB ID 0
[offset 80304063] Checksum OK
[offset 80304063] \o/ RDB looks OK! \o/
[info] 3307 keys read
[info] 0 expires
[info] 0 already expired
RDB preamble is OK, proceeding with AOF tail…
0x 79b7264: Expected prefix '*', got: '
AOF analyzed: size=127631360, ok_up_to=127627876, diff=3484
This will shrink the AOF from 127631360 bytes, with 3484 bytes, to 127627876 bytes
Continue? [y/N]: Successfully truncated AOF
larry@localhost:~$ sudo ~unms/app/unms-cli start
On the forums they seemed to recommend stopping the service and running
sudo ~unms/app/unms-cli rewrite-redis-aof
I was getting the following error when trying to run this command. Running the above command worked though.
larry@localhost:~$ sudo ~unms/app/unms-cli stop
larry@localhost:~$ sudo redis-check-aof --fix ~unms/data/redis/appendonly.aof
The AOF appears to start with an RDB preamble.
Checking the RDB preamble to start:
[offset 0] Checking RDB file --fix
--- RDB ERROR DETECTED ---
[offset 9] Can't handle RDB format version 9
[additional info] While doing: start
[additional info] Reading type 0 (string)
[info] 0 keys read
[info] 0 expires
[info] 0 already expired
RDB preamble of AOF file is not sane, aborting.
larry@localhost:~$
https://community.ui.com/questions/ERROR-UNMS-is-starting-This-should-not-take-more-than-a-minute-/1010b107-dfd4-4c0f-b667-2f3cf4ef713b
https://community.ui.com/questions/UNMS-is-broken-after-upgrade-from-13-x-to-14-x/411ec85e-7a1b-4d17-bb12-34e449b4ae5a
Looks like you can use Darling to run MacOS command line applications in Linux.
Helpful commands. Maybe?
Looks like most of the configuration scripts are in /sbin
Web from the /etc_ro/web/admin/managment.php
<fieldset> <legend><script type="text/javascript">Capture(management.Web_Access)</script></legend> <table class="setting_block"> <tr> <td class="head" id="remoteWebLogin"><script>Capture(management.Remote_Web_Login)</script></td> <td> <select name="remote_web_login"> <option value="0" <% getCfgSelected("DBID_LAN_LOGIN_ONLY", "1"); %>><script>Capture(share.disable)</script></option> <option value="1" <% getCfgSelected("DBID_LAN_LOGIN_ONLY", "0"); %>><script>Capture(share.enable)</script></option> </select> </td> </tr> <tr id="WirelessHostLogin_tr"> <td class="head" id="WirelessHostLogin"><script>Capture(management.wireless_access_web)</script></td> <td> <select name="wireless_access_web"> <option value="0" <% getCfgSelected("wireless_access_web", "0"); %>><script>Capture(share.disable)</script></option> <option value="1" <% getCfgSelected("wireless_access_web", "1"); %>><script>Capture(share.enable)</script></option> </select> </td> </tr> <tr id="web_login_access"> <td class="head" id="WebLoginWay"><script>Capture(management.way_access_web)</script></td> <td> <select name="way_access_web"> <!-- <option value="https" selected = "selected" <% getCfgSelected("way_access_web", "https"); %>><script>Capture(management.https)</script></option> --> <option value="http" <% getCfgSelected("way_access_web", "http"); %>><script>Capture(management.http)</script></option> <option value="http&https" <% gethttphttpsSelected("way_access_web", "http&https"); %>><script>Capture(management.http_https)</script></option> </select> </td> </tr> <tr id="localport_tr"> <td class="head"><script>Capture(management.localWeb_Port)</script></td>
nvram_
 nvram_get  nvram_set
 nvram_get
 Usage:
   nvram_get  [] []
 command:
   rt2860_nvram_show - display rt2860 values in nvram
   rtdev_nvram_show   - display 2nd ralink device values in nvram
   show    - display values in nvram for
   gen     - generate config file from nvram for
   renew   - replace nvram values for  with
   clear   - clear all entries in nvram for
 platform:
   2860    - rt2860
   rtdev    - 2nd ralink device
 file:
           - file name for renew command
 nvram_get show
 2860
 nvram_get show 2860
Trying to read data
nvram_get gen file tmp.txt
 Usage:
         nvram_get 2860 lan_ipaddr
 nvram_get 2860 lan_ipaddr
 192.168.11.1
 nvram_get 2860 http_wanport
 nvram_get 2860 http
 nvram_get 2860 httpd
 nvram_get 2860 remote_mgt_https
 nvram_get 2860 remote_mgt
 nvram_get 2860 telnet
 nvram_get 2860 remote_mgt
 nvram_get 2860 remote_ip
 nvram_get 2860 wan_ip
grep “nvram_get 2860” * | grep -i web
grep "nvram_get 2860" * | grep -i web check_goahead.sh:DBID_WEB_PORT=nvram_get 2860 DBID_WEB_PORTcommon_lib.sh: local webport=nvram_get 2860 DBID_WEB_PORTcommon_lib.sh: local webhttpsport=nvram_get 2860 DBID_WEB_SSL_PORTcommon_lib.sh: local web_remote_ip=nvram_get 2860 WebRemoteLegalIPcommon_lib.sh: wireless_access_web=nvram_get 2860 wireless_access_webcommon_lib.sh: wanwebport=nvram_get 2860 DBID_WEB_PORTcommon_lib.sh: local webhttpsport=nvram_get 2860 DBID_WEB_SSL_PORTcommon_lib.sh: lanwebport=nvram_get 2860 lan_webportcommon_lib.sh: local webport=nvram_get 2860 DBID_WEB_PORTcommon_lib.sh: local webhttpsport=nvram_get 2860 DBID_WEB_SSL_PORTcommon_lib.sh: local web_remote_ip=nvram_get 2860 WebRemoteLegalIPcommon_lib.sh: local teluserpwd=nvram_get 2860 DBID_SUPER_WEB_PASSWORDglobal.sh:webinit=nvram_get 2860 WebInitinternet.sh: pass=nvram_get 2860 DBID_SUPER_WEB_PASSWORDlan.sh:lan_gw=nvram_get 2860 lan_gateway#for debug, so remote host can access web route from another device in lan port nat.sh:webport=nvram_get 2860 DBID_WEB_PORTset_ping_rule.sh: local pinglegaip=nvram_get 2860 WebAclListstorage.sh: admPW=nvram_get 2860 DBID_SUPER_WEB_PASSWORDstorage.sh: admPW=nvram_get 2860 DBID_SUPER_WEB_PASSWORDstorage.sh: admPW=nvram_get 2860 DBID_NORMAL_WEB_PASSWORDstorage.sh: admPW=nvram_get 2860 DBID_SUPER_WEB_PASSWORDstorage.sh: admPW=nvram_get 2860 DBID_NORMAL_WEB_PASSWORDupdown_make.sh: url=nvram_get 2860 websURLFiltersupdown_make.sh: host=nvram_get 2860 websHostFilters
SSH
Not exactly sure if this does work, but seems like it should.
nvram_get SSH_SERVER_REMOTE_ENABLE
Default status

Enable
nvram_set SSH_SERVER_REMOTE_ENABLE 1
After running above command

Commit changes
nvram_get commit
Reboot
reboot
Seems like I am missing a step. Seems to change the password in the nvram, but does not actually change it permanently
Get current password
nvram_get 2860 Password
admin
nvram_set Password newpassword
Commit Changes and reboot
nvram_set commit
reboot
https://forum.dd-wrt.com/phpBB2/viewtopic.php?t=29181
Uses some of the commands (i.e. nvram_get 2860 HostName )
https://github.com/jameshilliard/hlk-rm04-squashfs-root-1.78/blob/master/sbin/lan.sh