Searching for devices in UniFi via command line / MongoDB

While the UniFi controller is nice and everything, it does make it hard to see if a device is already adopted. At least if you have a ton of sites. Fortunately, we can search the database directly to find out if a UniFi is already adopted and which site it is assigned to.

Connect to Mongo DB

First we need to connect to MongoDB. And then we need to use the ace database.

mongo -port 27117
use ace

List all the devices on the controller

This command will list all the devices on the controller. Regardless of which site they are assigned to.

db.device.find({}, { site_id:"", ip : "", name :"", mac:""})

Example output

{ "_id" : ObjectId("563a4d94e4b054e5376fc600"), "mac" : { "_id" : ObjectId("563a4d94e4b054e5376fc600"), "mac" : "44:d9:e7:34:d1:08", "ip" : "192.168.1.200", "name" : "Main_WiFi", "site_id" : "39485e9abf0e9a047bcded96" }
{ "_id" : ObjectId("9873b39ed1f5d30a6738abe"), "mac" : "44:d9:e7:01:a3:d4", "ip" : "192.168.1.201", "name" : "Testing_Wifi", "site_id" : "39485e9abf0e9a047bcded96" }

Each UniFi will have a “site_id”. You can use that ID to figure out which site it is assigned to.

List all the sites on the controller

db.site.find()

Example output

{ "_id" : ObjectId("39485e9abf0e9a047bcded96"), "name" : "default", "desc" : "Testing Site", "attr_hidden_id" : "default", "attr_no_delete" : true, "anonymous_id" : "83ae20ba-2948-458e-fd0a-1320583ecb04" }

Using our “site_id” from above, we see that the Testing_Wifi device is assigned to the “Testing Site” on the controller.

Something else to look at would be to use the UniFi controller API.

https://ubntwiki.com/products/software/unifi-controller/api

Obtain and Decrypt Cambium WiFi Router Password

By default the passwords are “encrypted” so you can not tell what the password is.

No way to view cnPilot WiFi password in the Web UI

We covered decrypting the passwords from the config file from cambium cloud. But what about a local router that is not connected to the cloud. What then?

Thankfully everything you need is on the router. We’ll need to use the command line tools.

1. Enable SSH

First verify that SSH is enabled.

Enable SSH n cnPilot

2. SSH into router

You may need to specify the “diffie-hellman-group1” option if it throws an error.

ssh admin@192.168.11.1 -o KexAlgorithms=+diffie-hellman-group1-sha1

3. Extract Encrypted WiFi Password from config

The config file is stored in “etc/cambium/bkup-config.txt”

cat etc/cambium/bkup-config.txt | grep 

This should dump the encrypted password(s).

Example Output.

WPAPSK1=[c760ba8ffe65c669]
RTDEV_WPAPSK1=[c760ba8ffe65c669]

4. Decrypt WiFi Password

Now we can decrypt the password. Replace the string at the end with the encrypted string

3des_hex -d c760ba8ffe65c669

It should now display the decrypted password

# 3des_hex -d c760ba8ffe65c669
12345678#

Note that it puts the # symbol after the password and if you try to type something in, it clears the line. you can use the following to have cleaner output.

echo $(3des_hex -d c760ba8ffe65c669 )

That will print the password on it’s own line

# echo $(3des_hex -d c760ba8ffe65c669 )
12345678
#

Getting Android WiFi state in Kotlin

In Kotlin you can request if the WiFi adapter is on or off with the following code
This changes the text on a textbox, replace with your textbox.

wifiManager = this.applicationContext.getSystemService(Context.WIFI_SERVICE) as WifiManager
textBox.text = "WiFi State = ${wifiManager.wifiState}"

The important part is

wifiManager.wifiState

It will return a number from 0-4 which indicates if it is on or off.

0 = WiFi is being disabled
1 = WiFi Disabled
2 = WiFi is being enabled
3 = WiFi is Enabled
4 = Error

https://developer.android.com/reference/kotlin/android/net/wifi/WifiManager#WIFI_STATE_DISABLED:kotlin.Int

Install UniFi 5.6.42 in Docker

Pull UniFi 5.6.42 docker image

sudo docker pull jacobalberty/unifi:5.6.42

Install image

sudo docker run -d --init --restart=unless-stopped --name=unifi-controller --net=host --volume=/docker/unifi:/var/lib/unifi -p 8080:8080/tcp -p 8081:8081/tcp -p 8443:8443/tcp -p 8843:8843/tcp -p 8880:8880/tcp -p 8883:8883/tcp -p 3478:3478/udp jacobalberty/unifi:5.6.42

Access and setup the unifi controller from a browser.

https://ip-address:8443

Mikrotik hAP – Change SSID via command line

Problem – Need 2.4 Ghz network enabled and SSID set to WiFi. Wireless router is behind a NAT, using UNMS to ssh into the radio, and from the radio ssh into hAP. Enter/Return key not working to run commands, so running the commands over ssh from the radio.

WA.v8.4.2# ssh admin@192.168.88.2  'interface wireless print'
admin@192.168.88.2's password: 
Flags: X - disabled, R - running 
 0    name="wlan1" mtu=1500 l2mtu=1600 mac-address=74:4D:28:0F:69:B3 
      arp=enabled interface-type=Atheros AR9300 mode=station ssid="MikroTik" 
      frequency=2412 band=2ghz-b/g channel-width=20mhz secondary-channel="" 
      scan-list=default wireless-protocol=any vlan-mode=no-tag vlan-id=1 
      wds-mode=disabled wds-default-bridge=none wds-ignore-ssid=no 
      bridge-mode=enabled default-authentication=yes default-forwarding=yes 
      default-ap-tx-limit=0 default-client-tx-limit=0 hide-ssid=no 
      security-profile=default compression=no 

 1  R name="wlan2" mtu=1500 l2mtu=1600 mac-address=74:4D:28:0F:69:B2 
      arp=enabled interface-type=Atheros AR9888 mode=ap-bridge ssid="WiFi" 
      frequency=5180 band=5ghz-n/ac channel-width=20mhz secondary-channel="" 
      scan-list=default wireless-protocol=802.11 vlan-mode=no-tag vlan-id=1 
      wds-mode=disabled wds-default-bridge=none wds-ignore-ssid=no 
      bridge-mode=enabled default-authentication=yes default-forwarding=yes 
      default-ap-tx-limit=0 default-client-tx-limit=0 hide-ssid=no 
      security-profile=default compression=no 

WA.v8.4.2# ssh admin@192.168.88.2  'interface wireless set disabled=no ssid=WiFi wlan1'
admin@192.168.88.2's password: 
WA.v8.4.2# ssh admin@192.168.88.2  'interface wireless print'
admin@192.168.88.2's password: 
Flags: X - disabled, R - running 
 0    name="wlan1" mtu=1500 l2mtu=1600 mac-address=74:4D:28:0F:69:B3 
      arp=enabled interface-type=Atheros AR9300 mode=station ssid="WiFi" 
      frequency=2412 band=2ghz-b/g channel-width=20mhz secondary-channel="" 
      scan-list=default wireless-protocol=any vlan-mode=no-tag vlan-id=1 
      wds-mode=disabled wds-default-bridge=none wds-ignore-ssid=no 
      bridge-mode=enabled default-authentication=yes default-forwarding=yes 
      default-ap-tx-limit=0 default-client-tx-limit=0 hide-ssid=no 
      security-profile=default compression=no 

 1  R name="wlan2" mtu=1500 l2mtu=1600 mac-address=74:4D:28:0F:69:B2 
      arp=enabled interface-type=Atheros AR9888 mode=ap-bridge ssid="WiFi" 
      frequency=5180 band=5ghz-n/ac channel-width=20mhz secondary-channel="" 
      scan-list=default wireless-protocol=802.11 vlan-mode=no-tag vlan-id=1 
      wds-mode=disabled wds-default-bridge=none wds-ignore-ssid=no 
      bridge-mode=enabled default-authentication=yes default-forwarding=yes 
      default-ap-tx-limit=0 default-client-tx-limit=0 hide-ssid=no 
      security-profile=default compression=no 

WA.v8.4.2# ssh admin@192.168.88.2  'interface wireless registration-table print'
admin@192.168.88.2's password: 
 # INTERFACE           RADIO-NAME       MAC-ADDRESS       AP  SIGNAL... TX-RATE
 0 wlan2                                A7:32:54:EE:E4:35 no  -77dBm... 18Mbps 
 1 wlan2                                34:7A:F4:43:AD:81 no  -69dBm... 6Mbps  

WA.v8.4.2# exit

Ubuntu UniFi server running out of space on /run

Had an issue that /run was randomly running out of space which in turn would interfere with the unifi-video service causing it to run, but not record.

/run looks like a tmpfs or ramdisk that Ubuntu sets up.  So you can do a “temporary” fix by remounting the tmpfs with a larger size.  Example below.  If /run is a 2GB directory, you can remount changing the size from 2GB to 2.5GB.

sudo mount -t tmpsfs tmpfs /run -o remount,size=2500M

Note that it is a temporary fix and goes away after a reboot.

The issue ended up being that the WiFi UniFi controller was setup to auto backup everything once a week.  So as it was backing stuff up, it would eat up the available space in the tmpfs, think there may be an issue with the size of the UniFi data and maybe not being able to fit it all in RAM?

Running the following command

df -h --max=1 /var | sort

shows the following

1.1M /run/udev
2.5G /run/
2.5G /run/unifi   <-- UniFi controller
4.0K /run/initramfs
8.0K /run/network
12K /run/user
288K /run/samba
404K /run/systemd

Looking inside the unifi directory shows the following folders.  Looks like the they are temp files.

200M /run/unifi/ExpTmp351719567129045774
696M /run/unifi/ExpTmp3406220793759111216
1.6G /run/unifi/ExpTmp3368400690321364109
0 /run/unifi/work
2.5G /run/unifi

Running an ls inside the folder shows

-rw-r----- 1 unifi unifi 13971807 Jul 2 02:30 db.gz
-rw-r----- 1 unifi unifi 1665223462 Jul 2 02:56 db_stat.gz

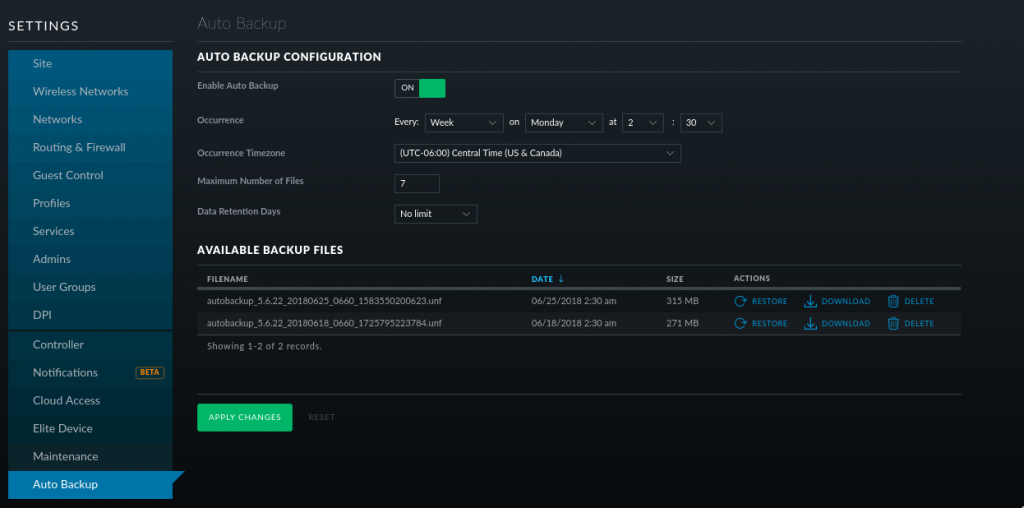
Looking inside the UniFi controller it is set to auto backup on Monday at 2:30AM

Looks like “/run/unifi” is used as a temporary folder to create the backups and when it is completed converts it to a .unf file and moves it to “/usr/lib/unifi/data/backup/autobackup/”  So the left over temp files were never completed or something caused them to stop working.  Maybe the backup was big enough to take up all the tmpfs space and cause the backup to fail.

Resolution.  To fix the problem I turned the data retention down to a week and deleted the temp files in /var/unifi.  Had to sudo su to root.  sudo wasn’t cutting it for some reason.

sudo su
rm -rf /var/unifi/Exp*
exit

Should be all good now.

How to install Broadcom WiFi drivers in Fedora 27

Install RPM Fusion

sudo dnf install https://download1.rpmfusion.org/free/fedora/rpmfusion-free-release-$(rpm -E %fedora).noarch.rpm https://download1.rpmfusion.org/nonfree/fedora/rpmfusion-nonfree-release-$(rpm -E %fedora).noarch.rpm

Install packages

sudo dnf install -y kernel-devel-$(uname -r)
sudo dnf install -y akmodssudo dnf install -y broadcom-wl

Give the computer a reboot and the Broadcom card should now work.