Simple method to Encrypt/Decrypt Zip files on Windows

Unfortunately, encrypting a file on Windows with a simple password is not super simple. While Windows does now support other compression formats (RAR, 7-Zip) it does not support encryption for them.

Currently, Windows natively supports the ZipCrypto algorithm. No AES. Note that the ZipCrypto algorithm is not considered secure, and shouldn’t be used for highly confidential data.

The following method, you will need 7-Zip to create the archive, but you won’t need it for decryption as Windows has built in support for ZipCrypto decryption.

To create the archive, you will need 7-Zip installed. Right click on your file/folder -> 7-Zip -> Add to Archive.

You should be presented with a similar window.

Change Archive format to zip
Enter the password
Ensure that the Encryption method is ZipCrypto
Hit OK to create the Archive.

You can now transfer the password protected archive to a new machine. You’ll be prompted for the password when you extract the archive.

Install and Setup OpenVAS on Kali Linux 2023/2024

Notes on installing OpenVAS on Kali Linux in 2023/2024

sudo apt install openvas

Run the setup script. This used to be called openvas-setup, now it is gvm-setup. Note that the script can take a long time to run.

gvm-setup

At the end of the script, it will give you a password. Use this password to log into the web interface. You can reset the password if needed.

If you run into issues with PostgreSQL, check out this post

Log into the web interface at

https://127.0.0.1:9392

Troubleshooting

On Kali Linux, you need to run commands as the _gvm user. You can do this by prepending the commands with

sudo runuser -u _gvm -- COMMAND

There are two — dashes, between the _gvm user and the COMMAND. Replace COMMAND with the GVM/OpenVAS command you want to execute.

Example, to list the current users do

sudo runuser -u _gvm -- gvmd --get-users

To create a new user run

sudo runuser -u _gvm -- gvmd --user=newadmin --new-password=longsecurepassword

Failed to find config ‘daba56c8-73ec-11df-a475-002264764cea’

If you receive a `Failed to find config ‘daba56c8-73ec-11df-a475-002264764cea'”` error,

try running the following command

sudo runuser -u _gvm -- greenbone-nvt-sync

This can take awhile, but it should sync all the files needed. Check the following link for more information.

https://forum.greenbone.net/t/cant-create-a-scan-config-failed-to-find-config/5509

The following link is also helpful for installing OpenVAS

https://stafwag.github.io/blog/blog/2021/02/28/howto-install-opevas-on-kali/

Table of Types of Law for Cyber Security

There are three types of law. Criminal, civil, and administrative.

Type of LawExamplesStandard of ProofBurden of ProofPenalty
Criminal LawMurder, assault, robbery, arsonBeyond a reasonable doubtInnocent until proven guiltyFines, Jail, Prison, Death penalty
Civil LawProperty Disputes, Personal injuryPreponderance of evidenceClaimant must give proof (most cases)Compensation for injuries/damage
Administrative LawDefine standards of performance and conduct for major industries, organizations and government agencies
Table of Law

https://www.diffen.com/difference/Civil_Law_vs_Criminal_Law

List of Laws and Acts

The following is a list of “good to know” legislative acts.

AcronymNameNotes
CFAAComputer Fraud and Abuse ActFirst major cyber crime legislation
Federal Sentencing Guidelines (1991)Responsibility on senior management
ECPAElectronic Communications Privacy Act of 1986Made it a crime to invade the electronic privacy of an individual
CALEAComm Assistance for Law Enforcement Act of 1994Amended ECPA. Made wiretaps possible for law enforcement with a court order.
Economic Espionage Act of 1996Made theft no longer tied to something physical
FISMAFederal Information Security Management ActCyber security requirements for government agencies
DMCADigital Millennium Copyright ActCopyright protection is 70 years +
1st major revision added CD/DVD protections
USA PATRIOTUSA PATRIOT Act of 2001Gave law enforcement and intelligence agencies broader wiretapping authorizations
Identity Theft and Assumption Deterrence Act (1998)Made identity theft a crime. Up to 15 years in prison and $250,000 fine.
HIPPAHealth Insurance Portability and Accountability Act (1996)Regulations for security measures for hospitals, physicians, and insurance companies
HITECHealth Information Technology for Economic and Clinical Health Act of 2009Amended HIPPA. Updated privacy/security requirements for Business Associates (BAs), requires a written contract known as a business associate agreement (BAA). BAs are directly subject to HIPPA and enforcement actions like a covered entity.
HITECH also introduced new data breach notifications.
GLBAGramm-Leach-Bliley ActLimits services that banks, lenders, and insurance agencies can provide and information they can share with each other
COPPAChild Online Privacy Protection ActSeeks to protects children (<13 years old) online
FERPAFamily Educational Rights and Privacy ActGives students certain privacy rights. Deals with adults >18, and Children in school <18
ITARInternational Traffic in Arms RegulationRegulates the export of military and defense related technologies
EARExport Administration RegulationsFor commercial use, but may have military applications.
Table of Laws and Acts

Trademark, Patents, Copyright etc.

NameProtection Length
Trademarks10 Years
Patents20 Years
Copyright 70 Years after the death of the author
Trade SecretsUntil they are leaked.
Table of Trademarks, Patents, Copyright, and Trade Secrets

Using Auditd to monitor changes to Linux

Install and enable auditd with

sudo dnf install auditd
sudo systemctl enable auditd
sudo systemctl start auditd

Add a file or directory to monitor with

auditctl -w /etc/passwd -k password

-w is watch path
-k is a filter key we can use later to search through logs

Now we can search with ausearch

ausearch -k password

Using Preconfigured Rules

There are already some preconfigured rules in /usr/share/audit/sample-rules/

We can copy those to /etc/auditd/rules.d/ and use them.

cd /usr/share/audit/sample-rules/
cp 10-base-config.rules 30-stig.rules 31-privileged.rules 99-finalize.rules /etc/audit/rules.d/
augenrules --load

Note on the 31-privileged.rules file. You’ll need to run the commands in the file which will create a new file. Then we can copy that to “/etc/auditd/rules.d/”

find /bin -type f -perm -04000 2>/dev/null | awk '{ printf "-a always,exit -F path=%s -F perm=x -F auid>=1000 -F auid!=unset -F key=privileged\n", $1 }' > priv.rules
#find /sbin -type f -perm -04000 2>/dev/null | awk '{ printf "-a always,exit -F path=%s -F perm=x -F auid>=1000 -F auid!=unset -F key=privileged\n", $1 }' >> priv.rules
#find /usr/bin -type f -perm -04000 2>/dev/null | awk '{ printf "-a always,exit -F path=%s -F perm=x -F auid>=1000 -F auid!=unset -F key=privileged\n", $1 }' >> priv.rules
#find /usr/sbin -type f -perm -04000 2>/dev/null | awk '{ printf "-a always,exit -F path=%s -F perm=x -F auid>=1000 -F auid!=unset -F key=privileged\n", $1 }' >> priv.rules
#filecap /bin 2>/dev/null | sed '1d' | awk '{ printf "-a always,exit -F path=%s -F perm=x -F auid>=1000 -F auid!=unset -F key=privileged\n", $2 }' >> priv.rules
#filecap /sbin 2>/dev/null | sed '1d' | awk '{ printf "-a always,exit -F path=%s -F perm=x -F auid>=1000 -F auid!=unset -F key=privileged\n", $2 }' >> priv.rules
#filecap /usr/bin 2>/dev/null | sed '1d' | awk '{ printf "-a always,exit -F path=%s -F perm=x -F auid>=1000 -F auid!=unset -F key=privileged\n", $2 }' >> priv.rules
#filecap /usr/sbin 2>/dev/null | sed '1d' | awk '{ printf "-a always,exit -F path=%s -F perm=x -F auid>=1000 -F auid!=unset -F key=privileged\n", $2 }' >> priv.rules

And Copy priv.rules to /etc/audit/rules.d/31-privileged.rules. Overwrite the file there if needed.

cp ./priv.rules /etc/audit/rules.d/31-privileged.rules

Load the rules.

augenrules --load

https://access.redhat.com/documentation/en-us/red_hat_enterprise_linux/8/html/security_hardening/auditing-the-system_security-hardening

How to Create WireGuard Point-to-point Between Mikrotik Routers

We’ll create a tunnel between two Mikrotik RouterOS routers. Once we have the tunnel connected, we can then route traffic between them.

Note: You can add Preshared keys, but we don’t cover that in this post, just to keep things simple. Check out the following post if you want to add Preshared keys.

How to Create a Preshared Key for Wireguard

Here is how we will want our routers set up. The WireGuard PtP IP is the IP addresses used on both ends of the tunnel. The WAN IP is the IP of each Router. Local IP on Host B is setup to distribute DHCP.

Host A

WAN IP: 172.16.0.1
WireGuard PtP IP: 10.1.1.1/30

Host B

WAN IP: 10.0.0.2
WireGuard PtP IP: 10.1.1.2/30
Local IP: 192.168.0.1/24

We need Host A to be able to access Private IP’s (192.168.0.0/24) behind Host B.

We’ll pretend that the 172.16.0.1 address is a public IP, and Host B, is behind some sort of NAT network.

To create the Point-to-point, or PtP, we will create a WireGuard VPN tunnel, and then add routes from Host A to Host B.

For each Mikrotik we need to create a WireGuard interface, and then a peer. One of the peers needs a keep alive if we are behind a NAT.

Wireguard Setup Overview

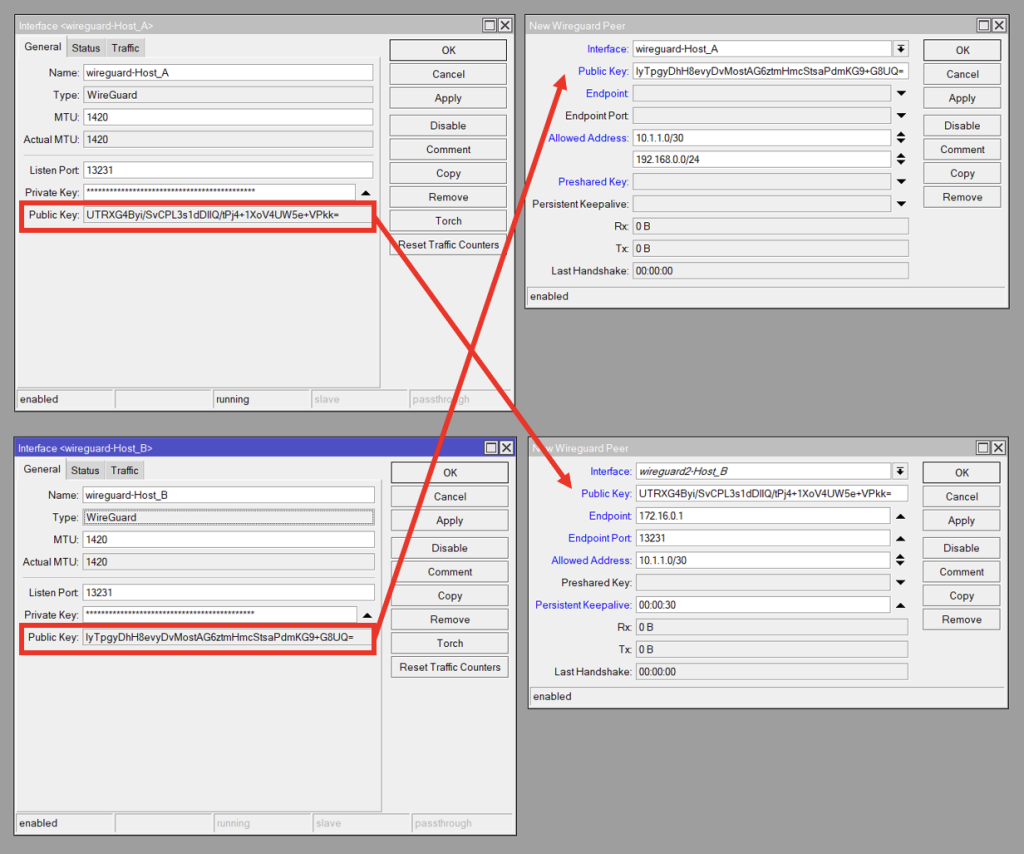
Here is an overview screenshot of what our WireGuard settings will look like. Host A is on top, and Host B on the bottom. On the left are the WireGuard interfaces, and the right contains the Peers.

We copy the Public Key from the remote WireGuard interface, to the Public Key on the local Peer. I.e. The Host_B Peer contains Host_A’s Interface Public Key and vice verse

Host A

If you want to, you can use the WinBox GUI to setup and configure the router.

Create the WireGuard interface

 /interface/wireguard/add name=wireguard-Host_A disabled=no

Add IP address 10.1.1.1/30 to the newly created WireGuard Interface in /IP/Address

/ip/address/add address=10.1.1.1/30 interface=wireguard-Host_A disabled=no

Create WireGuard Peer, WireGuard -> Peers

  • Select the WireGuard interface,
  • In the Allowed Addresses, put 10.1.1.0/30 and 192.168.0.0/24*.
  • Finally, put in the Public Key from Host B.
    Note that we can’t do this until we create the WireGuard Interface on Host B, so you’ll need to come back for this step.
interface/wireguard/peers/add interface=wireguard-Host_A public-key=HOST_B_WG_PUBLIC_KEY allowed-address=10.1.1.0/30,192.168.0.0/24

Add route for 192.168.0.0/24 to point to 10.1.1.2

/ip/route/add dst-address=192.168.0.0/24 gateway=10.1.1.2

*The Allowed Address sets which addresses work on the other side of the tunnel. If we don’t specify 192.168.0.0/24, then we won’t be able to route to those addresses. If we don’t add 10.1.1.0/30, then our tunnel won’t work at all. Since we only need to route to the 192.168.0.0/24 network from the Host A side, we don’t need this IP range on Host B.

Host B

Create the WireGuard interface, WireGuard -> Add

 /interface/wireguard/add name=wireguard-Host_B disabled=no

Add IP address 10.1.1.2/30 to the newly created WireGuard Interface in /IP/Address

/ip/address/add address=10.1.1.2/30 interface=wireguard-Host_B disabled=no

Create a WireGuard Peer, WireGuard -> Peers

  • Select the WireGuard interface,
  • In the Allowed Addresses, put 10.1.1.0/30
  • Finally, put in the Public Key from Host A.
/interface/wireguard/peers/add interface=wireguard-Host_A public-key=HOST_A_WG_PUBLIC_KEY endpoint-address=172.16.0.1 endpoint-port=13231 allowed-address=10.1.1.0/30 persistent-keepalive=00:00:30

Conclusion

That should be it. Verify that there is a connection. From Host A, ping 192.168.0.1 or any other remote device.

Troubleshooting

Unfortunately, there appear to be some wonky bugs with WireGuard on RouterOS. It does appear to be getting better, but here are a couple things to check if the tunnel is not connecting.

  1. Verify that the Firewall is not blocking WireGuard. You can allow the WireGuard port in the Firewall.
  2. Try disabling and re-enabling the Interfaces and/or Peers
  3. Verify that all the routes for the PtP are in /ip/routes. If not, try manually adding the route (10.1.1.0/30) on the WireGuard interface on both routers.
  4. Add a keep alive if a router is behind a firewall/NAT.
  5. Reboot and or Upgrade the RouterOS version and firmware.

MikroTik RouterOS Privilege Escalation Exploit CVE-2023-37099

Mikrotik Recently patched CVE-2023-37099 which was a way someone with an admin account, could escalate to a “super admin”, or jail break a router.

It appears the technique has been around for about a year.

Affected versions: < 6.49.7

The good news is that someone would already have to have an account to elevate permissions. If your routers have been using strong passwords or SSH public/private keys and have internet management disabled, then you are probably fine.

https://github.com/MarginResearch/FOISted

https://vulncheck.com/blog/mikrotik-foisted-revisited

Information on the mcuser on Ubiquiti Radios

Who is this mcuser on ubiquiti devices? Nothing shows up in the radio config file about it, but the user shows up in /etc/passwd

mcuser is used for AirControl2. If we look what is in the passwd file, we’ll notice that there is a ! at the beginning of the hash. Meaning that this password is disabled as the hash is not a proper hash. It’s only 10 characters long instead of the normal 13 for Unix DES hashes.

mcuser:!VvDE8C2EB1:0:0::/etc/persistent/mcuser:/bin/sh

https://community.ui.com/questions/Virus-atack-v2/be924ab6-5cb0-4f9b-a4f7-246025196cc0?page=10

There is a valid ssh key, so the mcuser can ssh to the device without a password and do what it needs to do. Doing an ls on a device shows the following.

Refer to the following article on removing AirControl Provisioning

How to Create a Preshared Key for Wireguard

You may have encountered a Mikrotik error when trying to create preshared key

Couldn't change wireguard peer<> - invalid preshared key (6)

This is because a Wireguard preshared key needs to be 256bit (32 byte) base64 encoded key. We have a couple different ways we can generate the correct format.

1. Use Openssl to generate a random 32 byte password

openssl rand 32 | base64

2. Create a 31 character password and base64 encode it

echo Thisisthepassword31characterslo | base64
VGhpc2lzdGhlcGFzc3dvcmQzMWNoYXJhY3RlcnNsbwo=

Now we can take this and add it to our config. The config option is

PresharedKey = VGhpc2lzdGhlcGFzc3dvcmQzMWNoYXJhY3RlcnNsbwo=

https://www.wireguard.com/papers/wireguard.pdf

https://forum.mikrotik.com/viewtopic.php?t=184469

Operation Triangulation – iOS Zero-click APT Exploit Info

Quick Summary: Operation Triangulation is an iOS zero-click exploit that will self destruct, looks to have been used since at least 2019, works on iOS 15.7, unsure if it works on iOS 16. Can collect location, mic recordings, photos, and manipulate iMessages. First point of entry is from an iMessage message, that compromises the device, after compromise, the message gets deleted.

https://securelist.com/operation-triangulation/109842/

https://www.kaspersky.com/about/press-releases/2023_kaspersky-reports-on-new-mobile-apt-campaign-targeting-ios-devices

https://arstechnica.com/information-technology/2023/06/clickless-ios-exploits-infect-kaspersky-iphones-with-never-before-seen-malware/

Links for checking for infection.

https://securelist.com/find-the-triangulation-utility/109867/

https://github.com/KasperskyLab/triangle_check

The following is a list of C&C domains from the securelist.com article. Did a quick DNS lookup for each domain and they currently have the following records & IP addresses. Note that these can change at any time and some of the IP addresses are/can be shared with other legitimate websites if it is on a shared hosting provider.

addatamarket.net - sandy.ns.cloudflare.com, doug.ns.cloudflare.com - No A records, or TXT
backuprabbit.com - nelci.ns.cloudflare.com, morgan.ns.cloudflare.com - No A records, or TXT
businessvideonews.com - ns2.dnsowl.com, ns3.dnsowl.com, ns1.dnsowl.com - 198.251.81.30, 209.141.38.71, 107.161.23.204
cloudsponcer.com - Cloudflare, kipp.ns.cloudflare.com, joyce.ns.cloudflare.com
datamarketplace.net - ns78.domaincontrol.com, ns77.domaincontrol.com, 34.98.99.30
mobilegamerstats.com - ns1.bitdomain.biz, No A records, TXT=v=spf1 redirect=_spf.mailhostbox.com
snoweeanalytics.com - cody.ns.cloudflare.com, arlee.ns.cloudflare.com - 104.21.76.6, 172.67.184.201
tagclick-cdn.com - ns4.bitdomain.biz, ns3.bitdomain.biz, ns2.bitdomain.biz, ns1.bitdomain.biz - No A records, TXT=v=spf1 redirect=_spf.mailhostbox.com"
topographyupdates.com - nero.ns.cloudflare.com, dalary.ns.cloudflare.com - 104.21.27.67, 172.67.141.199
unlimitedteacup.com - nelci.ns.cloudflare.com, javon.ns.cloudflare.com - 104.21.55.58, 172.67.145.72
virtuallaughing.com - elaine.ns.cloudflare.com, braden.ns.cloudflare.com - 104.21.60.240, 172.67.202.140
web-trackers.com - dns1.registrar-servers.com, dns2.registrar-servers.com - 15.164.228.250
growthtransport.com - ns3.dnsowl.com, ns2.dnsowl.com, ns1.dnsowl.com - 198.251.81.30, 107.161.23.204, 209.141.38.71
anstv.net - ns64.domaincontrol.com, ns63.domaincontrol.com. - 93.90.223.185
ans7tv.net - ns37.domaincontrol.com,ns37.domaincontrol.com - 93.90.223.185

List of domains

addatamarket.net
backuprabbit.com
businessvideonews.com
cloudsponcer.com
datamarketplace.net
mobilegamerstats.com
snoweeanalytics.com
tagclick-cdn.com
topographyupdates.com
unlimitedteacup.com
virtuallaughing.com
web-trackers.com
growthtransport.com
anstv.net
ans7tv.net

List of IPv4 addresses used

107.161.23.204
198.251.81.30
209.141.38.71
34.98.99.30
172.67.184.201
104.21.76.6
172.67.141.199
104.21.27.67
172.67.145.72
104.21.55.58
104.21.60.240
172.67.202.140
15.164.228.250
209.141.38.71
198.251.81.30
93.90.223.185

Bash command to get an updated IP address list. bad.txt contains all the above domain names.

for i in `cat bad.txt` ; do dig $i a +short >> badips.lst; done

Check DNS logs

If you have a DNS server, you can check to see if there has been any name resolution by using the following. Change named.log to your dns log

# list=""addatamarket.net"
"backuprabbit.com"
"businessvideonews.com"
"cloudsponcer.com"
"datamarketplace.net"
"mobilegamerstats.com"
"snoweeanalytics.com"
"tagclick-cdn.com"
"topographyupdates.com"
"unlimitedteacup.com"
"virtuallaughing.com"
"web-trackers.com"
"growthtransport.com"
"anstv.net"
"ans7tv.net""

# for domain in $list; do echo $domain && sudo grep -i $domain /var/log/named.log; done

Setup Mikrotik capture traffic

Mikrotik packet sniffer settings to capture traffic coming or going to the above IP addresses.

/tool sniffer
set file-limit=32000KiB file-name=Triangulation filter-ip-address="107.161.23.20\
    4/32,198.251.81.30/32,209.141.38.71/32,34.98.99.30/32,172.67.184.201/32,104.\
    21.76.6/32,172.67.141.199/32,104.21.27.67/32,172.67.145.72/32,104.21.55.58/3\
    2,104.21.60.240/32,172.67.202.140/32,15.164.228.250/32,209.141.38.71/32,198.\
    251.81.30/32,93.90.223.185/32" 

You can then start the sniffer by running Tools -> Packet Sniffer Settings -> Start

or run

/tool/sniffer/start

Resolution

Apple issued an update that fixes the kernel part of the vulnerability.

https://securelist.com/triangledb-triangulation-implant/110050/

Unable to launch Flatpaks on Fedora using Hardened Kernel

If you have installed the hardened Linux Kernel on Fedora, you may have encountered the following error when trying to launch Flatpak applications.

bwrap: No permissions to creating new namespace, likely because the kernel does not allow non-privileged user namespaces. On e.g. debian this can be enabled with 'sysctl kernel.unprivileged_userns_clone=1'.
error: Failed to sync with dbus proxy

https://security.stackexchange.com/questions/209529/what-does-enabling-kernel-unprivileged-userns-clone-do

https://github.com/containers/bubblewrap/issues/324

The issue looks to arise from the fact that the hardened Linux Kernel disables unprivileged name space and Fedora does not have setuid on by default on the bubblewrap executable.

Enabling setuid on bubblewrap

You can set the setuid permission on the bubblewrap executable with

sudo chmod u+s /usr/bin/bwrap

Allow Unprivileged Name Space (Alternative work around)

You could also allow unprivileged name space by running

sysctl kernel.unprivileged_userns_clone=1

Note that setting the setuid seems the safer/recommended option.

It looks like using the setuid binary for bubblewrap would be better to use then enabling unprivileged user space.

https://madaidans-insecurities.github.io/guides/linux-hardening.html#sysctl-kernel

Remove setuid on bubblewrap

If you would like to remove the setuid permission for any reason, you can with the following command.

sudo chmod u-s /usr/bin/bwrap