How to Undelete Files on XFS Filesystem

There are a couple different options for undeleting files for XFS filesystems.

TestDisk

TestDisk is a great command line recovery tool. Unfortunately, it can be slightly more difficult on systems using XFS compared to EXT4 systems. TestDisk does not support undeleting a file in place on XFS.

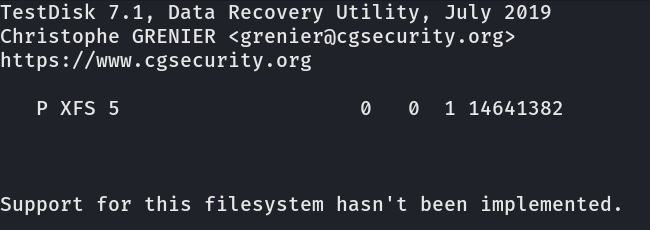
You can still recover files using TestDisk, you just need to recover the whole drive and dig through the recovery results to find the files you want.

xfs_undelete

There is also another utility that can be helpful. xfs_undelete

https://github.com/ianka/xfs_undelete

It allows for a little more flexibility in recovering files. For instance, you can specify to recover the files from the past hour to recover.

Download prerequisites

sudo dnf install tcllib
wget https://raw.githubusercontent.com/ianka/xfs_undelete/master/xfs_undelete
chmod u+x ./xfs_undelete

./xfs_undelete

Example of running xfs_undelete

./xfs_undelete -t -1hour ./dev/sda2

You will need a different filesystem to save the files to. Otherwise you will receive the following error.

Your output directory is  /home/bob/recovery/
That is within the filesystem  /  you want to recover files
from. This isn't feasible as it would overwrite the deleted files you wanted to
recover. Please specify the option -o /path/to/output_directory on another (rw
mounted) filesystem or run xfs_undelete from within a directory on that
filesystem so the recovered files could be written there. They cannot be
recovered in place.

It’s not the greatest idea to recover on the system while running. Ideally, shut the system down, plug the drive into another machine as read only, and copy the files off.

You could also boot up in single user mode or a live Linux iso/thumbdrive and mount another recovery drive. Should work for both physical and virtual environments.

Recover Password out of FileZillla Site Manager

Open up FileZilla, for to the Site Manager, right click on the entry you want, and export it. This will export all the settings for the site(s).

Once exported, open the XML file. Look for the Pass encoding field. Copy the base64 encoded password. Its the text highlighted in yellow. Yours should be longer.

FileZilla Base64 Encoded Password

Decode base64 encoded password. We can do this using the built in linux base64 utility. You can use also use python.

echo -n dWJudA== | base64 -d && echo ""

Result returns the password which is “ubnt”

UniFi UNVR – Recover from Failed USB Drive

Some of the UniFi UNVR’s have system files on a USB drive. There seem to be a number of the drives failing recently, rendering the UNVR inoperable. Fortunately it is easy to replace. The following steps should preserve the video recordings.

https://community.ui.com/questions/UNVR-stopped-responding-just-white-flashing-light/a051f869-8349-4a2a-a72a-ce3a8aa8c759

Steps to recover UNVR

  1. Power off the UNVR
  2. Remove the USB drive (use a heat gun or screw driver to break the glue that is holding the USB drive)
  3. Install new USB drive
  4. Temporarily remove UNVR HDDs (this may not be necessary, but rather be safe then sorry.)
  5. Boot UNVR with new USB drive. (Give it a little time to format and copy contents to the new USB drive. Should not take more then 30 minutes.)
  6. Setup the UNVR like it was before
  7. Power off the UNVR again
  8. Reinstall the HDD’s
  9. Power on the UNVR
  10. Log in and reconfigure the users

Note on Recovery

You could potentially mount the failed or failing USB drive on a Linux machine copy off a UniFi backup. Unfortunately, the UniFi Protect backup does not preserve the users. Just the video groups. You will probably have to resend invites to users.

Note on the video storage drives

It sounds like the UniFi Protect system will try to read the drives and if it can preserve the data or read the raid information it will try to use that. That is what it sounds like at least from the forums. More info on drive management.

https://help.ui.com/hc/en-us/articles/360037340954-UniFi-Hard-drive-compatibility-and-management#h_01F8QE56P7EY1P9FMTZHFZD463

Snapper reverting changes on Fedora

List snapper BTRFS snapshots with

snapper list

If you are in recovery mode on Fedora, add –no-dbus right after the snapper command. e.g.

snapper --no-dbus list

You can use the diff command to list the changes that happened between snapshots.

snapper --no-dbus diff 108..109

And to undo a change or all the changes between a snapshot, do the following. Where 108..109 are all the changes you want to remove. So essentially going back to snapshot 108.

snapper --no-dbus -v undochange 108..109

https://documentation.suse.com/sles/11-SP4/html/SLES-all/cha-snapper.html

Recovery, Your PC/Device needs to be repaired

File: \EFI\Microsoft\Boot\BCD
Error code: 0x000000f 
The Boot Configuration data for your PC is missing or contains errors.

The following notes may be of some help when trying to resolve the above error. Think the primary issue had to do with cloning a GPT drive to a RAID array that was using MBR. So think everything worked after converting it to GPT

All the commands are/were run from a recovery Command Prompt

Convert MBR disk to GPT

After running the following command the EFI directory was automatically created.
The command is supposed to be non destructive. Change the disk to whichever disk your trying to change to gpt.

gpt2efi /validate /disk:0

Other commands

If running the above command did not work then you may give the following command a try. Change the drive names where appropriate.

bcdboot c:\windows /s s: /f UEFI /v

You may be able to get away with just using

cdboot c:\windows

You can check if the above worked by seeing if it created any files in the directory, if new efi partition is S:, then from a command prompt run

S:
dir

Commands for recreating the EFI partition (WARNING! MAY DESTROY DATA!)

diskpart
list disk
select disk # Note: Select the disk where you deleted the EFI System partition.
list partition
create partition efi
format quick fs=fat32
list partition
list volume


Create an Image of Hard Drive with ddrescue on OS X

Install ddrescue

sudo port install ddrescue

If you don’t have ports installed, then I would recommend doing some web searching on how to install ddrescue.

Identify Disk:

identify the “name” of the disk you want to “image” .

diskutil list

Example:

Macbook:~ bob$ diskutil list
 /dev/disk0
 #:                       TYPE NAME                    SIZE       IDENTIFIER
 0:      GUID_partition_scheme                        *200.1 GB   disk0
 1:                        EFI EFI                     204.2 MB   disk0s1
 2:                  Apple_HFS Mac                     199.7 GB   disk0s2
 3:                 Apple_Boot Recovery HD             641.1 MB   disk0s3
 /dev/disk1
 #:                       TYPE NAME                    SIZE       IDENTIFIER
 0:     FDisk_partition_scheme                        *250.8 GB   disk1
 1:               Windows_NTFS Windows Hard Drive      250.8 GB   disk1s1
 Macbook:~ bob$

The first disk “disk0” is the OS X System disk, the second one “disk1” is an external drive, the one I want to image.

Recovery/Image command:

Change /dev/disk1s1 to your disk.  If you have multiple partitions and want to image the whole drive then just use the disk name like “/dev/disk1”  instead of  “/dev/disk1s1”.

sudo ddrescue -v /dev/disk1s1 ~/Desktop/ddrescue.dmg ddrescue.log

In the above command I am attempting to rescue data from the first partition on disk1 and send it to an image “ddrescue.dmg” on my desktop.

Now go get some coffee, lunch, etc. and it might be finished when you get back…