How to Fix OpenVAS “ERROR: The default PostgreSQL version (14) is not 16 that is required libgvmd”

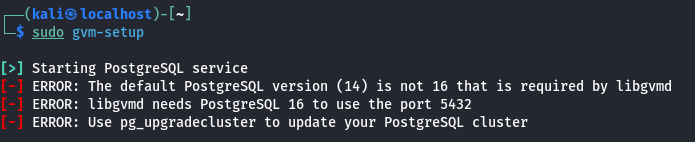
Currently OpenVAS needs PostgreSQL 16 on port 5432. If you have multiple versions of PostgreSQL, the lowest version will typically run on port 5432, and then they’ll increment from there. For example, if you have PostgreSQL 14, 15, and 16, 14 will run on port 5432, 15 on 5433, and 16 on 5434.

The quick fix is to edit the PostgreSQL config files, change the port numbers, restart PostgreSQL, and rerun gvm-setup.

vi /etc/postgresql/16/main/postgresql.conf

Change port number from 5434 to 5432

You will need to remove/disable/change the port for PostgreSQL 14

sudo apt remove postgresql-14
sudo systemctl restart postgresql@16-main.service

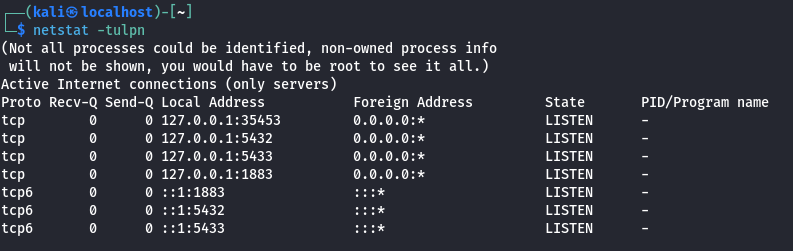
We can verify that PostgreSQL is running with netstat.

netstat -tulpn

We can see that the ports 5432 (PostgreSQL 16) and 5433 (PostgreSQL 15) are both running.

Rerun gvm-setup

sudo gvm-setup

Install and Setup OpenVAS on Kali Linux 2023/2024

Notes on installing OpenVAS on Kali Linux in 2023/2024

sudo apt install openvas

Run the setup script. This used to be called openvas-setup, now it is gvm-setup. Note that the script can take a long time to run.

gvm-setup

At the end of the script, it will give you a password. Use this password to log into the web interface. You can reset the password if needed.

If you run into issues with PostgreSQL, check out this post

Log into the web interface at

https://127.0.0.1:9392

Troubleshooting

On Kali Linux, you need to run commands as the _gvm user. You can do this by prepending the commands with

sudo runuser -u _gvm -- COMMAND

There are two — dashes, between the _gvm user and the COMMAND. Replace COMMAND with the GVM/OpenVAS command you want to execute.

Example, to list the current users do

sudo runuser -u _gvm -- gvmd --get-users

To create a new user run

sudo runuser -u _gvm -- gvmd --user=newadmin --new-password=longsecurepassword

Failed to find config ‘daba56c8-73ec-11df-a475-002264764cea’

If you receive a `Failed to find config ‘daba56c8-73ec-11df-a475-002264764cea'”` error,

try running the following command

sudo runuser -u _gvm -- greenbone-nvt-sync

This can take awhile, but it should sync all the files needed. Check the following link for more information.

https://forum.greenbone.net/t/cant-create-a-scan-config-failed-to-find-config/5509

The following link is also helpful for installing OpenVAS

https://stafwag.github.io/blog/blog/2021/02/28/howto-install-opevas-on-kali/

Mongo “illegal hardware instruction mongo” on Linux

While trying to install and run mongo on Kali Linux, I encountered the following error.

zsh: illegal hardware instruction mongo

Using a Bash shell it returns the following instead.

Illegal instruction

It appears that the issue is from running mongo in a virtual machine.

https://www.mongodb.com/community/forums/t/mongodb-community-5-0-12-illegal-instruction-core-dumped-ubuntu-20-04-5-lts/204332

https://askubuntu.com/questions/699077/how-to-enable-avx2-extensions-on-a-ubuntu-guest-in-virtualbox-5

Resolution? Run on bare metal or find a way to enable avx2 in the virtual machine.

Unsupported DEB-based OS: /etc/os-release ID ‘kali’

Unsupported DEB-based OS: /etc/os-release ID ‘kali’. You can get the above error if you try to install AMD drivers on Kali Linux. Looks like by default they are looking for a system that is Ubuntu, LinuxMint or Debian.

You can resolve the issue by opening up the “amdgpu-pro-install” file and adding more OS’s that it can check for.

vi ./amdgpu-pro-install

Scroll down to line 147 where is says

ubuntu|linuxmint|debian) 

and change it to

ubuntu|linuxmint|debian|kali)

The code function should look like the following.

142 function os_release() {
143         if [[ -r  /etc/os-release ]]; then
144                 . /etc/os-release
145
146                 case "$ID" in
147                 ubuntu|linuxmint|debian|kali)
148                         :
149                         ;;
150                 *)
151                         echo "Unsupported DEB-based OS: `
152                                 `/etc/os-release ID '$ID'" | stderr
153                         exit 1
154                         ;;
155                 esac
156         else
157                 echo "Unsupported OS" | stderr
158                 exit 1
159         fi
160 }

Save a close the file and install the AMD drivers

./amdgpu-pro-install -y --opencl=legacy,rocm --headless

Looking at trying to install AMD drivers for mining? Check out the following link
Install RX 580 Mining Drivers on Debian Based Distributions

More info on Stack Exchange
https://elementaryos.stackexchange.com/questions/24282/cant-install-amd-drivers-on-elementaryos-hera-unsupported-deb-based-os

Kali Linux Hash Sum Mismatch while doing apt update

https://askubuntu.com/questions/1235914/hash-sum-mismatch-error-due-to-identical-sha1-and-md5-but-different-sha256

Looks like the problem is caused by the Windows Hypervisor Platform. Work around is to disable it.

In the Start menu search for “turn Windows features on or off”

Once open, disable “Virtual Machine Platform” and “Windows Hypervisor Platform”

Disable Virtual Machine Platform

You will need to reboot after it finishes.

Install VirtualBox Guest Addition for Kali Linux

Boot up the virtual machince

Insert the “Guest Additions CD Image…” from the Devices menu

In the VM, open up Files/Nautilus or Dolphin and find the CD. Open a terminal in the same directory and execute the auto run script

sudo sh autorun.sh

It should pop up another window to install the guest additions. After it is installed, you’ll need to reboot the VM for the new changes to take effect.

Install dig on Ubuntu, Debian or Kali Linux

install dig
Help options for dig


Dig is a DNS lookup utility.  It is included in most Linux distributions by default, but if it isn’t you can easily install dig with the following command.

The dig utility is apart of the dnsutils package

sudo apt-get install dnsutils -y

After it is installed, we can verify that it is working with

dig -v

For more information on how to use dig, refer to the following link.

https://www.howtogeek.com/663056/how-to-use-the-dig-command-on-linux/

The following is copied and pasted from the dig man page.

NAME
       dig - DNS lookup utility

SYNOPSIS
       dig [@server] [-b address] [-c class] [-f filename] [-k filename] [-m] [-p port#] [-q name]
           [-t type] [-v] [-x addr] [-y [hmac:]name:key] [[-4] | [-6]] [name] [type] [class]
           [queryopt...]

       dig [-h]

       dig [global-queryopt...] [query...]

DESCRIPTION
       dig is a flexible tool for interrogating DNS name servers. It performs DNS lookups and
       displays the answers that are returned from the name server(s) that were queried. Most DNS
       administrators use dig to troubleshoot DNS problems because of its flexibility, ease of use
       and clarity of output. Other lookup tools tend to have less functionality than dig.

       Although dig is normally used with command-line arguments, it also has a batch mode of
       operation for reading lookup requests from a file. A brief summary of its command-line
       arguments and options is printed when the -h option is given. Unlike earlier versions, the
       BIND 9 implementation of dig allows multiple lookups to be issued from the command line.

       Unless it is told to query a specific name server, dig will try each of the servers listed
       in /etc/resolv.conf. If no usable server addresses are found, dig will send the query to the
       local host.

       When no command line arguments or options are given, dig will perform an NS query for "."
       (the root).

       It is possible to set per-user defaults for dig via ${HOME}/.digrc. This file is read and
       any options in it are applied before the command line arguments. The -r option disables this
       feature, for scripts that need predictable behaviour.

       The IN and CH class names overlap with the IN and CH top level domain names. Either use the
       -t and -c options to specify the type and class, use the -q the specify the domain name, or
       use "IN." and "CH." when looking up these top level domains.

SIMPLE USAGE
       A typical invocation of dig looks like:

            dig @server name type

       where:

       server
           is the name or IP address of the name server to query. This can be an IPv4 address in
           dotted-decimal notation or an IPv6 address in colon-delimited notation. When the
           supplied server argument is a hostname, dig resolves that name before querying that name
           server.

           If no server argument is provided, dig consults /etc/resolv.conf; if an address is found
           there, it queries the name server at that address. If either of the -4 or -6 options are
           in use, then only addresses for the corresponding transport will be tried. If no usable
           addresses are found, dig will send the query to the local host. The reply from the name
           server that responds is displayed.

       name
           is the name of the resource record that is to be looked up.

       type
           indicates what type of query is required — ANY, A, MX, SIG, etc.  type can be any valid
           query type. If no type argument is supplied, dig will perform a lookup for an A record.


Set Bash as users default shell

You can change the default shell for a Linux user with the following command.  Change “/bin/bash” to whatever shell you want and replace USERNAME with the Linux user.

chsh /bin/bash USERNAME

Enter in the users password and then log out and back in and the users shell will be whatever shell you specified.  In this case bash.

You can also do this by manually editing the /etc/passwd file.  Find the user by their username, and then replace the last part of the line with the new shell path.

Some Linux distributions (like Kali Linux) use /bin/sh as the default shell for new users.  Changing it to bash makes the shell a little more usable.

Kali Linux Mirrors

I had issues after installing Kali Linux with apt not working, ended up there were no repositories in the apt sources list, added the following line and did an apt-get update and everything started working.

Add this line to /etc/apt/sources.list

deb http://http.kali.org/kali kali-rolling main non-free contrib

Update

apt-get update

And dist upgrade

apt-get dist-upgrade

You may need to reboot.

reboot

How to Install NVIDIA Proprietary drivers on Kali Linux

Looks like the official docs have been updated. https://www.kali.org/docs/general-use/install-nvidia-drivers-on-kali-linux/

sudo apt update
sudo apt -y full-upgrade -y
sudo reboot

After the reboot, install the drivers with

sudo apt install -y nvidia-driver nvidia-cuda-toolkit
sudo reboot

Old Instructions

Leaving these here in case someone finds them helpful.

Run the following commands to update, and install the needed NVIDIA driver

apt-get update
apt-get dist-upgrade
apt-get install linux-headers-$(uname -r)
apt-get install nvidia-kernel-dkms nvidia-xconfig

Disable the nouveau driver, and reboot.

sed 's/quiet/quiet nouveau.modeset=0/g' -i /etc/default/grub
update-grub
nvidia-xconfig 
reboot

You also might want to install these.

 apt-get install nvidia-settings nvidia-smi nvidia-cuda-toolkit